Chapter 16 Chapter 16: Troubleshooting


92 Slides984.50 KB
Chapter 16 Chapter 16: Troubleshooting
Learning Objectives Chapter 16 Develop your own problem-solving strategy Use the Event Viewer to locate and diagnose problems Troubleshoot configuration, security, connectivity, and network printing problems
Learning Objectives (continued) Chapter 16 Troubleshoot boot problems, using a variety of tools including the emergency repair disk, safe mode, and the recovery console Back up and restore system state data
Problem Solving Strategy Chapter 16 Develop a problem solving strategy to help you troubleshoot more effectively such as: Understanding how the server and network interact Training users to help you solve problems Learning the essential business processes of your organization
Using Network Diagrams Chapter 16 Create network diagrams to help determine the location of specific problems
Training Users Chapter 16 Train users to work as allies in solving network and server problems by: Learning to save their work when a problem occurs Precisely recording error messages Quickly reporting error situations and the conditions under which they occurred
Learning Business Processes Chapter 16 Learn the essential business processes of your organization and use this knowledge to help you locate and solve problems more rapidly
Solving Problems Step by Step Chapter 16 Develop a thorough step-by-step approach to solving problems: Get as much information as possible before you start Obtain the precise wording of error messages Start with simple solutions Determine how many people are affected
Solving Problems Step by Step (continued) Check for alerts sent to your account Check the event logs Use System Monitor filtering Check for local power problems Chapter 16
Tracking Problems and Solutions Chapter 16 Keep a database or log of problems and how they were solved, so that later you don’t have to guess how the same or a similar problem was solved in the past
Using Run As Chapter 16 Sometimes you have to work on problems when someone else is logged on or from another person’s computer. Try using the Run as option so you do not have to log off that account to have Administrator privileges.
Using the Windows 2000 Server Logs for Troubleshooting Chapter 16 Windows 2000 Server records valuable notification information in event logs: System log: An event log that records information about system-related events such as hardware errors, driver problems, and hard drive errors Security log: An event log that records access and security information about logon accesses, file, folder, and system policy changes
Using the Windows Windows 2000 2000 Server Logs Logs for Troubleshooting Troubleshooting (continued) Chapter 16 Application log: An event log that records information about how software applications are performing Directory Service log: An event log that records events that are associated with the Active Directory, such as updates to the Active Directory, events related to the Active Directory’s database, replication events, and startup and shutdown events
Using the Windows Windows 2000 2000 Server Logs Logs for Troubleshooting Troubleshooting (continued) Chapter 16 DNS Server log: An event log that provides information about events associated with the DNS Server, such as instances in which DNS information is updated, when there are problems with the DNS service, and when the DNS Server has started successfully after booting File Replication Service log: An event log that contains information about file replication events such as changes to file replication, when the service has started, and completed replication tasks
Sample Information in the System Log Type of event Date and time of the event Source of the event Category of the event Event number User account involved Computer involved Chapter 16
Viewing an Event Log Chapter 16 Figure 16-1 Event Viewer
Viewing a Specific Event Chapter 16 Figure 16-2 Viewing a system log event
Troubleshooting Tip Chapter 16 If a server suddenly crashes or is not functioning normally, make the system log your first stop to look for a problem
Event Log Filtering Chapter 16 You can look for specific events in a log by setting up a filter on criteria such as: Event type, including warning, error, information, success audit, failure audit Event source Event category Event ID User account Computer Date range Time range
Setting Up an Event Log Filter Chapter 16 Figure 16-3 Creating a system log filter
Event Log Configuration Chapter 16 There are several options for maintaining event logs: To size each log to prevent it from filling to fast To regularly clear each log before it is full To automatically override the oldest events when a log is full
Event Log Configuration (continued) Figure 16-4 Configuring event log settings Chapter 16
Troubleshooting Server Configuration Problems Chapter 16 Steps you can take to troubleshooting server configuration problems include: Check the event logs Check the Control Panel Add/Remove Programs tool for components that need further configuration Use the Configure Your Server tool in the Administrative Tools menu
Troubleshooting Server Configuration Problems (continued) Chapter 16 Figure 16-5 Checking to make sure a Windows component is
Troubleshooting Server Configuration Problems (continued) Chapter 16 Use the Control Panel tools to solve configuration problems Use the Network and Dial-up Connections tool to solve connectivity problems Use tools such as Device Manager that are available in the Computer Management tool
Troubleshooting Server Configuration Problems (continued) Chapter 16 Figure 16-6 Using Device Manager to find a configuration conflict
Troubleshooting Connectivity Problems Chapter 16 To troubleshoot connectivity problems: Determine how many stations are experiencing the problem Check the server’s NIC connection Verify the protocol setup Make sure the NIC is properly configured and has the most recent driver Make sure clients are set up for the correct domain or workgroup
Troubleshooting Connectivity Problems (continued) Chapter 16 Check cable connections and connectors Examine network cable for damage
Troubleshooting Connectivity Problems (continued) Figure 16-7 Troubleshooting the NIC media type Chapter 16
Troubleshooting Connectivity Problems Connectivity Problem Solutions The NIC will not connect to the 1. Check the system log for reported problems. network (no computers are visible in 2. Check the cable and cable connection to the NIC for damage or for a loose My Network Places). Chapter 16 connection. Do the same for the connection into the wall or hub/switch. Also, check to make sure intermediate network equipment (such as hubs, switches, and routers) is working. 3. Check that the media type (cable type) set for the NIC is the same as is used on the network. 4. Check to make sure the NIC driver is installed, the most current, and bindings are set. 5. Check to make sure the correct protocol is installed and that all protocol parameters are correct, including packet type for NWLink. 6. Run the NIC manufacturer's NIC diagnostics program to locate problems. 7. Replace the NIC with one you know is working.
Troubleshooting Connectivity Problems (continued) Chapter 16 Connectivity Problem Solutions Windows 2000 Server periodically 1. Check the cable segment to make sure it is within disconnects from the network or it IEEE specs for distance and cable type. Also, check experiences a connectivity problem when a for electrical interference on the cable segment, particular computer is logged on. check the cable and connector for damage, check for a problem with that port on the network hub/switch, and check for a problem with the workstation NIC. 2. Make sure no other station on the network has the same computer name. 3. If using TCP/IP, make sure no other station is using the same IP address.
Troubleshooting Connectivity Problems (continued) Chapter 16 Connectivity Problem Solutions Windows 2000 Server has difficulty Try resetting the MaxPktSize for IPX communications. To maintaining a reliable connection as a do this, edit the Registry path: client or when acting as a gateway to a \HKEY LOCAL MACHINE\System\CurrentControlSet\Se NetWare server via NWLink. rvices\NwlnkIpx\Parameters\Adapters\ (adapter device address) and change the MaxPktSize value from 0 to a decimal 1000 (in either regedit or regedt32, double-click the parameter and enter 1000 in decimal). Computers on a Microsoft network may Windows 3.11 clients may contend with a Windows 2000 experience Network Neighborhood and or NT Server or Workstation to act as the Master Browser. My Network Places display problems when On every Windows 3.11 client, edit the System.ini file to Windows 3.11 clients are logged on. have the line: MaintainServerList no.
Troubleshooting Connectivity Problems (continued) Chapter 16 Connectivity Problem Solutions Clients cannot run logon scripts when Check to make sure the location of logon scripts matches the connecting to a Windows 2000 server. location specified via the Local Users and Groups or Active Directory Users and Computers tool for each account. Clients cannot access a shared directory or Check the rights, group memberships, share permissions, and printer regular permissions associated with the shared resource. Clients cannot log onto the Windows 2000 Make sure the Windows 2000 computer is powered on, properly Server. connected to the network, and that the Server, Workstation, and Computer Browser services are started (use the Services tool in the Administrative Tools menu).
Troubleshooting Connectivity Problems (continued) Connectivity Problem Solutions Windows 2000 is not responding as an 1. Make sure that the SNMP Service is SNMP agent. Chapter 16 installed and is set to automatically start when the computer is booted. 2. Make sure that the SNMP and SNMP Trap Services are started (use the Services tool in the Administrative Tools menu). 3. Make sure that the community names are set correctly.
Troubleshooting Connectivity Problems (continued) Chapter 16 Connectivity Problem Solutions Windows 2000 generates excessive Windows 2000 Server can be set up as an IPX router on a network that also has Routing Information Protocol (RIP) Novell NetWare servers. Normally, it is better to allow the NetWare servers and packets via NWLink, causing excessive network routers handle IPX routing and to leave this function turned off in network traffic. Windows 2000. To turn it off, click Start, point to Programs, point to Administrative Tools, click Routing and Remote Access, double-click IPX Routing under the tree, click RIP for IPX, double-click Local Area Connection (in the right pane), and remove the check from Enable RIP on this interface. (If SAP is not used by the NetWare servers, also disable SAP by double-clicking SAP for IPX in the tree, double-clicking Local Area Connection, and removing the check from Enable SAP on this interface.)
Troubleshooting Connectivity Problems (continued) Connectivity Problem TCP/IP packets sent from Windows 2000 are not routed. Solutions Enable the IP routing manager by clicking Start, pointing to Programs, pointing to Administrative Tools, clicking Routing and Remote Access, double-clicking IPRouting under the tree, clicking General, doubleclicking Local Area Connection (in the right pane), and making sure that Enable IP router manager is checkmarked. Chapter 16
Troubleshooting TCP/IP Connectivity Chapter 16 Windows 2000 Server includes command line tools that can be used to troubleshoot TCP/IP connectivity problems (many of these tools are also available in Windows 2000, Windows NT, Windows 98, and Windows 95 clients)
Ipconfig Chapter 16 Ipconfig is an example of a TCP/IP troubleshooting tool used to confirm information such as the IP address, subnet mask, and default gateway of the Windows 2000 Server
Ipconfig (continued) Chapter 16 Figure 16-8 Using ipconfig
Ping Chapter 16 Figure 16-9 Using ping
Windows 2000, NT, 98, and 95 Diagnostic Commands for TCP/IP Connectivity Chapter 16 Diagnostic Command Function winipcfg (Windows 98/95) Displays information about the TCP/IP setup at that computer (enter ipconfig (Windows 2000/NT) ipconfig /? or winipcfg /? to view all of the options for these commands) ping Polls another TCP/IP node to verify you can communicate with it (enter only ping to view all of the options for this command) netstat (-a, -e, -s) Displays information about the TCP/IP session from that computer (enter netstat /? to view all of the options for this command) nbtstat (-n) Shows the server and domain names registered to the network (enter only nbtstat to view all of the options for this command) tracert (server or host name) Shows the number of hops and other routing information on the path to the specified server or host (enter only tracert to view all of the options for this command)
Cable Problems Chapter 16 When network communication problems occur, check for cable problems as one source
Troubleshooting Cable Problems Chapter 16 Cable Problem Solutions A cable segment that is too long If a network segment is extended beyond the IEEE specifications, there will be communication problems affecting all nodes on that segment. Use a cable scanner, which is a device that tests network cable, to measure the distance of the cable. Mismatched or improper cabling Check the labeling on the cable jacket to make sure it is right for your network. Table 16-3 Troubleshooting Cable Problems
Troubleshooting Cable Problems (continued) Chapter 16 Cable Problem Solutions Defective or missing terminator on coaxial A segment with a defective or missing terminator responds like one cable that is too long and usually does not work. Workstations on the segment may disconnect, experience slow network response, or receive network error messages. If your cable scanner shows that the segment distance is invalid, check the terminators. Improper grounding Proper grounding is critical to packet transmission on the cable. Without it, the network packet transmissions will have many CRC errors. Ethernet frames include this check to ensure the reliability of data transfer from the source node to the recipient node. The Network Monitor reports CRC errors in the Total pane.
Troubleshooting Cable Problems (continued) Chapter 16 Cable Problem Solutions Open or short circuits Use a cable scanner or to find opens and shorts. Also, check the Network Monitor’s Total pane error statistics for CRC errors and dropped frames. Electrical and magnetic interference Electrical and magnetic interference result in excessive noise or jabber on the cable. This happens when the cable is run too close to an electrical field, such as over fluorescent lights in the ceiling or through a machine shop with heavy electrical equipment. Check the cable for these possibilities.
Troubleshooting Cable Problems (continued) Chapter 16 Cable Problem Solutions Defective connector A faulty connector can cause a short or open on the cable. If several workstations on a segment are experiencing problems, or a segment is automatically shut down by network equipment, this may be due to a cable connector on a workstation or server. Use a cable scanner to identify shorts and opens due to a faulty connector. Also, the Network Monitor can help through identifying a high rate of CRC errors and dropped frames.
Troubleshooting Cable Problems (continued) Chapter 16 Cable Problem Solutions Improper coax connectivity at the wall A T-connector should not be placed directly on a wall outlet because the outlet topology for a coax segment must be a bus or "in series." Improper distance between connections Two adjacent stations may have network communication problems, if the distance between their connectors is too short. The same is true if the distance is too short between a node and a hub. For example, on a thinnet coaxial Ethernet segment the minimum distance between nodes is 0.5 meters. For twisted-pair cable the minimum distance between two nodes, between a node and a hub, or between the wall outlet and a node is 3 meters. Check to be certain that all workstations are separated according to IEEE specifications.
Troubleshooting Network Printing Problems Try the simplest solutions first when troubleshooting network printing difficulties, such as checking printer connectivity Chapter 16
Troubleshooting Network Printing Problems Chapter 16 Network Printing Problem Solutions Only one character prints per page. 1. If only one workstation experiences this problem, reinstall the printer driver on that workstation using the Add Printer Wizard. 2. If all workstations are experiencing the problem, reinstall the printer and printer driver at the computer or print server offering the printer share (using the Add Printer Wizard). 3. Check the print monitor and data type setup. Some users get a no-access message when trying to access the printer share. Check the share permissions. Make certain the clients belong to a group for which at least Print permission has been granted and that none of the groups to which these users belong are denied Print permissions. Table 16-4 Troubleshooting Network Printing Problems
Troubleshooting Network Printing Problems (continued) Chapter 16 Network Printing Problem Solutions Printer control codes are on the 1. If only one workstation experiences the problem, reinstall the printout. printer driver on that workstation using the Add Printer Wizard. Also, make sure the software generating the printout is installed correctly. 2. If all workstations are experiencing the problem, reinstall the printer and printer driver at the computer or print server offering the printer share (using the Add Printer Wizard). 3. Make sure the share is set up for all operating systems that access it, that the right print monitor is installed, and that the right data type is used.
Troubleshooting Network Printing Problems (continued) Network Printing Problem Solutions A print server card is used on the printer Power off the printer. Disconnect the network and shows an amber or red data error light. cable to the printer. Reconnect the network cable Chapter 16 and turn on the printer. A print job shows it is printing, the printer looks fine, but nothing is printing. 1. Open the Printers folder and click the icon for the printer. Check for a problem with the print job at the top of the queue. If it shows the job is printing but nothing is happening, delete the print job because it may be hung (and resubmit the print job). 2. Also, try stopping and restarting the Print Spooler service (warn users first).
Troubleshooting Network Printing Problems (continued) Chapter 16 Network Printing Problem Solutions The wrong print form is used. Check the setup of the document in the software at the client. A workstation cannot view the printer 1. Check the network connection to that workstation, share in Network Neighborhood or in My including connectors, cable, network hub, and the Network Places. workstation's NIC. 2. Also, check the protocol setup at the workstation. Make sure that the workstation is a member of the domain, if the Active Directory is implemented.
Troubleshooting Network Printing Problems (continued) Network Printing Problem Chapter 16 Solutions Some clients find that the ending pages are Check the disk space on the server or workstation in not printed for large print jobs. which the job is spooled. It may not have enough space to fully spool all jobs. On some long print jobs, pages from other Set the printer properties for the printer so it starts print jobs are found in the printout. printing only after all pages are spooled. To do that open the Control Panel, open the Printers folder, rightclick the icon for the printer, click Properties on the shortcut menu, click the Advanced tab, click the radio button for Spool print documents so program finishes printing faster, click the radio button for Start printing after last page is spooled, and click OK.
Troubleshooting Network Printing Problems (continued) Chapter 16 Network Printing Problem Solutions Extra separator pages are printed or print Check the print processor in use. To do that, Open the Control jobs seem to get stuck in the printer for all Panel, open the Printers folder, right-click the icon for that users. printer, click Properties, click the Advanced tab, click the Print Processor button, check the print processor in use. Also check the data type. If the problem continues, try a different data type. Some clients occasionally send a document Have the spooler automatically hold printer jobs that contain that prints garbage on hundreds of pages the wrong printer setup information. To do that, open the before anyone notices and can stop the Printers folder, right-click the icon for that printer, click printing. Properties, click the Advanced tab, click the check box to Hold mismatched documents, click OK on the Properties dialog box.
Changing a Password Chapter 16 To change an account password when a user has forgotten his or hers: Open the Active Directory Users and Computers tool Open the container in which the account resides Right-click the account and click Reset Password Enter the new password, confirm it, and click User must change password at next logon
Using Auditing for Troubleshooting Chapter 16 To help resolve why an account cannot access certain resources, audit those resources and check the security log Also, use resource auditing to track intruders
Using the System Security and Analysis Tool Chapter 16 The System Security and Analysis tool can be used to set up default security and to later analyze existing security for problems
Using the System Security and Analysis Tool (continued) Chapter 16 Figure 16-10 Checking system security
Using the System Security and Analysis Tool (continued) Chapter 16 Figure 16-11 Security analysis results
Resolving Boot Problems Chapter 16 Boot problems can be caused by: Disk failure Corrupted partition table Corrupted boot file Corrupted master boot record Disk read error
Troubleshooting Tip Chapter 16 When you first experience a boot problem, try rebooting to see if it is a transient error
Safe Mode Chapter 16 Safe mode: A boot mode that enables Windows 2000 Server to be booted using the most generic default settings, such as for the display
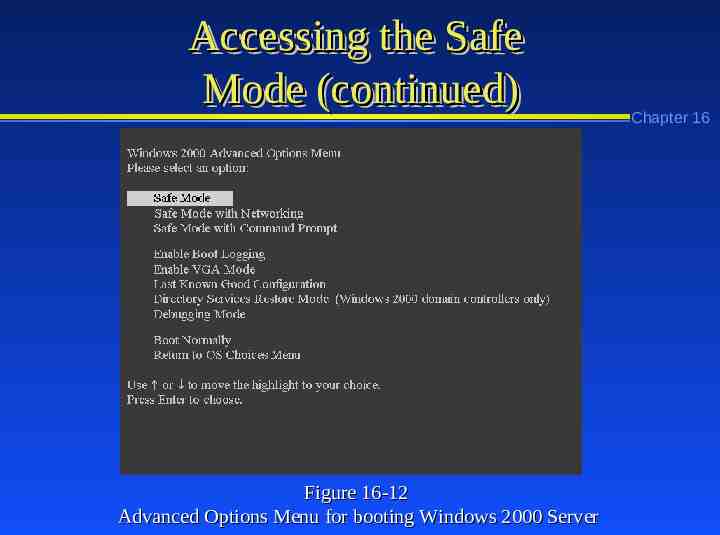
Accessing the Safe Mode Chapter 16 To access the safe mode: Reboot the computer Press F8 Select the desired safe mode option in the Advanced Options Menu Highlight Windows 2000 Server as the operating system and press Enter
Accessing the Safe Mode (continued) Figure 16-12 Advanced Options Menu for booting Windows 2000 Server Chapter 16
Advanced Menu Options Chapter 16 Booting Option Description Safe Mode System boots using the minimum configuration of devices and drivers and does not have network connectivity Safe Mode with Networking System boots using the minimum configuration of devices and drivers and does have network connectivity Safe Mode with Command System boots into the command mode using the Prompt minimum configuration of devices and drivers and does not have network connectivity Table 16-5 Advanced Menu Options
Advanced Menu Options (continued) Booting Option Description Enable Boot Logging Used to create a record of devices and drivers that Chapter 16 started, so you can check a log for points of failure – look for the log in the \Winnt folder with the name ntbtlog.txt Enable VGA Mode System boots using a generic VGA setting Last Known Good System boots using the last configuration before any Configuration changes were made and implemented in the Registry Directory Services Restore Recreates the Active Directory service and the SYSVOL Mode shared folder
Advanced Menu Options (continued) Booting Option Description Debugging Mode Boots the system while transmitting debug data to be Chapter 16 viewed at another computer over a serial connection, which can be used by Microsoft technicians to troubleshoot problems Boot Normally Boots the system without any special options Return to OS Choices Menu Returns to the regular operating system menu from which to select to boot from Windows 2000 (or another operating system on a dual boot system)
Using the Emergency Repair Disk Chapter 16 Use the emergency repair disk if you cannot boot or solve a problem via safe mode
Accessing the Emergency Repair Disk Chapter 16 To access the ERD: Boot from the Windows 2000 Server CD-ROM or Setup Disk 1 Press R on the Welcome to Setup screen Press R again on the next screen Insert the ERD Select M to manually select what to repair or select F to perform all repair options Follow the repair instructions
Accessing the Emergency Repair Disk (continued) Figure 16-13 Accessing the repair option Chapter 16
Accessing the Emergency Repair Disk (continued) Figure 16-14 Repair options Chapter 16
Troubleshooting Tip Chapter 16 Keep the ERD updated after each key change to Windows 2000 Server so that you can troubleshoot using the most recent configuration information
Using the Recovery Console for Troubleshooting Chapter 16 Recovery console: A recovery tool that enables you to boot directly into the Windows 2000 Server command line to perform recovery and troubleshooting operations. The Recovery Console can be added as a boot option, started from the Windows 2000 Server CD-ROM, or started from the Windows 2000 Server floppy installation disks.
Recovery Console Command Options Some examples of commands that can be used from the recovery console are: chkdsk disable diskpart enable fixboot fixmbr format Chapter 16
Troubleshooting Boot Problems Chapter 16 Boot Problem Solutions A message appears when booting, such as 1. The boot sector on the NTFS partition is corrupted or the hard drive is damaged. one of the following: Inaccessible Boot This may be caused by a virus, a corrupted partition table, a BIOS setting change, Device; Invalid Partition Table; Hard Disk or a corrupted disk. Check the BIOS setup to make certain it is correct. Correct Error; Hard Disk Absent or Failed. any improper settings (also make sure the CMOS battery is working). 2. If there are no BIOS problems, boot the system using the Recovery Console. Insert a virus scanner in drive A and attempt to scan the hard disk for viruses. If a virus is found, remove it. Whether or not a virus is found, reboot so you can use the emergency repair disk to replace corrupted files. 3. If the disk cannot be accessed, determine if the problem is the hard disk, disk controller, or a SCSI adapter; and replace the defective part (make sure to check that a SCSI adapter is properly terminated). If the hard disk must be replaced, reinstall the operating system.
Troubleshooting Boot Problems (continued) Chapter 16 Boot Problem Solutions The system hangs when booting. 1. Power off and on the computer to reboot. Try rebooting a couple of times. 2. If rebooting does not work, check the BIOS settings to be sure they have not changed and that the CMOS battery is working. If many of the BIOS settings are incorrect, replace the battery and restore the proper settings. 3. Boot up so you can use the emergency repair disk, having it check the boot sector, startup, and system files. 4. For an SMP computer, the hal.dll file may be corrupted. Boot up so you can use the Recovery Console to reinstall the hal.dll from the manufacturer's disk.
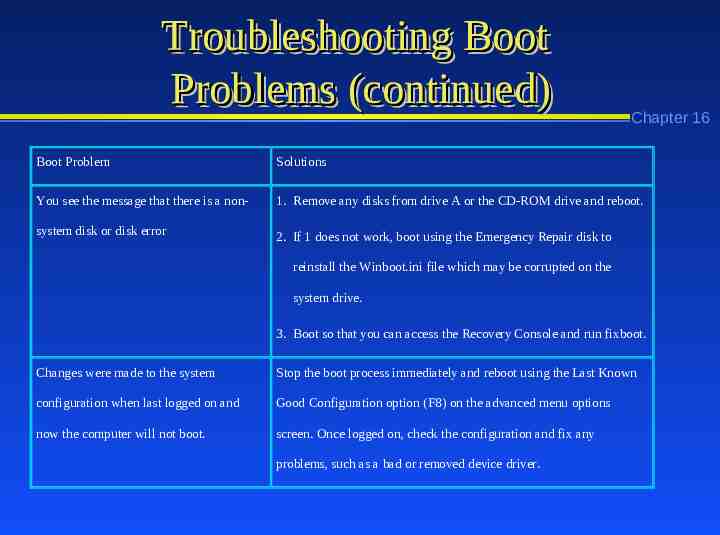
Troubleshooting Boot Problems (continued) Chapter 16 Boot Problem Solutions You see the message that there is a non- 1. Remove any disks from drive A or the CD-ROM drive and reboot. system disk or disk error 2. If 1 does not work, boot using the Emergency Repair disk to reinstall the Winboot.ini file which may be corrupted on the system drive. 3. Boot so that you can access the Recovery Console and run fixboot. Changes were made to the system Stop the boot process immediately and reboot using the Last Known configuration when last logged on and Good Configuration option (F8) on the advanced menu options now the computer will not boot. screen. Once logged on, check the configuration and fix any problems, such as a bad or removed device driver.
Troubleshooting Boot Problems (continued) Boot Problem Solutions The screen display goes blank or is 1. Immediately stop the boot process. Restart the Chapter 16 jumbled as the computer begins booting computer, accessing the BIOS Setup before starting into Windows 2000. Windows 2000. Check the video BIOS setup to make sure it is correct and restore any settings that are changed. Reboot the computer. 2. If there are no BIOS problems, reboot using the Enable VGA Mode from the advanced menu options. Once logged on, check and reinstall the display driver.
Troubleshooting Boot Problems (continued) Chapter 16 Boot Problem Solutions A driver is missing, but you are not sure Boot using Safe Mode and watch for a which one, or the operating system is problem as the drivers are loaded, or boot having trouble recognizing all hardware using the Enable Boot Logging option components on the computer when it boots from the advanced menu options and examine the \Winnt\ntbtlog.txt file.
Troubleshooting Boot Problems Associated with Stop Messages Chapter 16 Stop Message Solutions 0x00000023 and the message Fat File 1. Boot into Safe Mode or the Recovery Console System or NTFS File System and run chkdsk to repair any damaged files. 2. If you have recently installed a virus scanner or a disk defragmenter that is not from Microsoft or compatible with Windows 2000 Server, boot into Safe Mode or using Last Known Good Configuration and remove that software. Table 16-7 Troubleshooting Boot Problems Associated with Stop Messages
Troubleshooting Troubleshooting Boot Boot Problems Problems Associated Associated with with Stop Stop Messages Messages (continued) (continued) Chapter 16 Stop Message Solutions 0x0000001E and the message 1. If you have recently installed a new video system Kmode Exception Not Handled and associated drivers, remove the new hardware, and reboot into the Safe Mode to remove the new drivers (or boot using Enable VGA Mode). Do the same if you have installed any new drivers. 2. Verify the video setup in the computer’s BIOS or install any updated BIOS software offered by the computer vendor. 3. Reboot using Safe Mode or the Recovery Console and make sure that you are not out of disk space.
Troubleshooting Troubleshooting Boot Boot Problems Problems Associated Associated with with Stop Stop Messages Messages (continued) (continued) Chapter 16 Stop Message Solutions 0x000000B4 and the message 1. If you have recently installed a new video system and associated Video Driver Init Failure drivers, remove the new hardware, and reboot into the Safe Mode to remove the new drivers (or boot using Enable VGA Mode). 0x0000007B and the message 1. Boot into Safe Mode and check for a virus. Inaccessible Boot Device 2. Boot into the Recovery Console and restore the master boot record using the fixmbr command. 3. Boot into the Recovery Console and run chkdsk to repair any damage files. 4. Use the emergency repair disk and the F option repair critical files.
Troubleshooting Troubleshooting Boot Boot Problems Problems Associated Associated with with Stop Stop Messages Messages (continued) (continued) Chapter 16 Stop Message Solutions 0x0000002E and the message Data Boot using the Recovery Console and run memory test software Bus Error such as diagnostics that come with your computer or from a or memory vendor, and replace any defective memory 0x0000007F and the message Unexpected Kernel Mode Trap 0x0000000A and the message IRQL Suspect a hardware resource conflict caused by a new device or Not Less or Equal card you have added. If you can boot using the Safe Mode, check the system log. If you cannot boot into Safe Mode, remove the new device or devices and boot using Last Known Good Configuration.
Troubleshooting Troubleshooting Boot Boot Problems Problems Associated Associated with with Stop Stop Messages Messages (continued) (continued) Chapter 16 Stop Message Solutions 0x00000058 and the message Ftdisk Suspect that the main volume in a mirrored set has Internal Error failed. Boot using the secondary volume and use the Disk Management tool to attempt to repair the main volume and resynchronize it with the secondary volume. If you cannot repair the volume, use the Disk Management tool to break the mirrored set, replace the damaged disk, and then recreate the mirrored set.
Troubleshooting Troubleshooting Boot Boot Problems Problems Associated Associated with with Stop Stop Messages Messages (continued) (continued) Chapter 16 Stop Message Solutions 0x000000BE and the message Attempted Boot using the Enable Boot Logging option and then Write to Readonly Memory boot again into Safe Mode (or the Recovery Console) so you can examine the \Winnt\ntbtlog.txt log for a driver that did not start or that is causing problems, then reinstall or replace the driver using the Safe Mode or by copying it into the system using the Recover Console.
System State Data Chapter 16 Plan to back up important system state data so that it can be recovered, if necessary.
System State Data Elements Chapter 16 System state data consists of: System and boot files Active Directory SYSVOL folder Registry COM Class Registration information DNS zones (if installed) Certificate information (if installed) Server cluster data (if installed)
Backing Up System State Data Using the Backup Tool Chapter 16 Figure 16-15 Backing up system state data
Protected System Files Plan to backup the protected system files along with the system state data The protected system files include: Ntldr Bootsect.dos Boot.ini Ntdetect.com Ntbootdd.sys Ntoskrnl.exe Hal.dll Chapter 16
Restoring a Failed System Volume Chapter 16 To restore a failed system volume: Replace the failed hardware Install Windows 2000 Server from the CDROM Use the Backup utility to restore system state data and all other data using the most recent backup tapes
Chapter Summary Chapter 16 Develop a problem solving strategy that matches your equipment and organization’s needs Develop familiarity with the troubleshooting tools in Windows 2000 Server, such as the Event Viewer, System Monitor, Network Monitor, the Network and Dial-up Connections tool, safe mode, and recovery console
Chapter Summary Chapter 16 Learn to use the right troubleshooting tool for the job Plan to keep the ERD updated for future troubleshooting View troubleshooting situations as an opportunity to better understand your organization, its network, and the Windows 2000 servers on the network