Checkpoint System Training Module 2021-2022


51 Slides4.07 MB
Checkpoint System Training Module 2021-2022
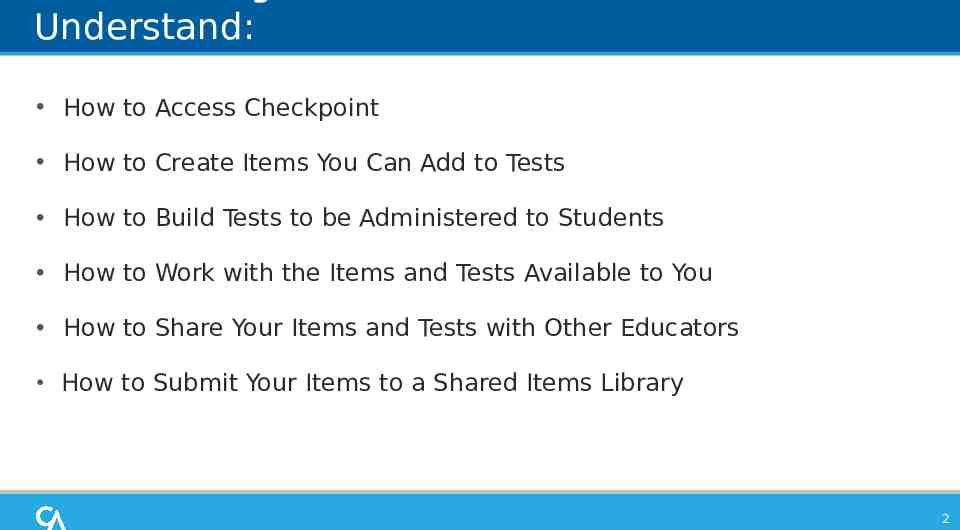
Understand: How to Access Checkpoint How to Create Items You Can Add to Tests How to Build Tests to be Administered to Students How to Work with the Items and Tests Available to You How to Share Your Items and Tests with Other Educators How to Submit Your Items to a Shared Items Library 2
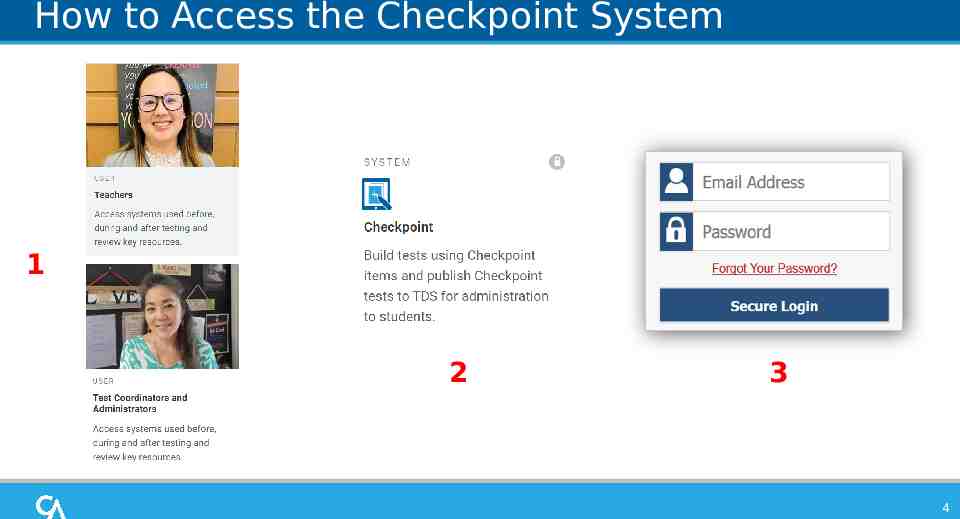
How to Access the Checkpoint System
How to Access the Checkpoint System 1 2 3 4
Logging in to Checkpoint (continued) The system has an authentication process that triggers when you log in from a different device or browser, or after clearing your browser’s cache. If you see this screen, an email containing the code will be in your inbox. Enter the code and click Submit. If you need the code resent, click Resend Code. 5
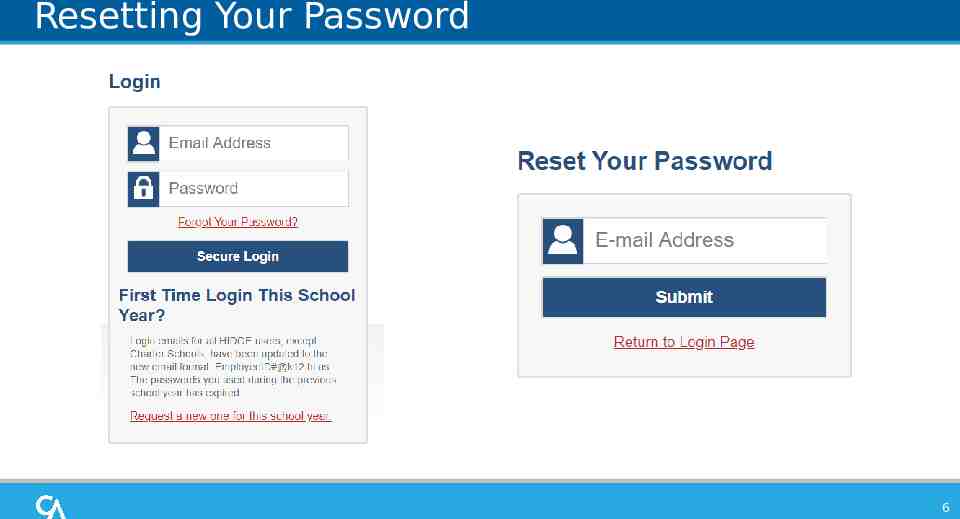
Resetting Your Password 6
How to Navigate the Checkpoint Site
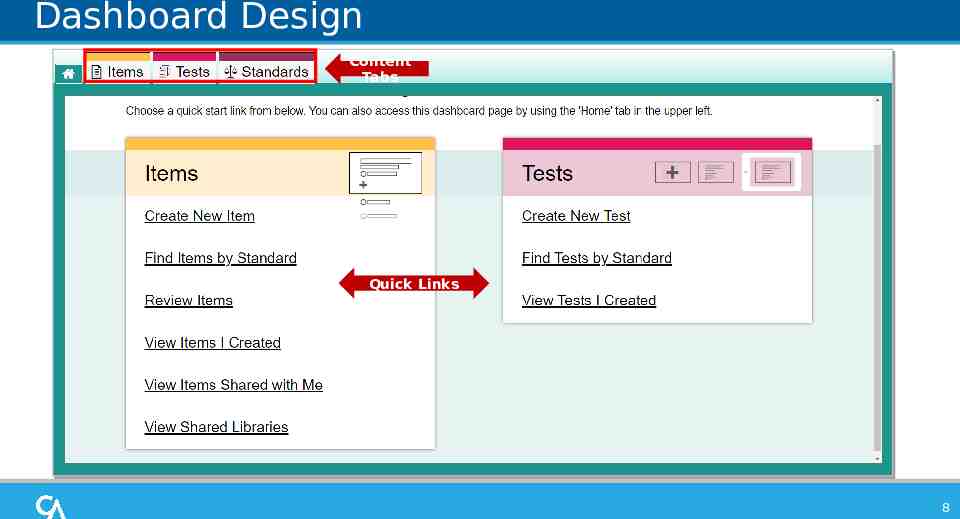
Dashboard Design Content Tabs Quick Links 8
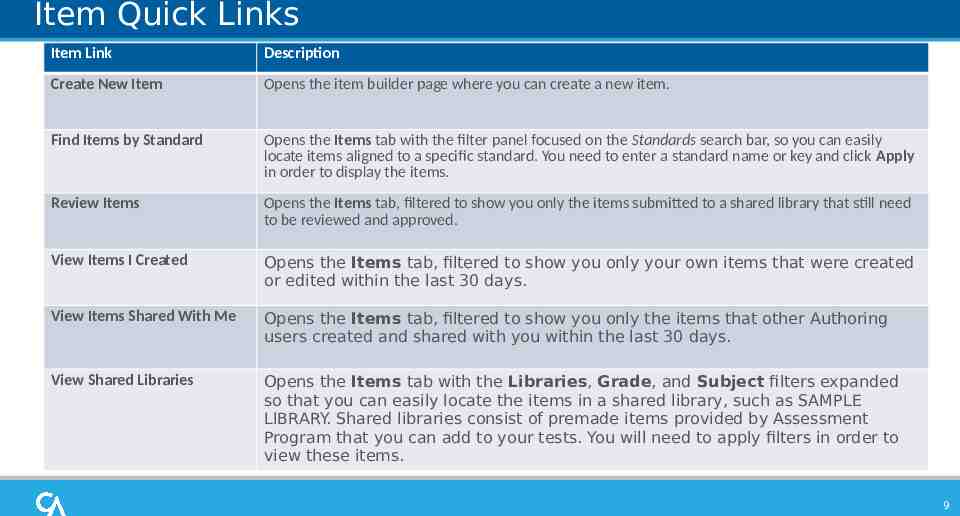
Item Quick Links Item Link Description Create New Item Opens the item builder page where you can create a new item. Find Items by Standard Opens the Items tab with the filter panel focused on the Standards search bar, so you can easily locate items aligned to a specific standard. You need to enter a standard name or key and click Apply in order to display the items. Review Items Opens the Items tab, filtered to show you only the items submitted to a shared library that still need to be reviewed and approved. View Items I Created Opens the Items tab, filtered to show you only your own items that were created or edited within the last 30 days. View Items Shared With Me Opens the Items tab, filtered to show you only the items that other Authoring users created and shared with you within the last 30 days. View Shared Libraries Opens the Items tab with the Libraries, Grade, and Subject filters expanded so that you can easily locate the items in a shared library, such as SAMPLE LIBRARY. Shared libraries consist of premade items provided by Assessment Program that you can add to your tests. You will need to apply filters in order to view these items. 9
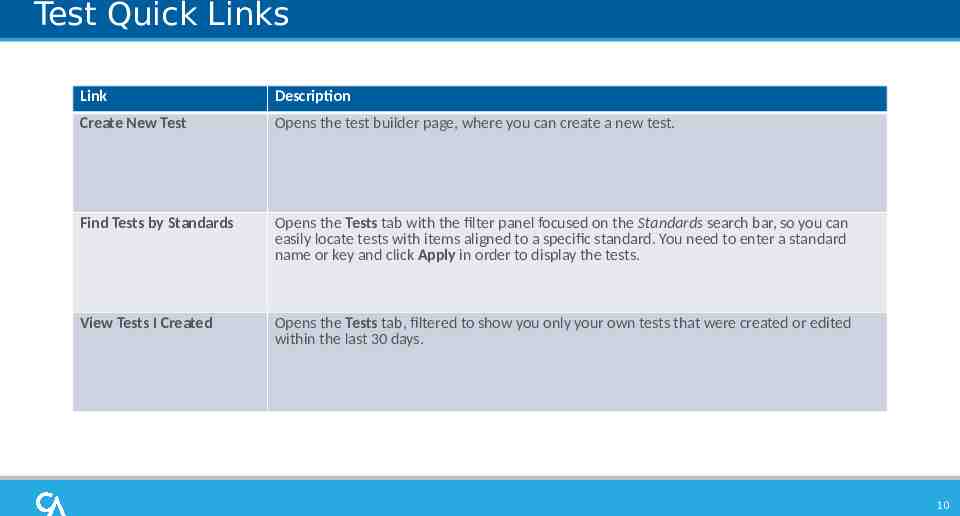
Test Quick Links Link Description Create New Test Opens the test builder page, where you can create a new test. Find Tests by Standards Opens the Tests tab with the filter panel focused on the Standards search bar, so you can easily locate tests with items aligned to a specific standard. You need to enter a standard name or key and click Apply in order to display the tests. View Tests I Created Opens the Tests tab, filtered to show you only your own tests that were created or edited within the last 30 days. 10
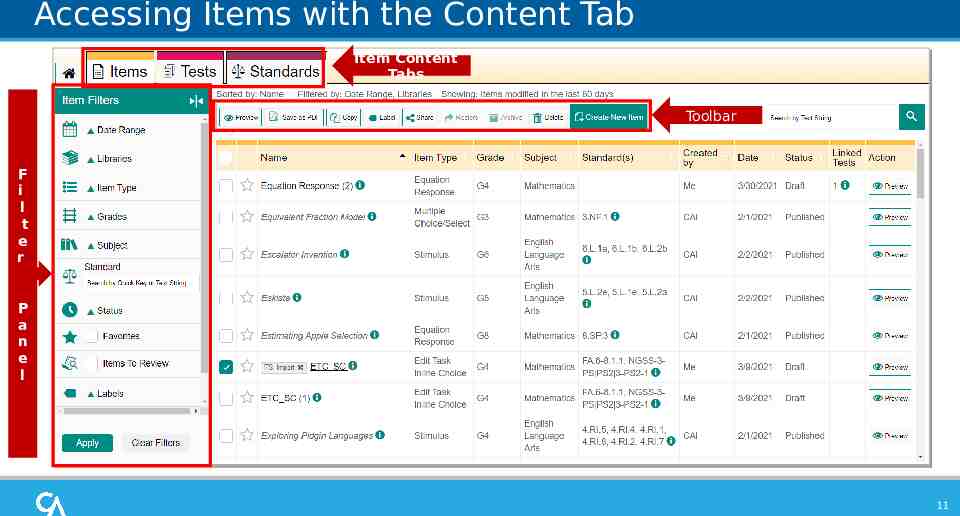
Accessing Items with the Content Tab Item Content Tabs Toolbar F i l t e r P a n e l 11
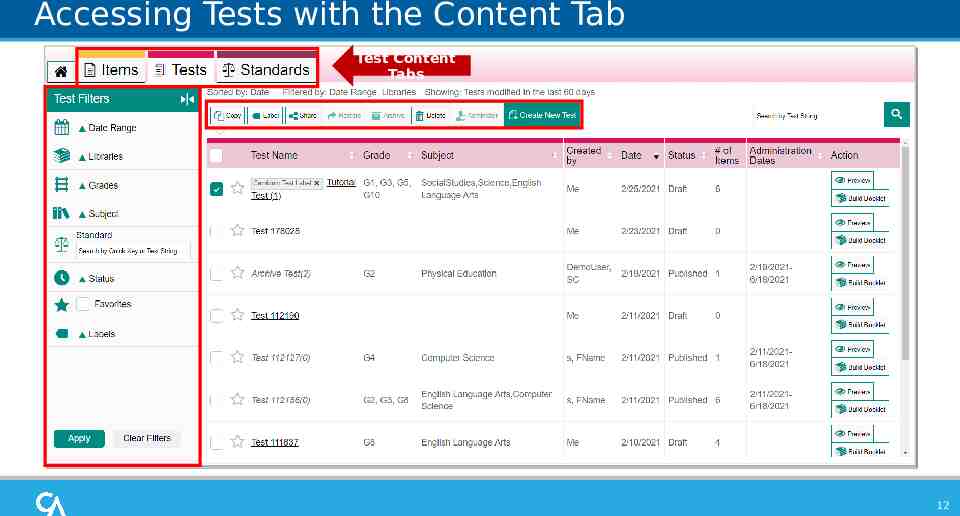
Accessing Tests with the Content Tab Test Content Tabs 12
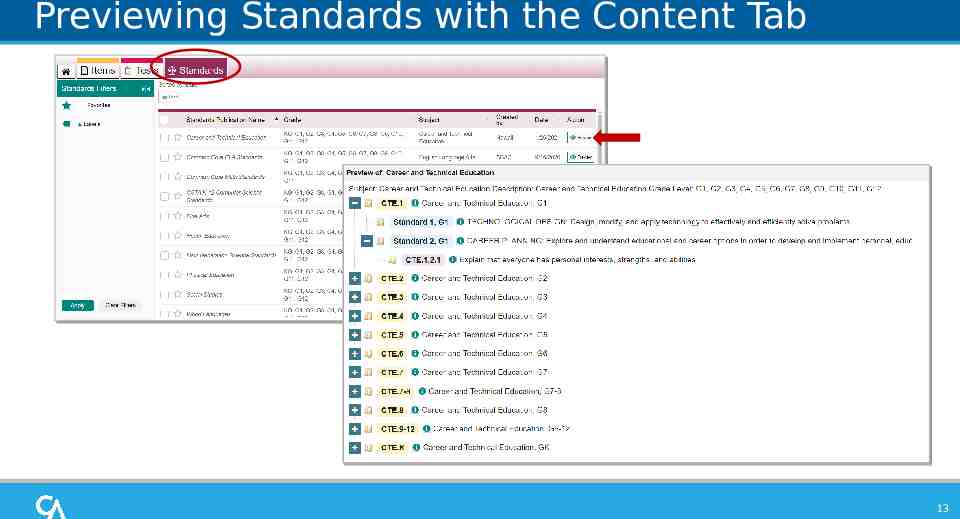
Previewing Standards with the Content Tab 13
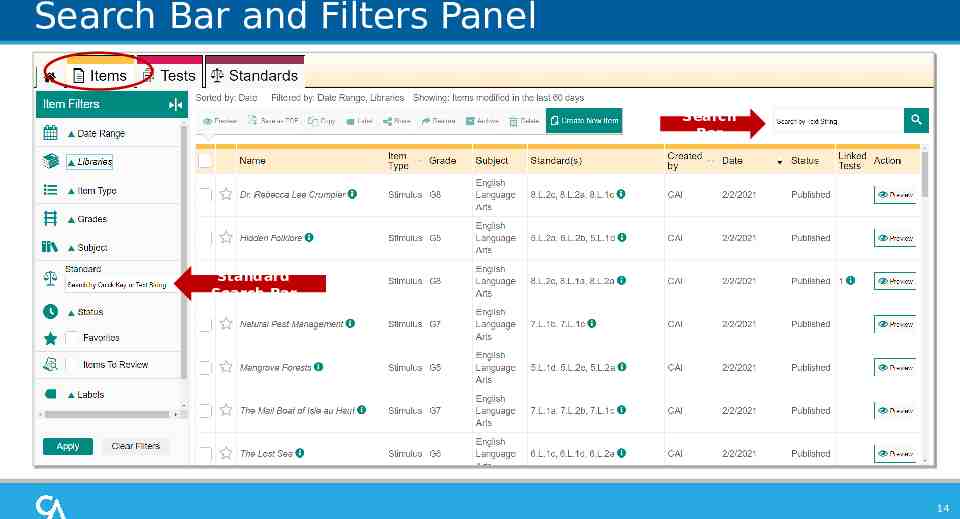
Search Bar and Filters Panel Search Bar Standard Search Bar 14
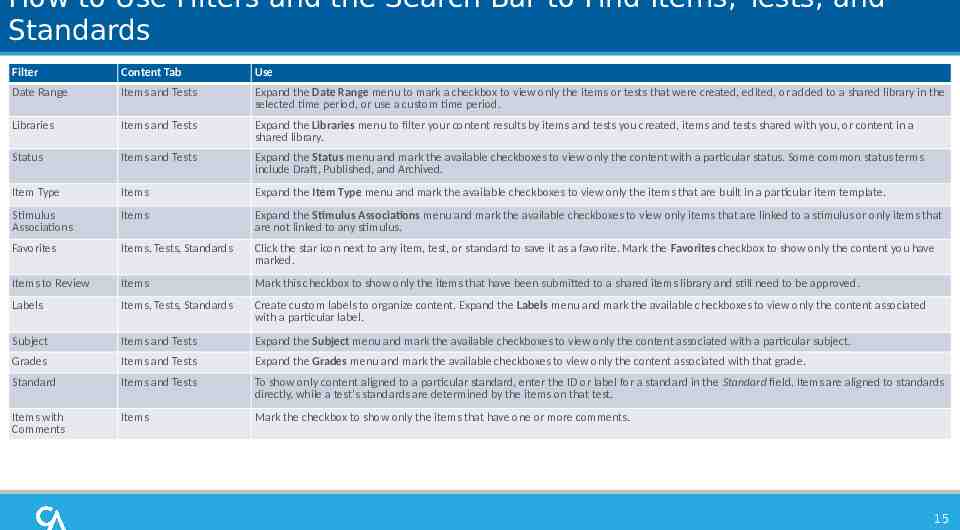
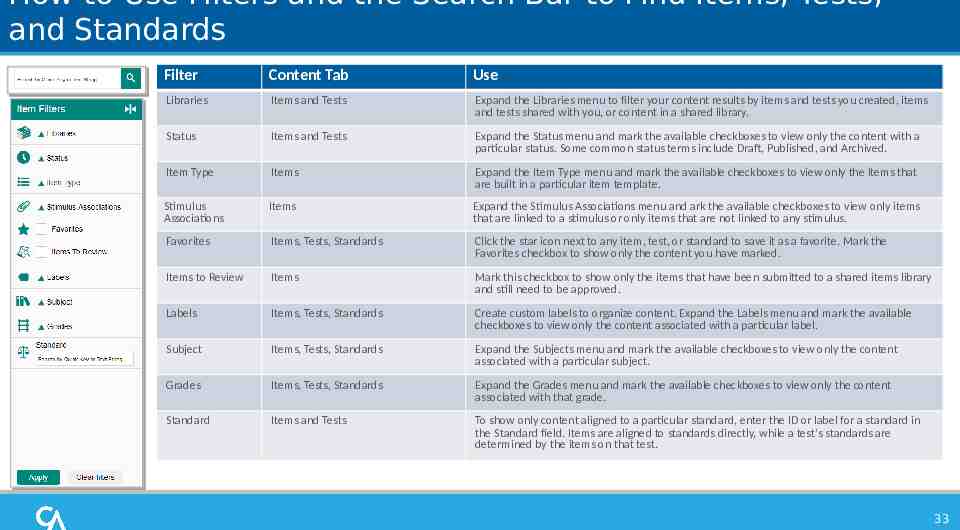
How to Use Filters and the Search Bar to Find Items, Tests, and Standards Filter Content Tab Use Date Range Items and Tests Expand the Date Range menu to mark a checkbox to view only the items or tests that were created, edited, or added to a shared library in the selected time period, or use a custom time period. Libraries Items and Tests Expand the Libraries menu to filter your content results by items and tests you created, items and tests shared with you, or content in a shared library. Status Items and Tests Expand the Status menu and mark the available checkboxes to view only the content with a particular status. Some common status terms include Draft, Published, and Archived. Item Type Items Expand the Item Type menu and mark the available checkboxes to view only the items that are built in a particular item template. Stimulus Associations Items Expand the Stimulus Associations menu and mark the available checkboxes to view only items that are linked to a stimulus or only items that are not linked to any stimulus. Favorites Items, Tests, Standards Click the star icon next to any item, test, or standard to save it as a favorite. Mark the Favorites checkbox to show only the content you have marked. Items to Review Items Mark this checkbox to show only the items that have been submitted to a shared items library and still need to be approved. Labels Items, Tests, Standards Create custom labels to organize content. Expand the Labels menu and mark the available checkboxes to view only the content associated with a particular label. Subject Items and Tests Expand the Subject menu and mark the available checkboxes to view only the content associated with a particular subject. Grades Items and Tests Expand the Grades menu and mark the available checkboxes to view only the content associated with that grade. Standard Items and Tests To show only content aligned to a particular standard, enter the ID or label for a standard in the Standard field. Items are aligned to standards directly, while a test’s standards are determined by the items on that test. Items with Comments Items Mark the checkbox to show only the items that have one or more comments. 15
How to Create Original Items for Your Tests
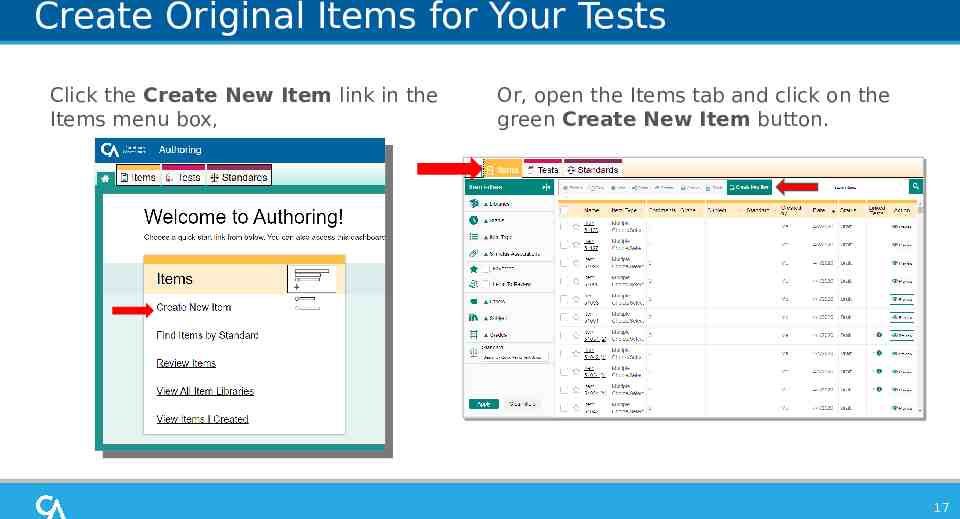
Create Original Items for Your Tests Click the Create New Item link in the Items menu box, Or, open the Items tab and click on the green Create New Item button. 17
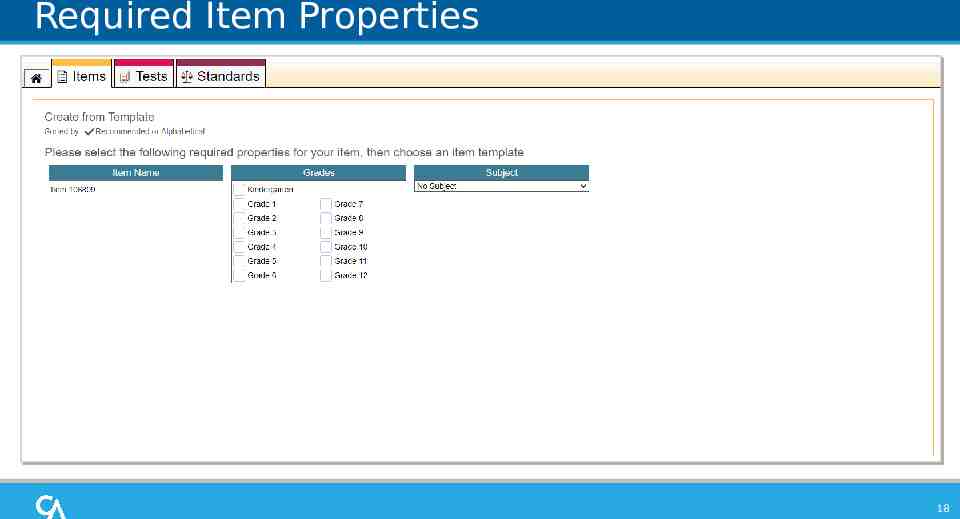
Required Item Properties 18
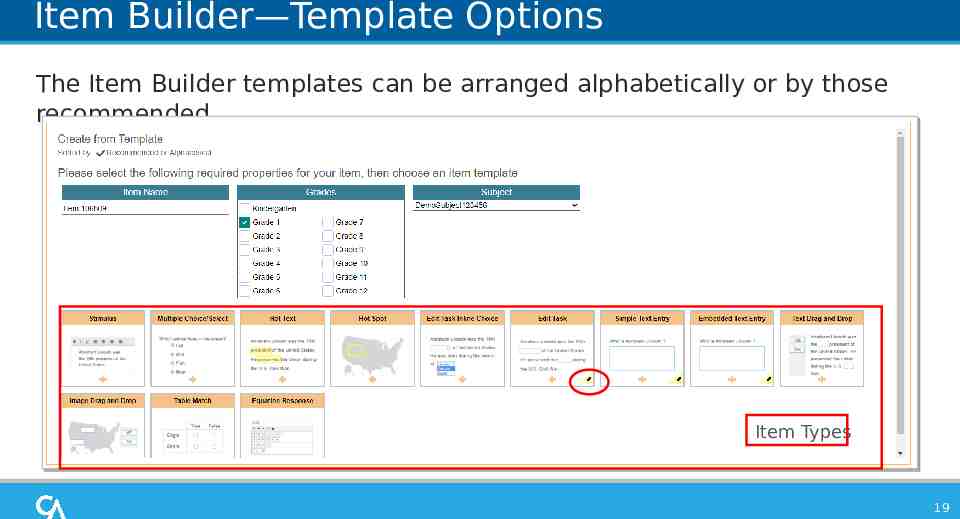
Item Builder—Template Options The Item Builder templates can be arranged alphabetically or by those recommended. Item Types 19
Item Builder—3 Main Steps 1 2 Multiple Choice Item Type 1. Compose the Item Prompt 2. Create the Response Area, 3. Construct the Answer Key. 3 20
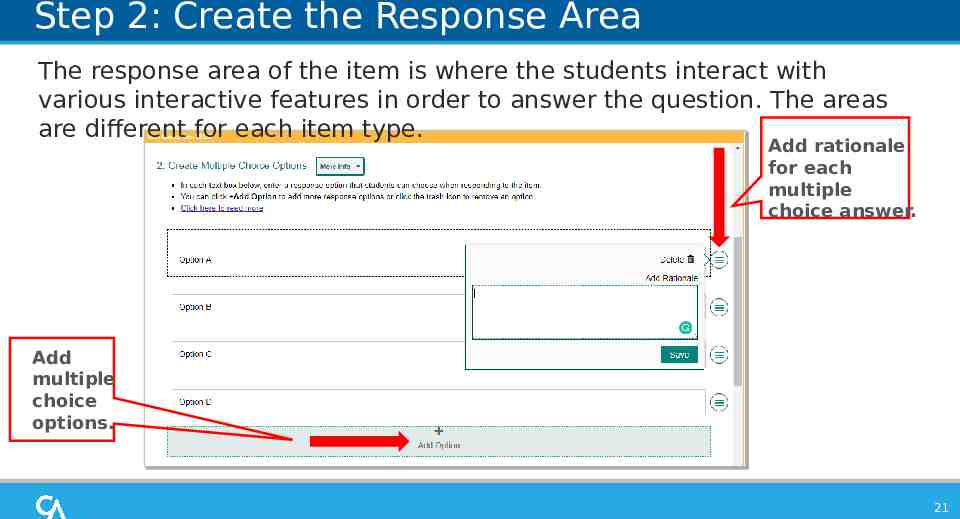
Step 2: Create the Response Area The response area of the item is where the students interact with various interactive features in order to answer the question. The areas are different for each item type. Add rationale for each multiple choice answer. Add multiple choice options. 21
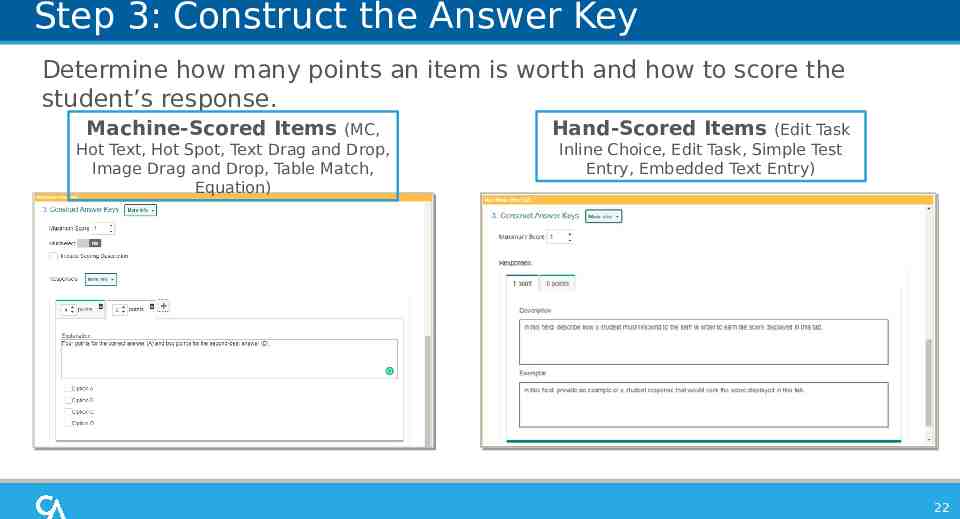
Step 3: Construct the Answer Key Determine how many points an item is worth and how to score the student’s response. Machine-Scored Items (MC, Hot Text, Hot Spot, Text Drag and Drop, Image Drag and Drop, Table Match, Equation) Hand-Scored Items (Edit Task Inline Choice, Edit Task, Simple Test Entry, Embedded Text Entry) 22
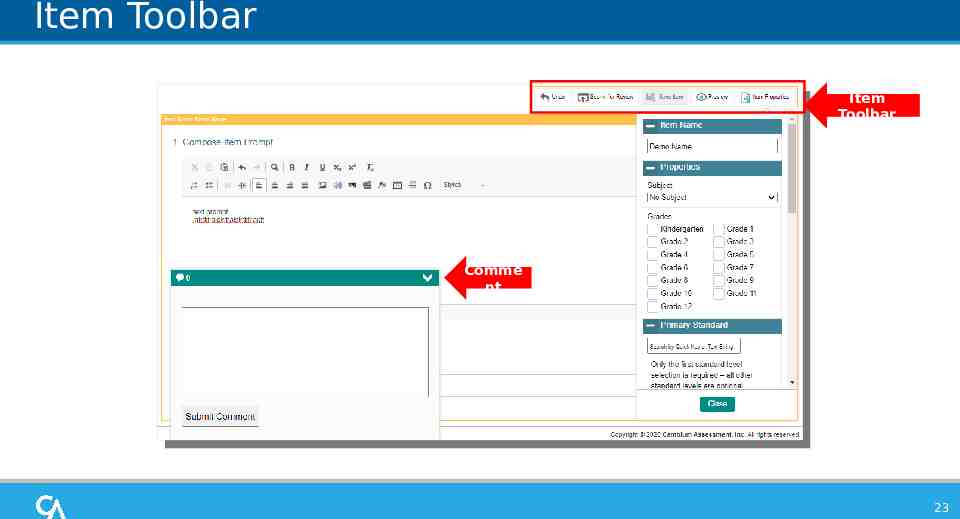
Item Toolbar Item Toolbar Comme nt 23
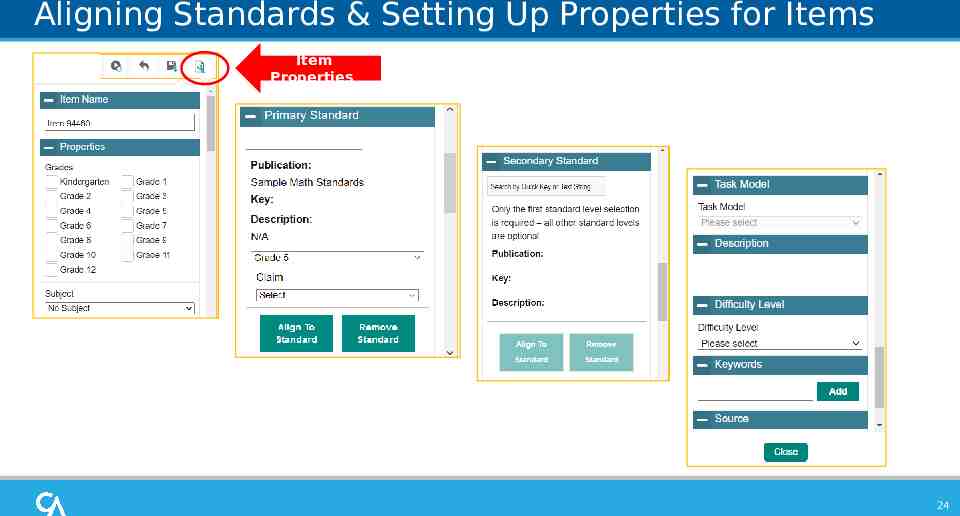
Aligning Standards & Setting Up Properties for Items Item Properties 24
How to Build Tests to Administered to Students
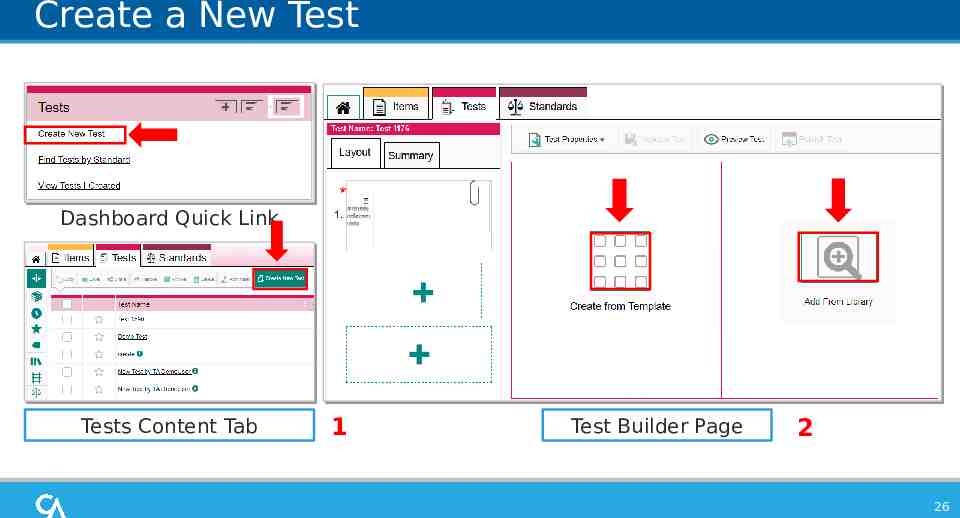
Create a New Test Dashboard Quick Link Tests Content Tab 1 Test Builder Page 2 26
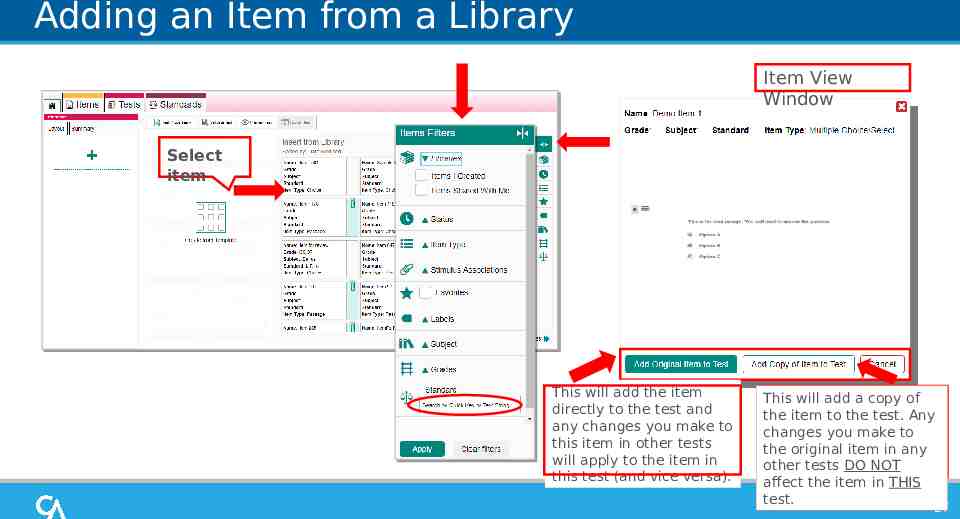
Adding an Item from a Library Item View Window Select item This will add the item directly to the test and any changes you make to this item in other tests will apply to the item in this test (and vice versa). This will add a copy of the item to the test. Any changes you make to the original item in any other tests DO NOT affect the item in THIS test. 27
Editing Item Content when Building a Test Edit Item You can add an item to a test by clicking the plus icon Save Item This is for items that have been copied to a test. When you add a stimulus to the test, a paper clip and a separate, smaller plus sign appears in the left panel, allowing you to create items to link to that stimulus. 28
Test Properties Menu/Validate/Preview/Publish Validate Test: ensures there are no issues with test Preview Test: to see Publish Test: what your test will look like totests available to students administer makes Test Administration System: Test Selection Window 29
How to Work with the Items and Tests Available to You
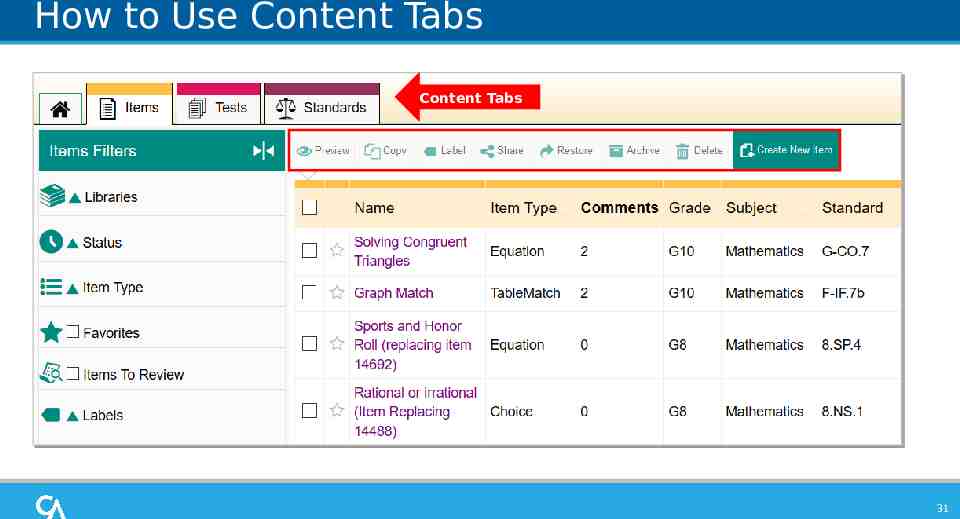
How to Use Content Tabs Content Tabs 31
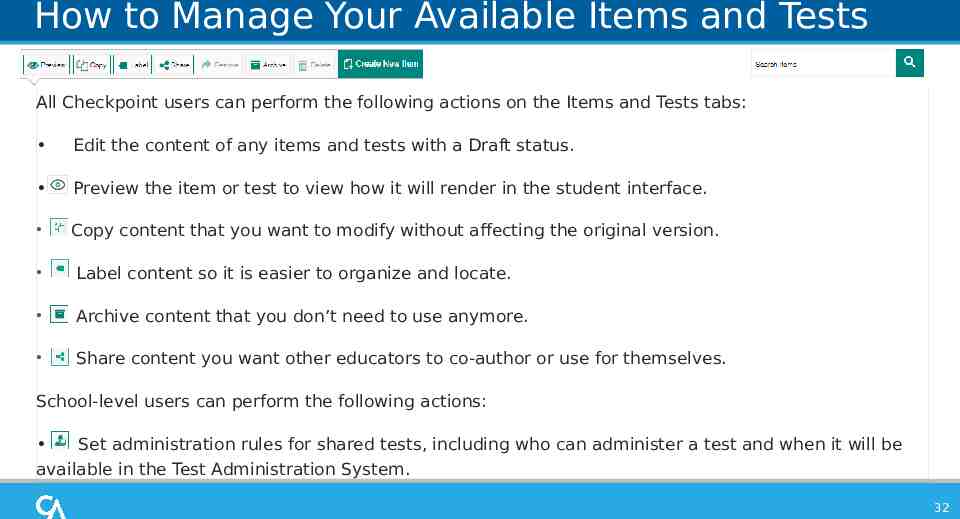
How to Manage Your Available Items and Tests All Checkpoint users can perform the following actions on the Items and Tests tabs: Edit the content of any items and tests with a Draft status. Preview the item or test to view how it will render in the student interface. Copy content that you want to modify without affecting the original version. Label content so it is easier to organize and locate. Archive content that you don’t need to use anymore. Share content you want other educators to co-author or use for themselves. School-level users can perform the following actions: Set administration rules for shared tests, including who can administer a test and when it will be available in the Test Administration System. 32
How to Use Filters and the Search Bar to Find Items, Tests, and Standards Filter Content Tab Use Libraries Items and Tests Expand the Libraries menu to filter your content results by items and tests you created, items and tests shared with you, or content in a shared library. Status Items and Tests Expand the Status menu and mark the available checkboxes to view only the content with a particular status. Some common status terms include Draft, Published, and Archived. Item Type Items Expand the Item Type menu and mark the available checkboxes to view only the items that are built in a particular item template. Stimulus Associations Items Expand the Stimulus Associations menu and ark the available checkboxes to view only items that are linked to a stimulus or only items that are not linked to any stimulus. Favorites Items, Tests, Standards Click the star icon next to any item, test, or standard to save it as a favorite. Mark the Favorites checkbox to show only the content you have marked. Items to Review Items Mark this checkbox to show only the items that have been submitted to a shared items library and still need to be approved. Labels Items, Tests, Standards Create custom labels to organize content. Expand the Labels menu and mark the available checkboxes to view only the content associated with a particular label. Subject Items, Tests, Standards Expand the Subjects menu and mark the available checkboxes to view only the content associated with a particular subject. Grades Items, Tests, Standards Expand the Grades menu and mark the available checkboxes to view only the content associated with that grade. Standard Items and Tests To show only content aligned to a particular standard, enter the ID or label for a standard in the Standard field. Items are aligned to standards directly, while a test’s standards are determined by the items on that test. 33
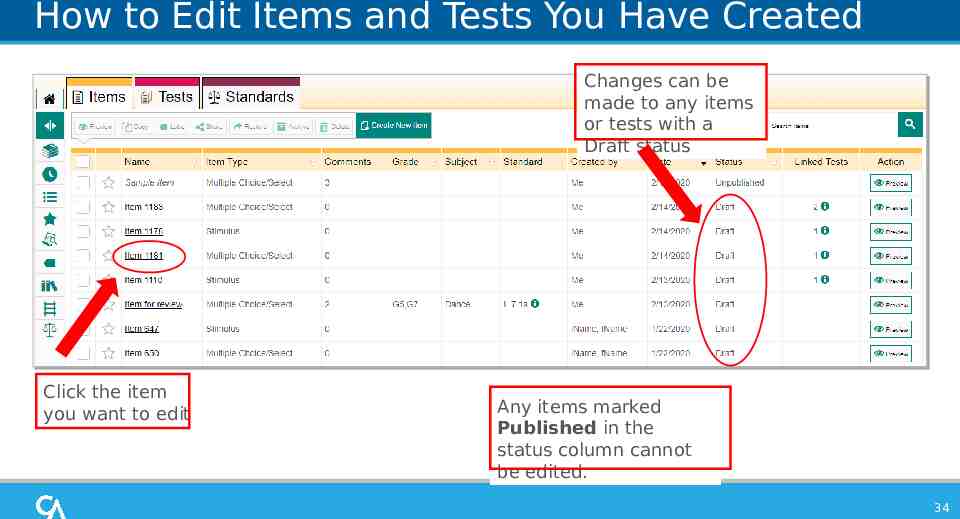
How to Edit Items and Tests You Have Created Changes can be made to any items or tests with a Draft status Click the item you want to edit Any items marked Published in the status column cannot be edited. 34
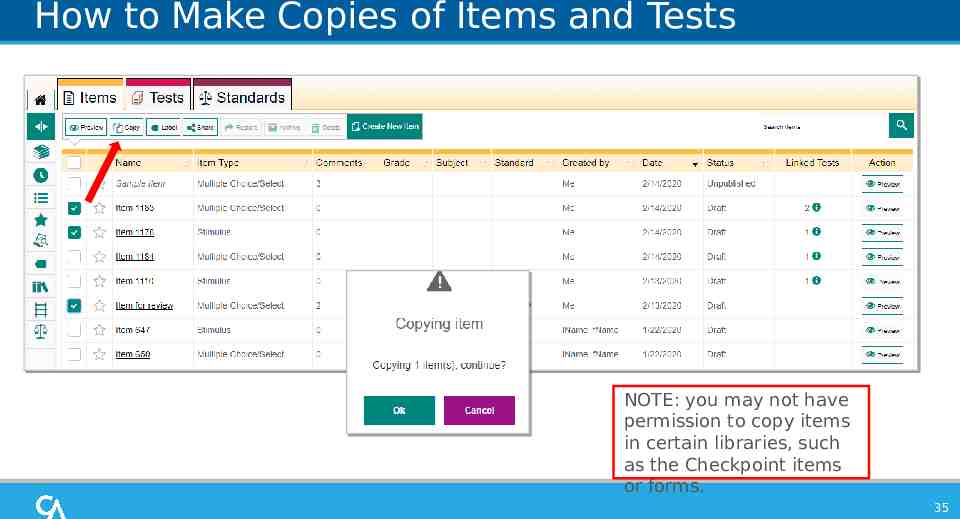
How to Make Copies of Items and Tests NOTE: you may not have permission to copy items in certain libraries, such as the Checkpoint items or forms. 35
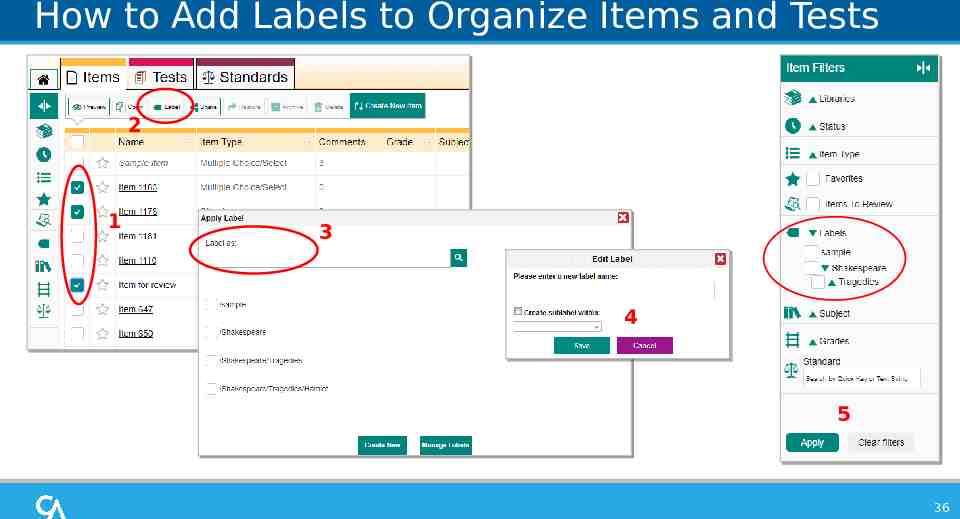
How to Add Labels to Organize Items and Tests 2 1 3 4 5 36
Need 2 1 3 37
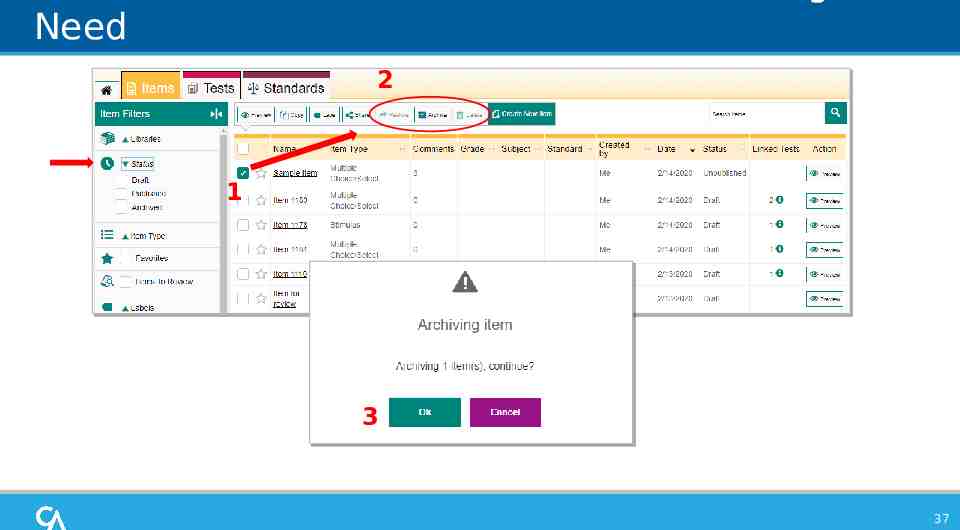
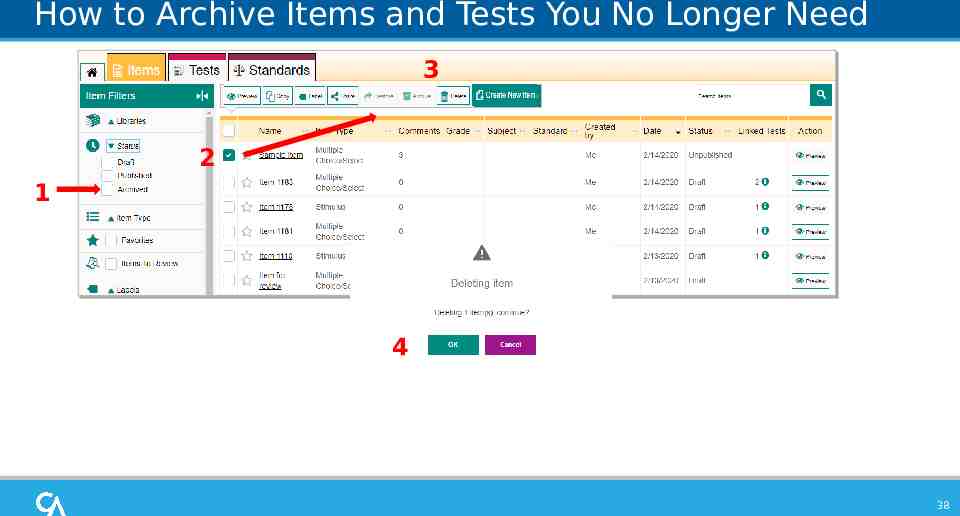
How to Archive Items and Tests You No Longer Need 3 2 1 4 38
with Content 39
How to Share Your Content with Other Educators
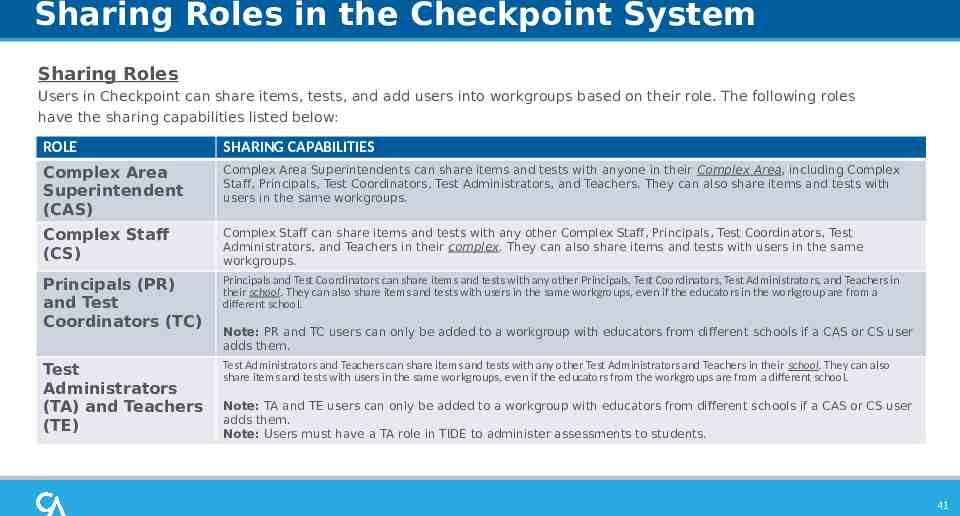
Sharing Roles in the Checkpoint System Sharing Roles Users in Checkpoint can share items, tests, and add users into workgroups based on their role. The following roles have the sharing capabilities listed below: ROLE SHARING CAPABILITIES Complex Area Superintendent (CAS) Complex Area Superintendents can share items and tests with anyone in their Complex Area, including Complex Staff, Principals, Test Coordinators, Test Administrators, and Teachers. They can also share items and tests with users in the same workgroups. Complex Staff (CS) Complex Staff can share items and tests with any other Complex Staff, Principals, Test Coordinators, Test Administrators, and Teachers in their complex. They can also share items and tests with users in the same workgroups. Principals (PR) and Test Coordinators (TC) Principals and Test Coordinators can share items and tests with any other Principals, Test Coordinators, Test Administrators, and Teachers in their school. They can also share items and tests with users in the same workgroups, even if the educators in the workgroup are from a different school. Test Administrators (TA) and Teachers (TE) Test Administrators and Teachers can share items and tests with any other Test Administrators and Teachers in their school. They can also share items and tests with users in the same workgroups, even if the educators from the workgroups are from a different school. Note: PR and TC users can only be added to a workgroup with educators from different schools if a CAS or CS user adds them. Note: TA and TE users can only be added to a workgroup with educators from different schools if a CAS or CS user adds them. Note: Users must have a TA role in TIDE to administer assessments to students. 41
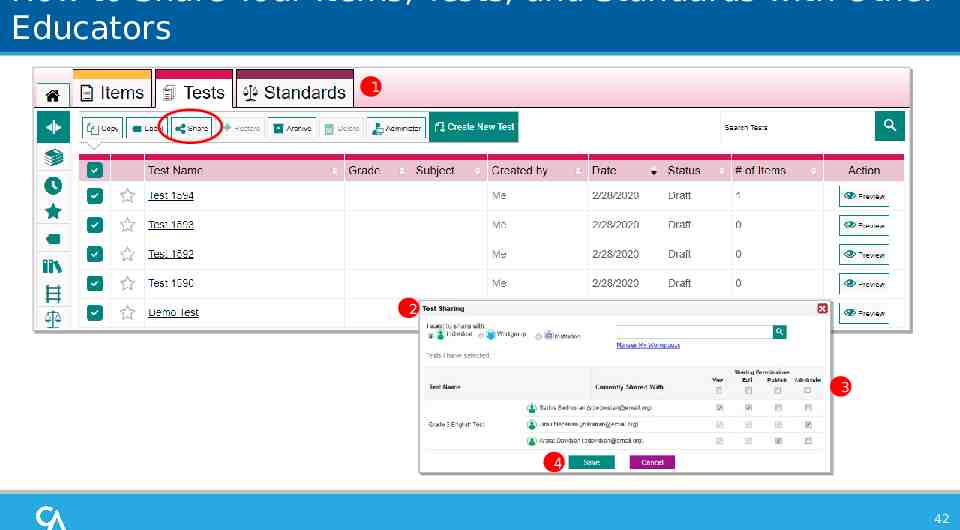
How to Share Your Items, Tests, and Standards with Other Educators 1 2 3 4 42
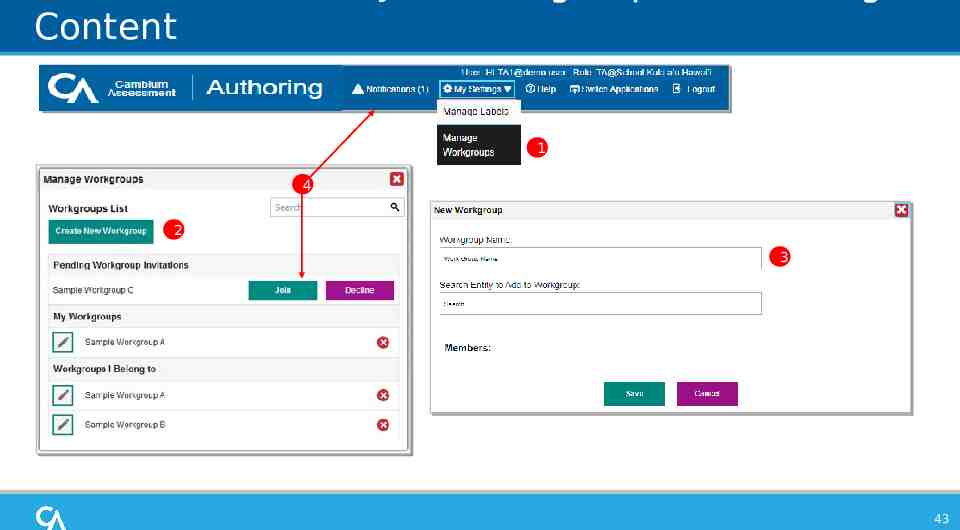
Content 1 4 2 3 43
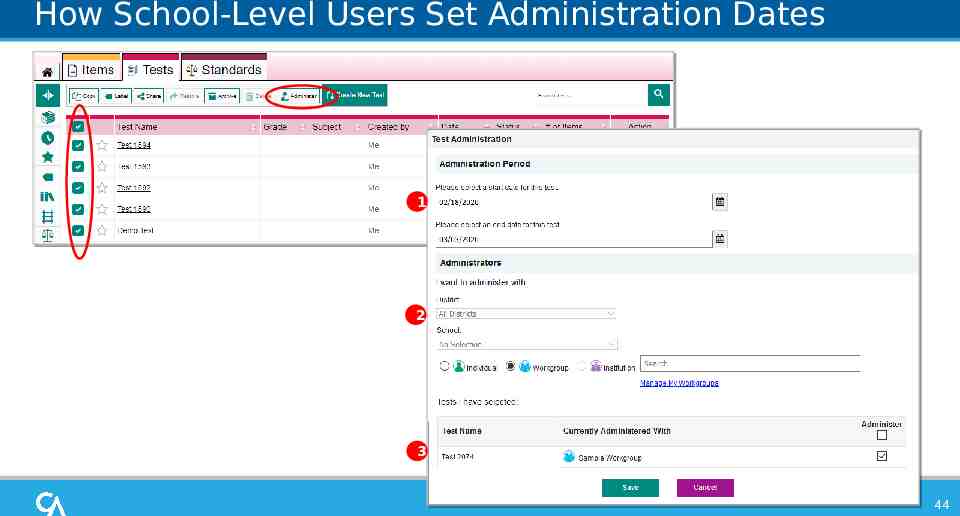
How School-Level Users Set Administration Dates 1 2 3 44
How to Submit Your Items to a Shared Items Library
Submitting Items for Review: Requirements In order to submit an item for review, it must meet the following requirements: The item has all the required content (such as a prompt, response area, and valid answer key) The item has a Draft status and has not yet been added to any tests The item is not shared with any other users 46
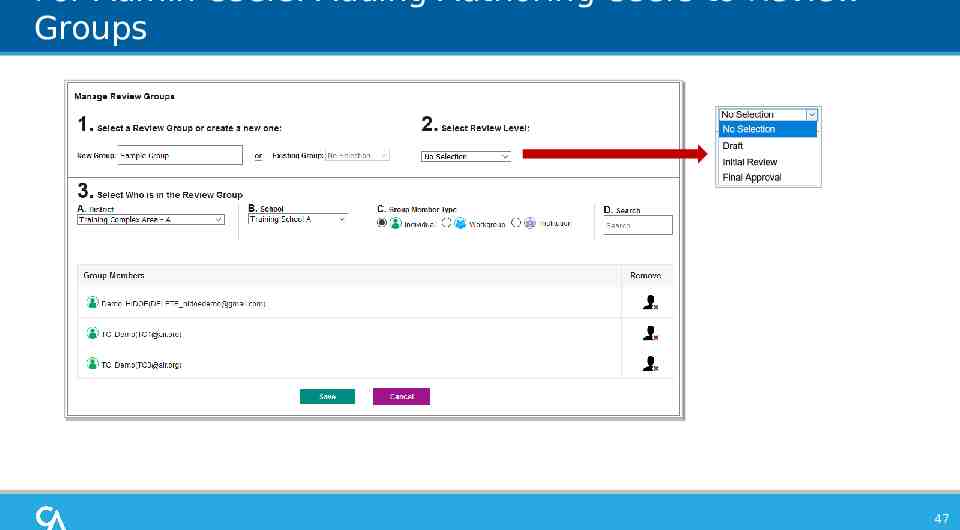
For Admin Users: Adding Authoring Users to Review Groups 47
Library 1 2 3 48
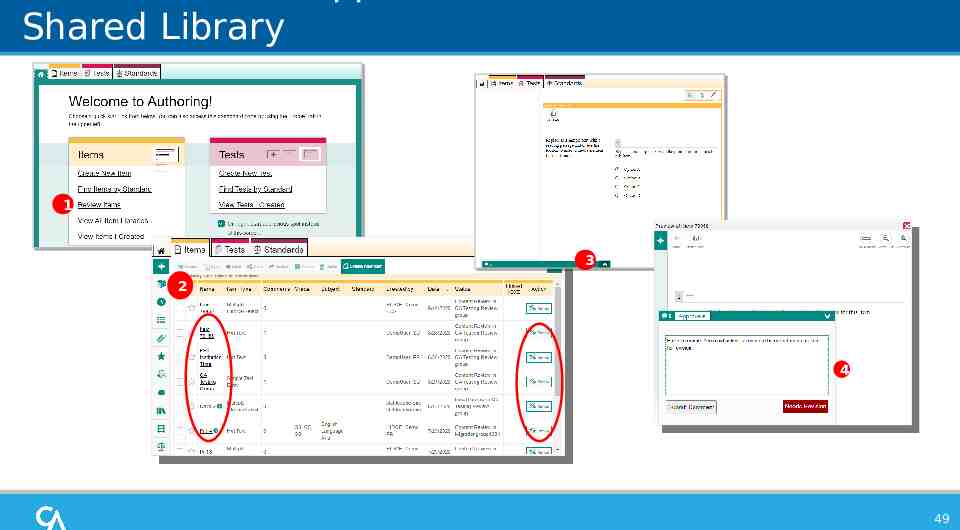
Shared Library 1 3 2 4 49
Checkpoint Resources For more information about the Checkpoint Checkpoint Mini Modules: System, please refer to the following resources on the Smarter Balanced, HSA How Tests Created in Checkpoint Are Reported How to Add Checkpoint Users to Review Groups How to Add Images to Items How to Align Items to Standards How to Filter and Search for Items How to Publish Tests in Checkpoint How to Start a Teacher-Authored Test in TDS How to Submit an Item for Review How to Understand Status How to Write an Item in Checkpoint Science, and EOC pages of the HSAP portal. Checkpoint User Guides: Checkpoint User Guide Quick Guide to Sharing in Checkpoint 50
For More Help You can contact the HSAP Help Desk for assistance with any technical issues you encounter. When contacting the HSAP Help Desk, please be ready to provide: Any error messages that are appearing (including codes) Your operating system and browser information Your network configuration information Your contact information for follow-up by phone or email Any other relevant information, such as test names or content areas, student IDs, session IDs, and Further Information HSAP Portal: https://alohahsap.org/ HSAP Help Desk Phone: 1-866-648-3712 Email: hsaphelpdesk@cambiumassessment .com Thank you! search criteria 51