Epic Scanning 9/7/2021


72 Slides2.28 MB
Epic Scanning 9/7/2021
AGENDA 7:00am Introductions, Log-ins, Epic Overview 8:00am Scanning Grid Overview, Patient-Level Scanning 9:00am Encounter-Level Scanning 11:00am Order-Level Scanning 12:00pm BREAK for LUNCH 1:00pm Order-Level Scanning Continued 2:00pm Advance Directives 3:00pm Scan Error Corrections
Epic Overview Patient Lookup Chart Review Tabs Storyboard Media Manager Filters In Basket Care Everywhere
Patient Lookup Finding a patient in EPIC Go to EPIC Patient Care Chart Pin Chart Enter patient information (Name, MRN, DOB) in the ‘Patient lookup’ screen and click ‘Find Patient’ or press Enter Select correct patient from ‘Patient Select’ screen
Patient Look Up Time to Practice Look up your first test patient via Chart
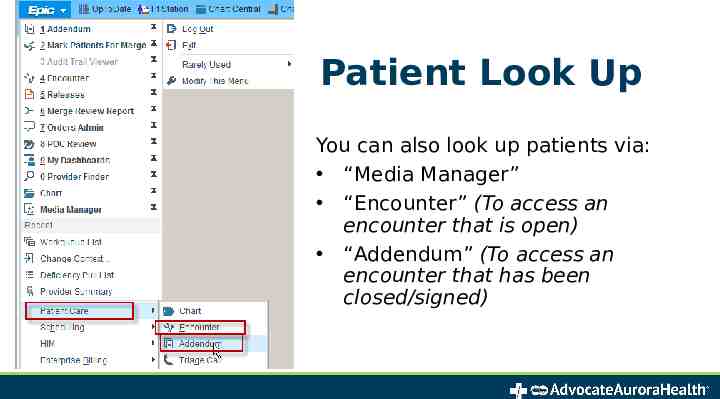
Patient Look Up You can also look up patients via: “Media Manager” “Encounter” (To access an encounter that is open) “Addendum” (To access an encounter that has been closed/signed)
Chart Review Click “Chart Review” and select the appropriate “TAB” Encounters tab Displays all patient encounters Lab, Imaging, Procedures, CARDIAC DX Displays all corresponding diagnostic results and orders Notes Displays all electronic and scanned documentation that qualifies as a note Ex: H&P, Consult, D/C Sum, Progress Note, Procedure Note Media Displays all imported & Scanned documents & diagnostic results
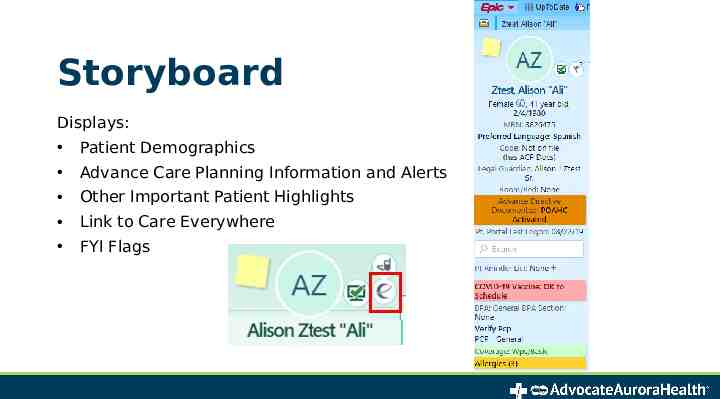
Storyboard Displays: Patient Demographics Advance Care Planning Information and Alerts Other Important Patient Highlights Link to Care Everywhere FYI Flags
Media Manager Media Manager houses all media including scanned/imported documents, and allows users to edit scans Click on EPIC- Patient Care - Media Manager Hint: Pin “Media Manager” to save as a favorite
Your Turn Lookup Test Patient in Media Manager
Filters Create filters in the Encounters tab for efficiency: Click Encounters tab Click Filters Click Encounter Type Select the encounter type to create a filter for (i.e. Advance Directives, External Record) Click “Save as New Filter” Enter a Caption then click Accept
Filters cont. Create a Document Type filter in the Media tab for efficiency: Open Chart Review, click Media tab Click Filters Click Document Type(s) to create a filter for Click “Save as New Filter” Enter a Caption then click Accept
Filters cont. After a filter is built you can click to instantly see all encounter or document types associated:
In Basket Your Epic In Basket offers several features. Folders on the left will appear only if there are items within that folder. Encounters Encounters that you create (except for External Record Encounters) need to be signed and closed: Click on the Encounters folder, click on a row, then click Sign Encounter
Care Everywhere Care Everywhere (CE) exchanges health information between organizations All documentation from an organization that uses Epic is in CE and should not be scanned, except for health maintenance documentation (ex. mammograms, colonoscopies, etc) To view documents in CE: Click on the CE symbol on the Storyboard Click Documents
Now let’s learn about scanning!
Scanning into EPIC High-Quality Scanning is extremely important to maintain the accuracy and integrity of our patients’ medical record documentation in the shared electronic health record. It is necessary to ensure: Patient Safety Quality Service Accurate Treatment Clinician Decision Support Health Insurance Portability and Accountability Act (HIPAA) Compliance Accurate Release of Information To ensure correct information is released when using release templates Prevent Protected Health Information from inappropriate release, which can lead to a HIPAA violation.
Scanning Timeframes Diagnostics (radiology exams, labs, cardiac tests, eye exams, etc.) within 5 years will be scanned to order-level. Exceptions: scan ALL Colonoscopies, Pathology, and Sleep Studies from ANY date to the order-level. All non-diagnostic documents within the past 5 years will be scanned to encounter-level Exception: scan all Implant records and Obstetric (OB) Histories from ANY date to the encounter-level. Anything that does not meet the above timeframes should not be scanned, unless the clinician specifically requests an exception.
Scanning Grid Scanning Grid maps documents according to their Document Type Category using a consistent naming convention. Think of a Document Type as a file folder that holds a category of documents. Open the scanning grid file on your computer Use Ctrl F function to search by key word Try searching for Consent Audiology
Scanning Levels There are 3 Levels in which Documentation is attached/filed into Epic. 1. Patient level Documentation that spans all encounters – such as Advance Directives 2. Encounter-level (non-diagnostic results) Documentation is attached to a specific encounter/visit 3. Order-level (diagnostic results) Results must be attached to an order to file correctly
Why Scanning Levels Matter Scanning to the correct level is extremely important for accuracy and consistency of filing documentation into the shared electronic health record. It is necessary to ensure: Safe patient care Clinical information can be located quickly for continuity of care Documentation files in chronological order Release of Information is performed accurately Correct information is released when using release templates Avoid inappropriate release which can lead to a HIPAA violation
IMPORTANT!! Please note that when you are scanning in Media Manager, it automatically defaults to patient level. You MUST change the scan level for all non-patient level documents. Refer to grid for scanning level. Clinical Documentation (non-diagnostic – Encounter Level) Results/Diagnostics (Order Level) HIM Auth to Release PHI – (Patient Level)
Patient-Level Scanning Patient Level documentation follows a patient in every capacity of their care. Spans the patients entire chart Not attached to any specific encounter Viewable from all encounters If not scanned correctly, can be released inadvertently. Examples include: HIM ROI Authorizations Advance Directive documents such as a Power of Attorney for healthcare. Note: Two patient identifiers should be located on every page of the document that you are scanning
Patient-Level Scanning cont. To scan to the patient level: Open the correct patient’s chart via Media Manager Select ‘New files will be attached’ to: “Patient” *Reminder: Automatic default to patient level Click ‘Scan’
Patient-Level Scanning cont. Enter a description (if applicable) in the description field. Type or click magnifying glass to select the Document Type.
Patient-Level Scanning cont. Insert the document into the scanner click on ‘Acquire’ Once the document is scanned, take one last look at the document to ensure ‘X’ out of the ‘Patient Scan’ screen The document will flow into ‘Media Manager’ and be viewable across patient’s encounters. accuracy and click ‘Save doc’.
Let's Scan!! For training today we will click “Import” and select the electronic document from the computer folder. Have your scanning grid ready – use Ctrl-F to search for the correct Document Type. Access the patient level scan examples.
Find your scanned document Open Chart Review Look in Encounters tab Look in Media tab
Encounter-Level Scanning Encounter level documents are clinical documentation that is not diagnostic test results. Examples: Consults, Progress notes, Consents, FMLA forms Encounter level documents reside within a specific encounter, for example: Office visit External record encounter Telephone encounter NO diagnostic result type documentation is scanned to this level. Note: Two patient identifiers should be located on every page of the document that you are scanning
What Encounter Do I Scan to? Internal (Office Visit, Appointment, etc): Documentation that has been created inside of your practice that does not interface (automatically file) with Epic. For internal documents, an encounter should exist in Epic to scan to because the document was completed during the patient’s visit. External (External Record Encounter): Documentation that has been created outside of your practice and does not reside in Care Everywhere. When there is no patient care encounter to attach the documents to, an External Record Encounter should be created. (Order-level test results from an outside facility will be scanned to the order and connected to an external record encounter
Encounter Level Cont. Create an External Record Encounter to scan all external documents - For Incoming History or Run-On records, use the most current date of service as Contact Date. ‘Contact Date’ the date of service on the document - Exception: Order Level Scanning the contact date will be 01/01/current year. I.E., 01/01/2021 (Order level scanning to come) You must be logged into Epic with your HIM department (SITE MED INFO) to be able to create an external record encounter. Note: Department will be assigned at Go-Live
Encounter Level Cont. Run On Documents scan as Document Type ‘Incoming History’: A document that cannot be separated. For example: Progress note that ends halfway down the page and an imagining report starts immediately after it on the same page. Add description of Facility and Date Range. I.e., CSM 6/17/18-6/20/18)
Encounter Level Creation Creating an Encounter Via Media Manager: 1. Click on the down arrow next to “Patient” in the ‘New files will be attached to’ 2. Click on “Create New Encounter” Fill in the New Contact fields as identified below: Contact date: Date of Service located on the document (today’s date automatically populates) Contact type: External Record Provider: Provider, Outside [9998] Department: Select the appropriate department (Site will be assigned at go-live) 3. Select ‘Create Encounter’
Encounter Level Scanning Documents are scanned to Existing Encounter (Practice office visit) “External Record” Encounter created by the Scanning Team Member Scanning to an existing encounter: Navigate to media manager Click down arrow next to patient Click on ‘Choose an Encounter” Choose the encounter that corresponds to date of service or date document was signed. The encounter you chose will show in blue at the top Click on ‘Scan’
Encounter Level Continued Enter a description (if applicable) Select Document Type To route to physician, enter name under ‘Recipient’ (Your practice can decide when documents should be routed)
Encounter Level Continued Insert the document into the scanner click on ‘Acquire’ Once the document is scanned, take one last look at the document to ensure accuracy and click ‘Save doc’. ‘X’ out of the ‘Patient Scan’ screen The document will flow into ‘Media Manager’ and attach to the selected encounter.
Let's Scan!! Access the Encounter-Level Scanning Examples in the folder to begin hands-on practice Have your grid ready!
Find your scanned document Open Chart Review Look in Encounters tab Look in Media tab
Time for a well-deserved break!
Order-Level Scanning Diagnostic test results should be scanned to the Order-Level Examples: US, XR, Mammo, EKG, ECHO, PFT, etc. Order-level documents file into the appropriate tab in Chart Review (The order may have been created by patient care or by the scanning team member) Examples: EKG will file to the ‘CARDIAC DX’ tab. X-ray & Mammo will file to the ‘Imaging’ tab.
Order Level Scanning Cont. Scanning Order Level Document: Open patient’s chart via ‘chart’ or ‘Media Manager’ Click the down arrow next to New files will be attached to: ‘Patient’ Click ‘Choose an Order’ The ‘Order Search’ box will appear Enter the date of the order in the ‘From’ box or delete date in ‘from’ box and click on ‘All’ radio button to populate all orders for the patient. Click on the order In Media Manger, Click on ‘Scan’
Order Level Cont. Enter a description (if applicable) Enter Document Type If there is no ‘Result Date’ in the ‘Result Information’ section, click the ‘modify result’ check box. Enter the result date. Important! The ‘Result Status’ should be left ‘In Progress’. Do NOT finalize orders that the clinician is responsible to finalize. To Route to clinician, click on ‘CC’ and enter clinician's name in ‘CC Recipients of Results’ box.
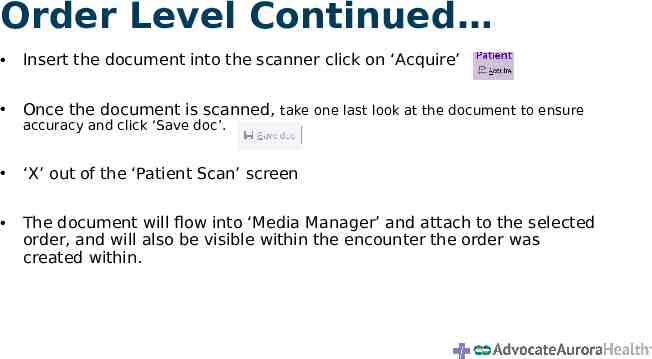
Order Level Continued Insert the document into the scanner click on ‘Acquire’ Once the document is scanned, take one last look at the document to ensure ‘X’ out of the ‘Patient Scan’ screen The document will flow into ‘Media Manager’ and attach to the selected order, and will also be visible within the encounter the order was created within. accuracy and click ‘Save doc’.
Now let’s try order-level scanning when there is not an existing order placed in Epic
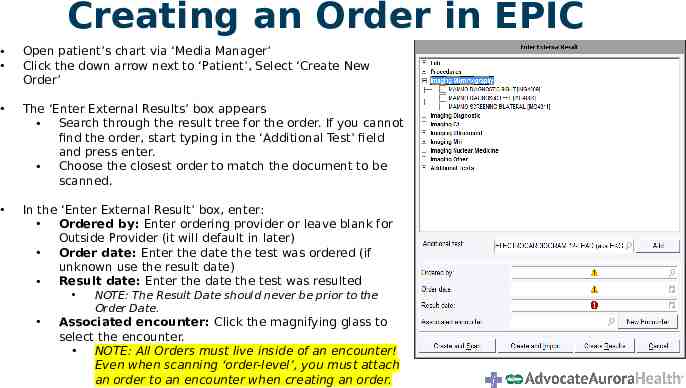
Creating an Order in EPIC Open patient’s chart via ‘Media Manager’ Click the down arrow next to ‘Patient’, Select ‘Create New Order’ The ‘Enter External Results’ box appears Search through the result tree for the order. If you cannot find the order, start typing in the ‘Additional Test’ field and press enter. Choose the closest order to match the document to be scanned. In the ‘Enter External Result’ box, enter: Ordered by: Enter ordering provider or leave blank for Outside Provider (it will default in later) Order date: Enter the date the test was ordered (if unknown use the result date) Result date: Enter the date the test was resulted NOTE: The Result Date should never be prior to the Order Date. Associated encounter: Click the magnifying glass to select the encounter. NOTE: All Orders must live inside of an encounter! Even when scanning ‘order-level’, you must attach an order to an encounter when creating an order.
Creating an Order in EPIC Continued If you need to create an encounter, click on the “New Encounter” button. Enter the Encounter information in the “New Contact” box Use 1/1/current year as the encounter date. This is different than encounter-level scanning where date of service is used. Once you select or create your encounter, it will appear in the “Associated Encounter” field. Click Create and Scan Note: Since you entered the “Result Date” above, the order will automatically be finalized in the scan screen.
Order Level Continued Enter a description (if applicable) in the description field. Type or click magnifying glass for Document Type. If there is no ‘Result Date’ in the ‘Result Information’ section, click the ‘modify result’ check box. Enter the result date. Important! The ‘Result Status’ should be left ‘In Progress’. Do NOT finalize orders the clinician is responsible to finalize. To Route to clinician, click on ‘CC’ and enter clinician's name in ‘CC Recipients of Results’ box.
Eye Exams Dilated or non-dilated eye exams that contain results. HIM will enter the components from the report for health maintenance. This allows for tracking and trending for patient care. The three orders for eye exam reports are: Eye Exam Dilated (SCAN19) - Use for all exams that mention either dilated or diabetic Eye Exam Non-Dilated (SCAN20) - Use for exams with no mention of dilated or diabetic PRO9000152 Diabetic Retinavue Eye Exam – Use for Retinavue reports/images
Creating an Order for Eye Exams Open the patient chart via ‘encounter’ Find the external record for 01/01/current year or create a new external record encounter. ‘Enter/Edit Results’ will appear. Click on ‘Ext Results’
Creating an Order for Eye Exams In ‘Additional test’ type in the appropriate order for the eye exam report Enter the ‘order date’ which is the date the exam was done. ‘Create Results’ ‘Enter/Edit Results’ will reappear. Enter the correct information under ‘value’ In ‘Category Select’ choose value The ‘Result’ date will be the date of exam Click ‘Accept’ and ‘x’ out. Do NOT sign the visit.
Pap Smear/Pap Test To create a pap order: Open the patient chart via Encounter Find the 01/01/current year encounter with site department In ‘Enter/Edit Results’, click on ‘Ext Results’ Enter ‘Pap Order [LAB10332]’ in the additional test. Add ‘order date’ and click create results. ‘Enter/Edit Results’ will reappear. Enter the collection date, the result date, and change status to finalize. Click ‘Accept’. Go to Media Manager- ‘Choose order’ at Patient Drop Down- Find PAP order.
Pathology To Create a pathology order: Go to chart - Media Manager - Select ‘Create New order’ from New Files will be attached to. Use generic pathology code (88305.02) in the additional test field Enter the order date and result date and attached to the external record encounter 01/01/current year for the site. Click ‘Create and Scan’
Let's Scan!! Access the Order-Level Scanning Examples in the folder to begin hands-on practice Have your grid ready!
Find your scanned document Open Chart Review Look under the appropriate tab Lab, Imaging, Cardiac DX, etc. Look in Encounters tab Look in Media tab
Additional Info Multiple results for the same test can be grouped together for easier scanning: Use 1 order if the documents are the same Example: 5 bilateral mammogram results are received in a large volume of incoming records. Place 1 Mammogram order, final result it with most recent result date, scan all mammogram results as a single scan to the order with the most current date on top, and enter the Facility Name and Date Range in the Document field.
Onto Advance Directive Processing Please open the AD Scanning Procedure Please note: This process will be changing due to an Epic upgrade in September 2021
Advance Directives Advance Directives (AD) are essential to patient care. They must be scanned accurately and timely into EPIC (patient-level) so that they are available in the event they must be acted upon. Advance directive template documentation must also be completed in order for the appropriate Storyboard banners and alerts to display. Advance Directive examples: Guardianship Power of Attorney for Healthcare (POA-HC) Physician Orders for Life-Sustaining Treatment (POLST) Living Will Declaration for Mental Health Treatment Certification of Incapacity (WI Activation)
Advance Directive Scanning Open the patient chart via ‘Media Manager’ Search to see if the document has been scanned previously by clicking on the document type column header to sort. Review documents beginning with ‘Directives-’. If document has not been scanned, review document for completeness and validity according to the AD procedure Note – if the AD is not complete, please reach out to the patient to obtain a valid copy. Letters can be created from within Epic if desired.
Advance Directive Scanning Cont. Ensure that “Files attached to” is at the patient-level, then click Scan. Enter a description (if applicable, according to the AD procedure) Enter the Document Type (“Directives- ”)
Advance Directive Scanning Cont. Insert the document into the scanner click on ‘Acquire’ Once the document is scanned, take one last look at the document to ensure accuracy and click ‘Save doc’. ‘X’ out of the ‘Patient Scan’ screen The document will now be available across the patient’s record.
Let's Scan!! Access the Advance Directives Scanning Examples in the folder to begin hands-on practice Have your AD Procedure ready!
Find your scanned AD document Open Chart Review Look in Media tab
Use filter in encounter tab to confirm if an advance directive encounter already exists. If an encounter already exists, open through addendum. You do NOT need to create a new encounter. If an encounter does not exist, create one.
Creating an Advance Directives Encounter To create an encounter via the “Encounter function” Click on the Epic button Open the Patient Care menu and click on “Encounter” Find/click on the patient's name The “Encounter Selection” box will open Click on ‘New” The “New Encounter” box will open. Enter the Encounter information into the fields The ‘Visit Navigator’ will open. This is where you will document the advance directive.
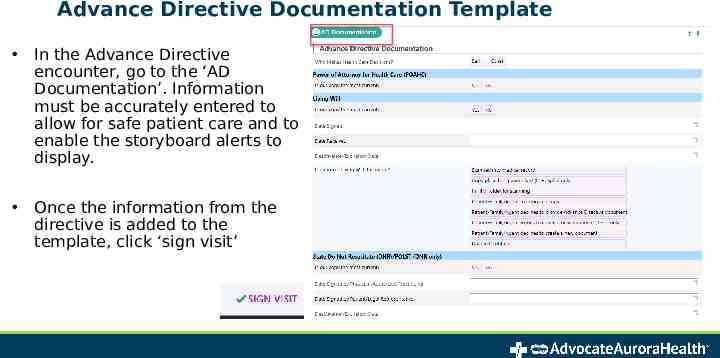
Advance Directive Documentation Template In the Advance Directive encounter, go to the ‘AD Documentation’. Information must be accurately entered to allow for safe patient care and to enable the storyboard alerts to display. Once the information from the directive is added to the template, click ‘sign visit’
Let’s complete the AD template! After completing the documentation template, check if the storyboard banner alerts display properly
CHART CORRECTIONS Editing a scan Deleting a scan Marking an encounter as erroneous Order entry errors
Scan Error Corrections To edit a document Open the patient chart via Media Manager To edit a document, click on the document then click Edit From this screen, the document type or description can be edited. The document can also be moved to a different encounter or order. *FYI: Certain document types cannot be edited, and will need to be printed, deleted, and re-scanned. Examples: H&P, Consult, Progress notes.
Scan Error Corrections To Delete a document: Open the patient chart via Media Manager Click Delete Enter a deletion reason, then click Delete Note: If a wrong patient scan error was discovered: after deletion of the erroneous document, refer the situation for a privacy investigation.
Scan Error Corrections Erroneous Encounter Process Select the patient and open the encounter via 'Encounter' Click 'Add Order' Search erroneous, press enter, and accept Click on 'DX Association' and type Erroneous in the diagnosis field. Select 'Erroneous Encounter-Disregard' Click Accept Click 'DX Associate' and enter erroneous in the diagnosis field Click on add and then accept Click on the ‘up’ arrow next to ‘sign orders’ and select remove all At the ‘Orders Cart’ box, select ‘Do not show this again’ and ‘remove’ Sign the encounter using ‘Sign Visit’ Note- Place a ticket with Epic IT - orders created in error must be deleted by IT
CONGRATULATIONS! Thank you for your time and participation today. For questions and ongoing support, please reach out to the HIM Quality & Training Specialists: [email protected]
Phone Number for IT in IL: 630-990-7000