Dell C2772DE Monitor To make the most of our available space in

16 Slides3.04 MB
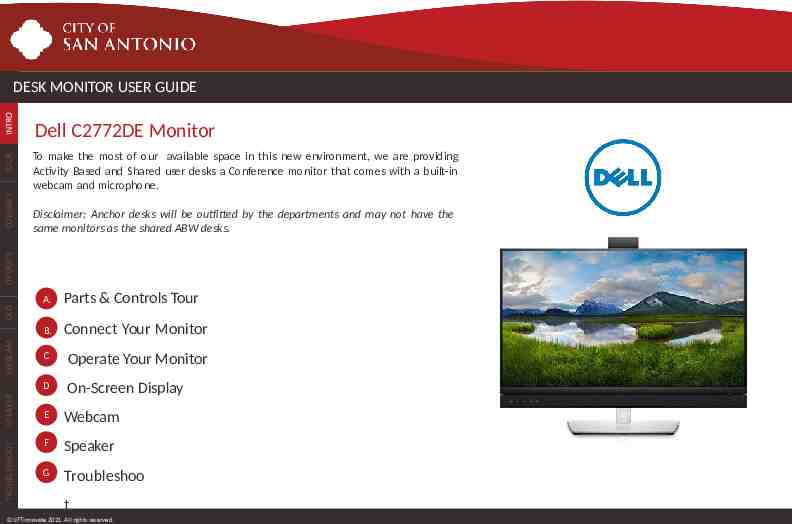
Dell C2772DE Monitor To make the most of our available space in this new environment, we are providing Activity Based and Shared user desks a Conference monitor that comes with a built-in webcam and microphone. Disclaimer: Anchor desks will be outfitted by the departments and may not have the same monitors as the shared ABW desks. TROUBLESHOOT SPEAKER WEBCAM OSD OPERATE CONNECT TOUR INTRO DESK MONITOR USER GUIDE A. Parts & Controls Tour B. Connect Your Monitor C Operate Your Monitor D On-Screen Display E Webcam F Speaker G Troubleshoo t LIFTinnovate 2021. All rights reserved.
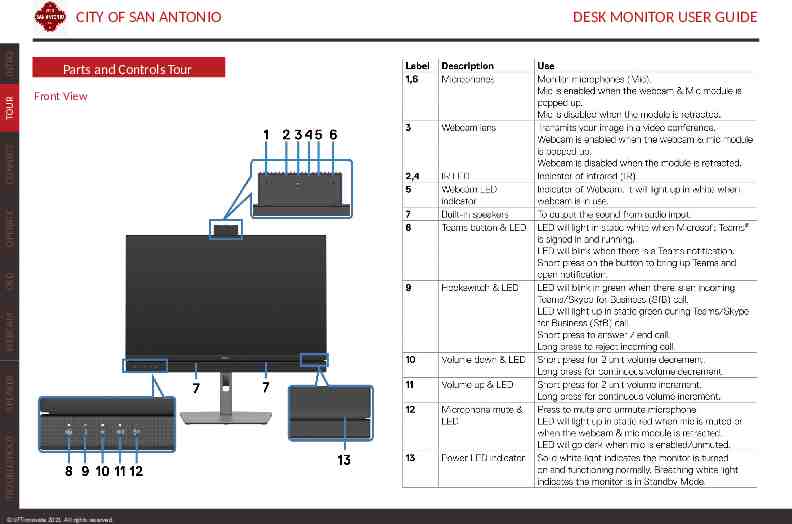
Parts and Controls Tour Front View TROUBLESHOOT SPEAKER WEBCAM OSD OPERATE CONNECT TOUR INTRO CITY OF SAN ANTONIO LIFTinnovate 2021. All rights reserved. DESK MONITOR USER GUIDE
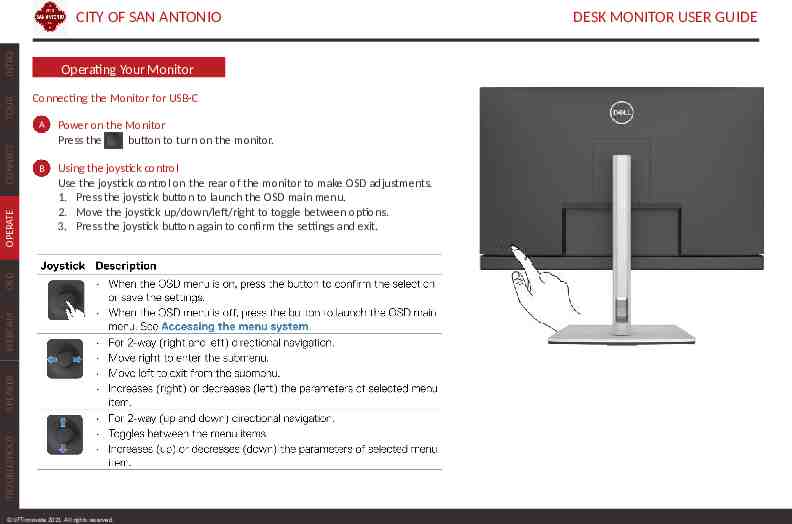
Operating Your Monitor Connecting the Monitor for USB-C A Power on the Monitor Press the button to turn on the monitor. B Using the joystick control Use the joystick control on the rear of the monitor to make OSD adjustments. 1. Press the joystick button to launch the OSD main menu. 2. Move the joystick up/down/left/right to toggle between options. 3. Press the joystick button again to confirm the settings and exit. TROUBLESHOOT SPEAKER WEBCAM OSD OPERATE CONNECT TOUR INTRO CITY OF SAN ANTONIO LIFTinnovate 2021. All rights reserved. DESK MONITOR USER GUIDE
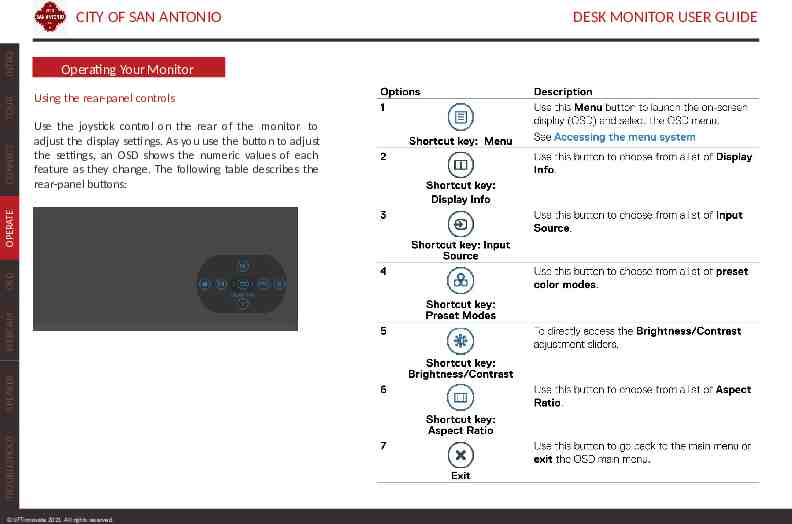
Operating Your Monitor Using the rear-panel controls Use the joystick control on the rear of the monitor to adjust the display settings. As you use the button to adjust the settings, an OSD shows the numeric values of each feature as they change. The following table describes the rear-panel buttons: TROUBLESHOOT SPEAKER WEBCAM OSD OPERATE CONNECT TOUR INTRO CITY OF SAN ANTONIO LIFTinnovate 2021. All rights reserved. DESK MONITOR USER GUIDE
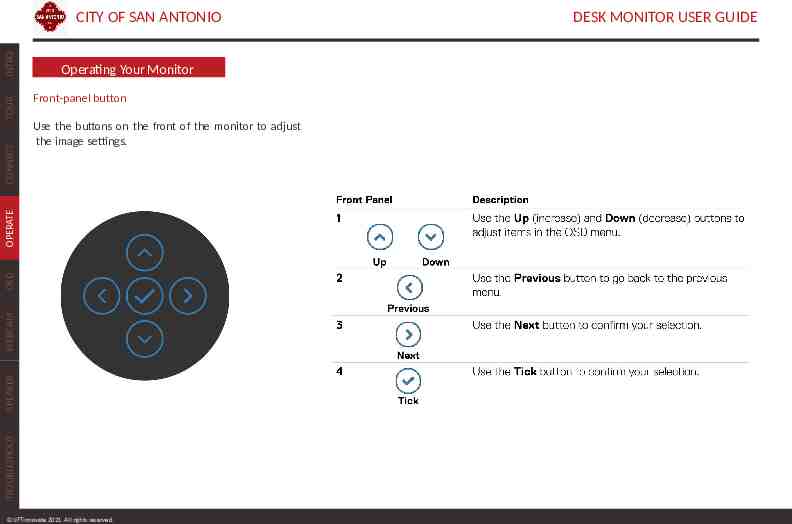
Operating Your Monitor Front-panel button Use the buttons on the front of the monitor to adjust the image settings. TROUBLESHOOT SPEAKER WEBCAM OSD OPERATE CONNECT TOUR INTRO CITY OF SAN ANTONIO LIFTinnovate 2021. All rights reserved. DESK MONITOR USER GUIDE
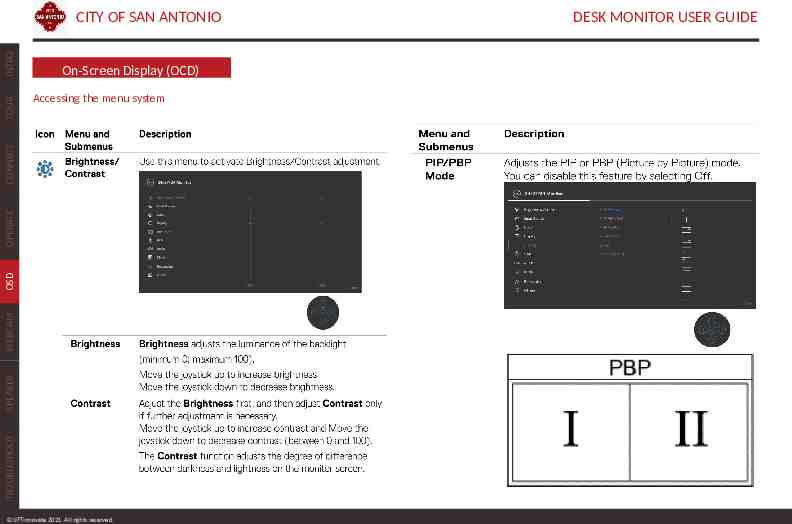
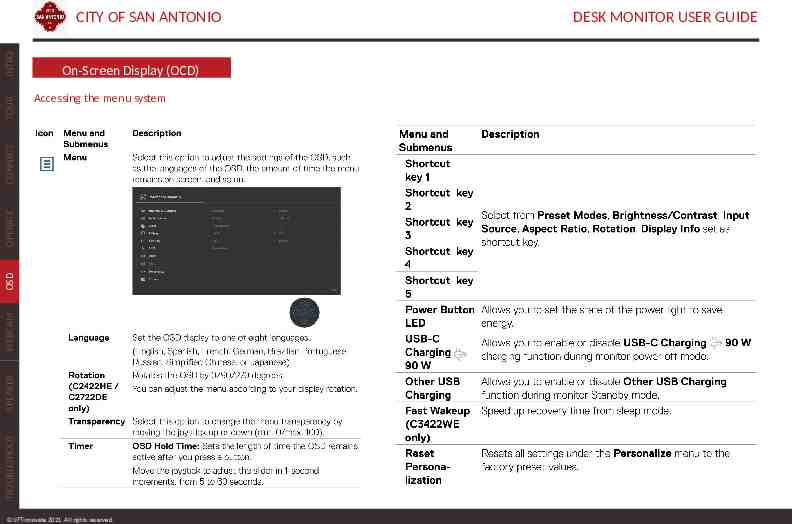
On-Screen Display (OCD) Accessing the menu system TROUBLESHOOT SPEAKER WEBCAM OSD OPERATE CONNECT TOUR INTRO CITY OF SAN ANTONIO LIFTinnovate 2021. All rights reserved. DESK MONITOR USER GUIDE
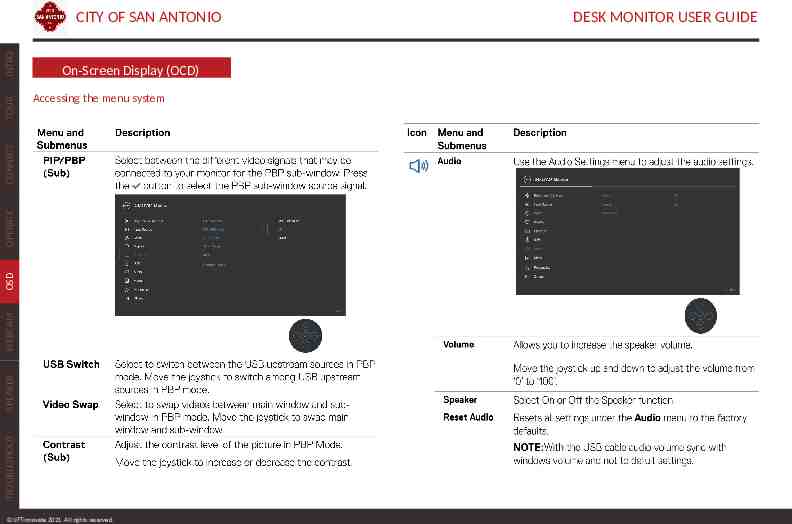
On-Screen Display (OCD) Accessing the menu system TROUBLESHOOT SPEAKER WEBCAM OSD OPERATE CONNECT TOUR INTRO CITY OF SAN ANTONIO LIFTinnovate 2021. All rights reserved. DESK MONITOR USER GUIDE
On-Screen Display (OCD) Accessing the menu system TROUBLESHOOT SPEAKER WEBCAM OSD OPERATE CONNECT TOUR INTRO CITY OF SAN ANTONIO LIFTinnovate 2021. All rights reserved. DESK MONITOR USER GUIDE
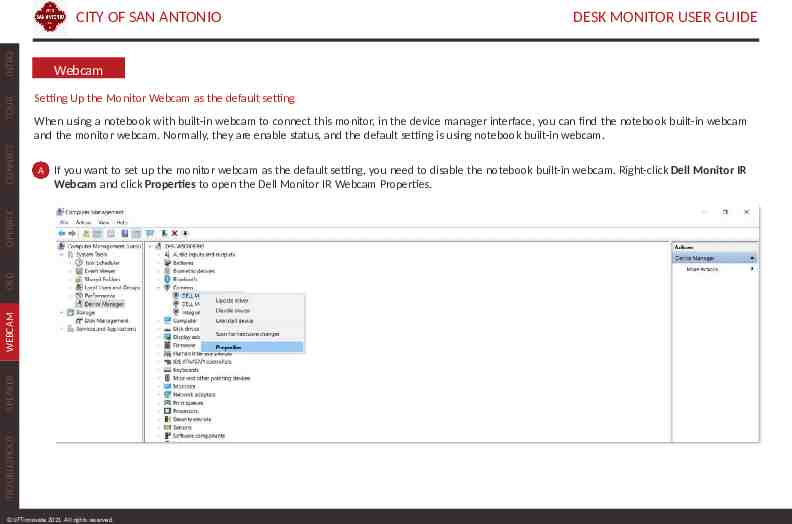
DESK MONITOR USER GUIDE Webcam Setting Up the Monitor Webcam as the default setting When using a notebook with built-in webcam to connect this monitor, in the device manager interface, you can find the notebook built-in webcam and the monitor webcam. Normally, they are enable status, and the default setting is using notebook built-in webcam. A If you want to set up the monitor webcam as the default setting, you need to disable the notebook built-in webcam. Right-click Dell Monitor IR Webcam and click Properties to open the Dell Monitor IR Webcam Properties. TROUBLESHOOT SPEAKER WEBCAM OSD OPERATE CONNECT TOUR INTRO CITY OF SAN ANTONIO LIFTinnovate 2021. All rights reserved.
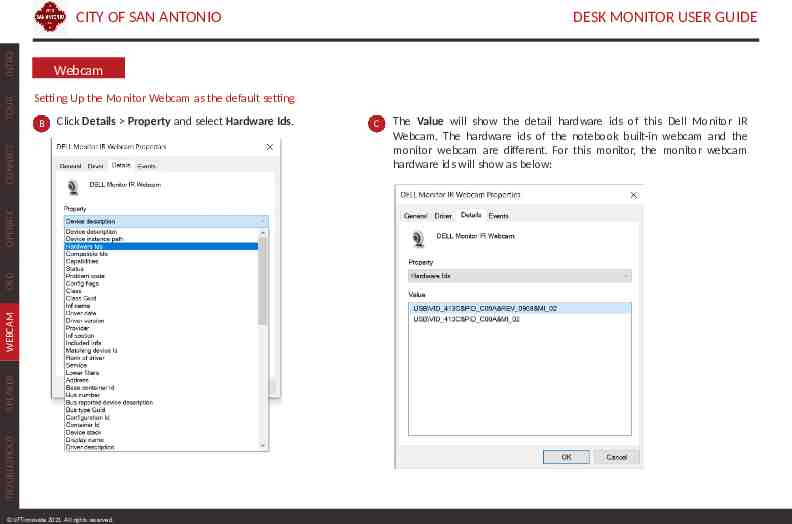
DESK MONITOR USER GUIDE Webcam Setting Up the Monitor Webcam as the default setting B Click Details Property and select Hardware Ids. TROUBLESHOOT SPEAKER WEBCAM OSD OPERATE CONNECT TOUR INTRO CITY OF SAN ANTONIO LIFTinnovate 2021. All rights reserved. C The Value will show the detail hardware ids of this Dell Monitor IR Webcam. The hardware ids of the notebook built-in webcam and the monitor webcam are different. For this monitor, the monitor webcam hardware ids will show as below:
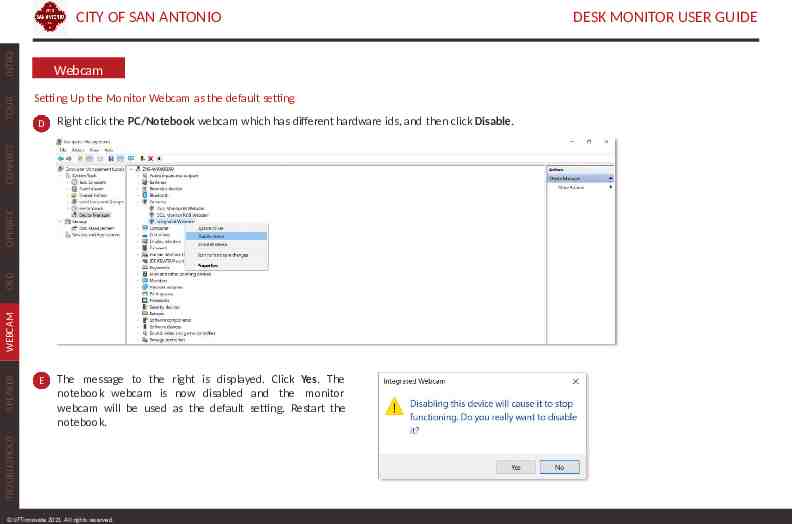
Webcam Setting Up the Monitor Webcam as the default setting D Right click the PC/Notebook webcam which has different hardware ids, and then click Disable. E The message to the right is displayed. Click Yes. The notebook webcam is now disabled and the monitor webcam will be used as the default setting. Restart the notebook. TROUBLESHOOT SPEAKER WEBCAM OSD OPERATE CONNECT TOUR INTRO CITY OF SAN ANTONIO LIFTinnovate 2021. All rights reserved. DESK MONITOR USER GUIDE
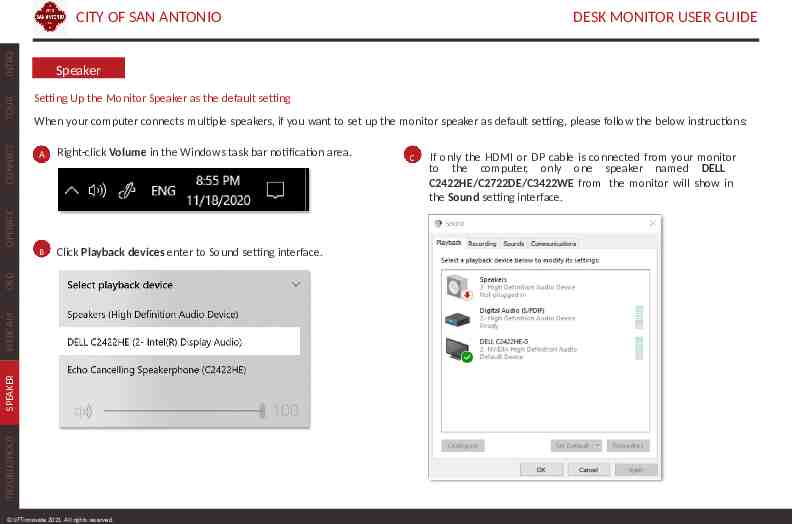
DESK MONITOR USER GUIDE Speaker Setting Up the Monitor Speaker as the default setting When your computer connects multiple speakers, if you want to set up the monitor speaker as default setting, please follow the below instructions: A Right-click Volume in the Windows task bar notification area. B Click Playback devices enter to Sound setting interface. TROUBLESHOOT SPEAKER WEBCAM OSD OPERATE CONNECT TOUR INTRO CITY OF SAN ANTONIO LIFTinnovate 2021. All rights reserved. C If only the HDMI or DP cable is connected from your monitor to the computer, only one speaker named DELL C2422HE/C2722DE/C3422WE from the monitor will show in the Sound setting interface.
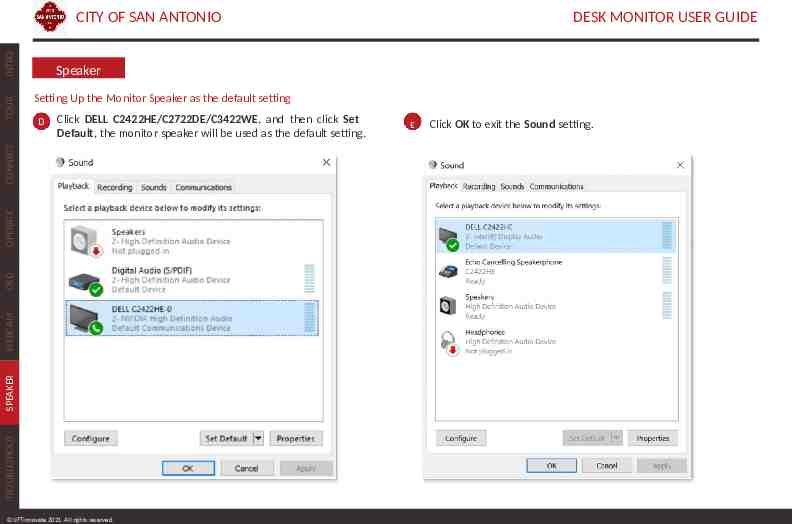
DESK MONITOR USER GUIDE Speaker Setting Up the Monitor Speaker as the default setting D Click DELL C2422HE/C2722DE/C3422WE, and then click Set Default, the monitor speaker will be used as the default setting. TROUBLESHOOT SPEAKER WEBCAM OSD OPERATE CONNECT TOUR INTRO CITY OF SAN ANTONIO LIFTinnovate 2021. All rights reserved. E Click OK to exit the Sound setting.
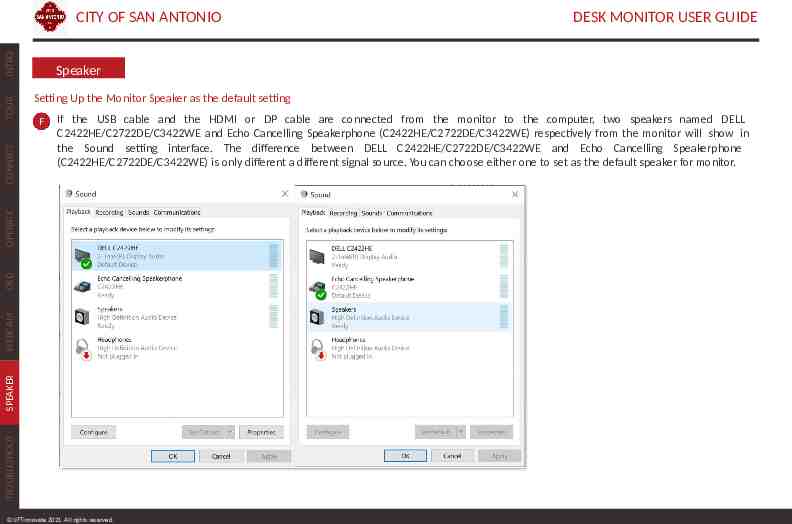
DESK MONITOR USER GUIDE Speaker Setting Up the Monitor Speaker as the default setting F If the USB cable and the HDMI or DP cable are connected from the monitor to the computer, two speakers named DELL C2422HE/C2722DE/C3422WE and Echo Cancelling Speakerphone (C2422HE/C2722DE/C3422WE) respectively from the monitor will show in the Sound setting interface. The difference between DELL C2422HE/C2722DE/C3422WE and Echo Cancelling Speakerphone (C2422HE/C2722DE/C3422WE) is only different a different signal source. You can choose either one to set as the default speaker for monitor. TROUBLESHOOT SPEAKER WEBCAM OSD OPERATE CONNECT TOUR INTRO CITY OF SAN ANTONIO LIFTinnovate 2021. All rights reserved.
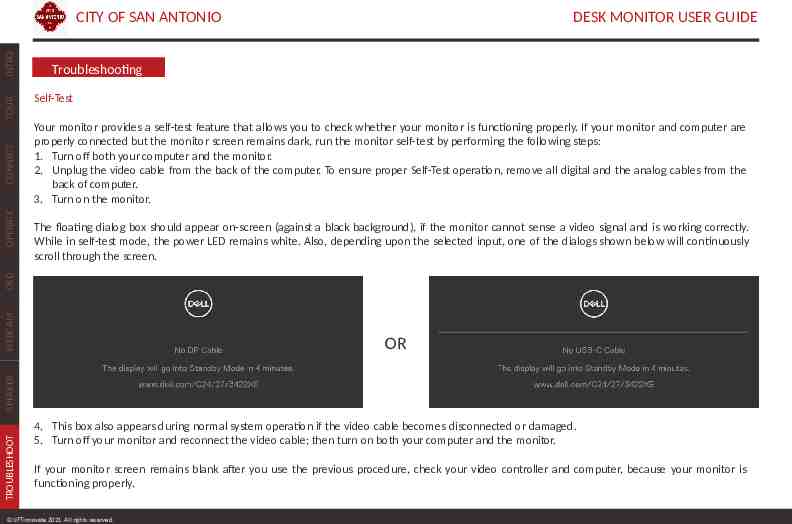
DESK MONITOR USER GUIDE Troubleshooting Self-Test Your monitor provides a self-test feature that allows you to check whether your monitor is functioning properly. If your monitor and computer are properly connected but the monitor screen remains dark, run the monitor self-test by performing the following steps: 1. Turn off both your computer and the monitor. 2. Unplug the video cable from the back of the computer. To ensure proper Self-Test operation, remove all digital and the analog cables from the back of computer. 3. Turn on the monitor. The floating dialog box should appear on-screen (against a black background), if the monitor cannot sense a video signal and is working correctly. While in self-test mode, the power LED remains white. Also, depending upon the selected input, one of the dialogs shown below will continuously scroll through the screen. WEBCAM OSD OPERATE CONNECT TOUR INTRO CITY OF SAN ANTONIO TROUBLESHOOT SPEAKER OR 4. This box also appears during normal system operation if the video cable becomes disconnected or damaged. 5. Turn off your monitor and reconnect the video cable; then turn on both your computer and the monitor. If your monitor screen remains blank after you use the previous procedure, check your video controller and computer, because your monitor is functioning properly. LIFTinnovate 2021. All rights reserved.
DESK MONITOR USER GUIDE Troubleshooting Built-in diagnostics Your monitor has a built-in diagnostic tool that helps you determine if the screen abnormality you are experiencing is an inherent problem with your monitor or with your computer and video card. To run the built-in diagnostics: 1. Ensure the screen is clean (no dust particles on the surface of the screen). 2. Press and hold Up or Down or Left or Right direction for four seconds until a menu appears on the screen. 3. Using the joystick control, highlight the Diagnostics option, and press the joystick button to start the diagnostics. A gray screen is displayed. 4. Observe if the screen has any defects or abnormalities. 5. Toggle the joystick once again until a red screen is displayed. 6. Observe if the screen has any defects or abnormalities. 7. Repeat steps 5 and 6 until the screen displayed green, blue, black, and white colors. Note any abnormalities or defects. The test is complete when a text screen is displayed. To exit, toggle the joystick control again. If you do not detect any screen abnormalities upon using the built-in diagnostic tool, the monitor is functioning properly. Check the video card and computer. TROUBLESHOOT SPEAKER WEBCAM OSD OPERATE CONNECT TOUR INTRO CITY OF SAN ANTONIO LIFTinnovate 2021. All rights reserved.