Crane Safety


68 Slides1.93 MB
Crane Safety
Hurt at Work You've carefully thought out all the angles. You've done it a thousand times. It comes naturally to you. You know what you're doing, its what you've been trained to do your whole life. Nothing could possibly go wrong, right ?
Think Again!
APPLICABLE REGULATIONS 29CFR - Safety and Health Standards 1910 - Industrial Safety 179 - Overhead and Gantry Cranes ACME CRANE JIB CRANE 2 TON
APPLICABLE REGULATIONS 29CFR - Safety and Health Standards 1910 - Industrial Safety 184 - Slings VERTICAL CHOKER HITCH BASKET HITCH
APPLICABLE REGULATIONS 29CFR - Safety and Health Standards 1926 - Construction Safety 550 - Cranes and Derricks 20 TON CAPACITY GANTRY CRANE
INDUSTRY CONSENSUS STANDARDS ANSI/ASME* - B-30 Series Safety Requirements for Cranes, Derricks, Hoists, Jacks, and Slings CMAA** - Specifications No. 70 and 74 - Crane Operator’s Manual * American National Standards Institute * American Society of Mechanical Engineers ** Crane Manufacturer’s Association of America
INDUSTRY CONSENSUS STANDARDS ANSI/ASME B- 30.2 B- 30.9 B- 30.10 B- 30.11 B- 30.13 B- 30.16 B- 30.17 B- 30.18 B- 30.21 Overhead and Gantry Cranes (top running hoist) Slings Hooks Monorail and Underhung Cranes Storage/Retrieval (S/R) Machines Overhead Hoists (underhung) Overhead and Gantry Cranes (underhung hoist) Stacker Cranes Manually Lever Operated Hoists
PROGRAM ELEMENTS PROGRAM ELEMENTS INCLUDE: Site Safety Rules. Periodic Training. Inspection Program. Maintenance Program. Operating Safety Rules. Control of Hazardous Energy Sources. CRANE SAFETY
TYPES OF CRANES AND HOISTS ACME CRANE 2 TON INDOOR BRIDGE CRANE
TYPES OF CRANES AND HOISTS 20 TON CAPACITY GANTRY CRANE
TYPES OF CRANES AND HOISTS ACME CRANE 2 TON JIB CRANE
TYPES OF CRANES AND HOISTS ACME CRANE 2 TON MONORAIL CRANE
INSPECTION, TESTING & MAINTENANCE Documentation: 1. 2. 3. 4. 5. Identify items that were inspected. Show the status of the inspected items. Provide the signature of the inspector. Show the date. File it and maintain it! REVIEW THE MANUFACTURERS SPECIFIC INSPECTION REQUIREMENTS! INSPECTION CHECKLIST FOR CRANES
INSPECTION, TESTING & MAINTENANCE Start of Each Shift: 1. Visually Inspect all units for integrity, leaks etc. 2. Check the operation of the crane; controls & movement. 3. Operate empty hook till it actuates the upper limit switch. 4. Operate hoist and trolley brakes, ensure no excessive coasting. 5. Check for twisted, broken or kinked cables or chains. 6. Observe correct drum spooling as the hook is raised. 7. Inspect for deformed, cracked, or stretched hooks. 8. Inspect for serviceable safety latches. 9. Check for air or hydraulic fluid leakage. 10. Check for load capacity stenciling on both sides of unit. REVIEW THE MANUFACTURERS SPECIFIC INSPECTION REQUIREMENTS!
INSPECTION, TESTING & MAINTENANCE Monthly Inspections: 1. 2. 3. 4. 5. 6. Visually Inspect all critical items. Measure hooks for deformation or stretching. Inspect hooks for cracks, missing or broken parts. Measure lifting chains for excessive stretch, twisting etc. Inspect for twisted, broken or kinked cables or chains. Follow any additional recommendations of the manufacturer. REVIEW THE MANUFACTURERS SPECIFIC INSPECTION REQUIREMENTS!
INSPECTION, TESTING & MAINTENANCE Periodic Inspections (1 to 12 Month Intervals): 1. 2. 3. 4. Interval dependant on the type of activity performed. Interval dependant on the severity of service. Interval dependant on the environmental conditions. As a minimum the inspection should cover: Chain or cable Electrification Brakes Rails Warning Devices Reeving Hoist Drives Limit Switches Balance End Stops Hook Condition Travel Drives Couplings Controls Signage REVIEW THE MANUFACTURERS SPECIFIC INSPECTION REQUIREMENTS!
INSPECTION, TESTING & MAINTENANCE Periodic CMAA Inspection Recommendations: Class A B C D E F Description Typical Schedule Standby or infrequent service Light service - 2-5 lifts hr. Moderate service - 50% capacity, 5-10 lifts hr. Heavy service - 50% capacity, 10-20 lifts hr. Severe service - Near capacity, 20 lifts hr. Continuous severe service - Near capacity and continuous service throughout day Annually Annually Annually Semiannually Quarterly Bi-monthly DIFFERENT CONDITIONS MAY SUGGEST DIFFERENT INTERVALS. REVIEW THE MANUFACTURERS SPECIFIC INSPECTION REQUIREMENTS!
INSPECTION, TESTING & MAINTENANCE New Cranes: Prior to initial use, cranes must be tested and inspected completely using the criteria applicable to periodic inspections. A report should be kept on file for future reference. REVIEW THE MANUFACTURERS SPECIFIC INSPECTION REQUIREMENTS!
INSPECTION, TESTING & MAINTENANCE Idle Cranes: Cranes that have been idle for a period that exceeds six months must be inspected and tested before being placed back in service using the criteria that applies to periodic inspection. Special attention should be given to the hook, lifting chain and wire rope. REVIEW THE MANUFACTURERS SPECIFIC INSPECTION REQUIREMENTS!
INSPECTION, TESTING & MAINTENANCE Altered Cranes: All cranes that have been extensively altered or repaired must be completely inspected and tested. If load sustaining parts have been altered or repaired, then a load test should be conducted to verify the rated load capacity of the crane. A report should be issued by a qualified person and kept on file for future reference. REVIEW THE MANUFACTURERS SPECIFIC INSPECTION REQUIREMENTS!
INSPECTION, TESTING & MAINTENANCE Load Testing a New Crane: New and rebuilt hoist are load tested by the manufacturer at the factory. Most manufacturers will furnish load test certificates for a nominal charge. REVIEW THE MANUFACTURERS SPECIFIC INSPECTION REQUIREMENTS!
INSPECTION, TESTING & MAINTENANCE Load Testing a Used Crane: When load testing a used crane, the test load cannot exceed 125 percent of the rated load unless otherwise recommended by the manufacturer. The hoist, trolley and crane should be operated a number of times at various positions. The test load should be transported by the trolley and bridge over the full length of the crane. A report should be issued by the testing organization giving the conditions under which the system was load tested. REVIEW THE MANUFACTURERS SPECIFIC INSPECTION REQUIREMENTS!
INSPECTION, TESTING & MAINTENANCE Preventive Maintenance Should Cover: 1. 2. 3. 4. 5. 6. 7. 8. 9. Cleaning and lubricating the wire rope (cable) and load chain. Adjusting the brakes. Checking and filling the gear cases to the proper levels. Replacing any contaminated oils. Lubricating the bearings, gears, pinions, linkages, shafts, etc. Adjusting the operation of limit switches. Cleaning or replacing pitted or burned electrical contacts. Cleaning or replacing the air and fluid filters. Inspecting the operation of all controls and warning systems. REVIEW THE MANUFACTURERS SPECIFIC INSPECTION REQUIREMENTS!
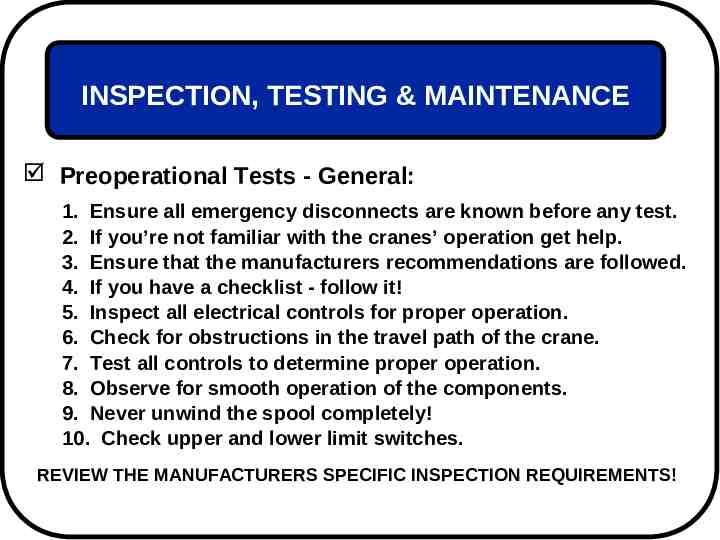
INSPECTION, TESTING & MAINTENANCE Preoperational Tests - General: 1. Ensure all emergency disconnects are known before any test. 2. If you’re not familiar with the cranes’ operation get help. 3. Ensure that the manufacturers recommendations are followed. 4. If you have a checklist - follow it! 5. Inspect all electrical controls for proper operation. 6. Check for obstructions in the travel path of the crane. 7. Test all controls to determine proper operation. 8. Observe for smooth operation of the components. 9. Never unwind the spool completely! 10. Check upper and lower limit switches. REVIEW THE MANUFACTURERS SPECIFIC INSPECTION REQUIREMENTS!
INSPECTION, TESTING & MAINTENANCE Preoperational Tests - Hooks: 1. 2. 3. 4. 5. 6. Replace if deformation or cracks are found. Check for proper function of the safety latch. Inspect for twists from the plane of the unbent hook. Check for proper swivel. Hook repair is generally not recommended. Emergency hook repair must be performed only under competent supervision. 7. After any hook repairs, the hook must be load tested before being returned to normal service. REVIEW THE MANUFACTURERS SPECIFIC INSPECTION REQUIREMENTS!
INSPECTION, TESTING & MAINTENANCE Preoperational Tests - Rope: 1. 2. 3. 4. 5. Reduction in rope diameter (replace if found). Broken or worn outside wires. Corroded or broken wires at end of connections. Severe kinking, crushing, cutting or unstranding. Corroded, cracked, bent, worn, or improperly applied end connections. REVIEW THE MANUFACTURERS SPECIFIC INSPECTION REQUIREMENTS!
INSPECTION, TESTING & MAINTENANCE Lock-Out Tag-Out Considerations: 1. 2. 3. 4. 5. DANGER LOCKED OUT Review requirements for the individual crane. Integrate lock out and maintenance requirements. Ensure training in adequate for level of maintenance. Ensure written programs are established and reviewed. Carefully select lockout devices, ask the manufacturer for recommendations. 6. Do not necessarily assume devices are interchangeable between different types of cranes. DON’T OPERATE This Lock/Tag may only be removed by NAME: DEPT : COMPLETION DATE: TIME: REVIEW THE MANUFACTURERS SPECIFIC INSPECTION REQUIREMENTS!
BASICS OF CRANE SAFETY KNOW THE RATED LOAD OF THE CRANE ACME CRANE 10 TON CAPACITY 2 TON 10 TON CAP. 10 TON ALWAYS CHECK LOAD RATING
BASICS OF CRANE SAFETY KNOW THE RATED LOAD OF THE CRANE 5 TON 2 TON 10 TON LOAD ALWAYS ENSURE THE LIFTING DEVICE AND ALL SUPPORTING COMPONENTS ARE RATED FOR THE LOAD TO BE LIFTED!
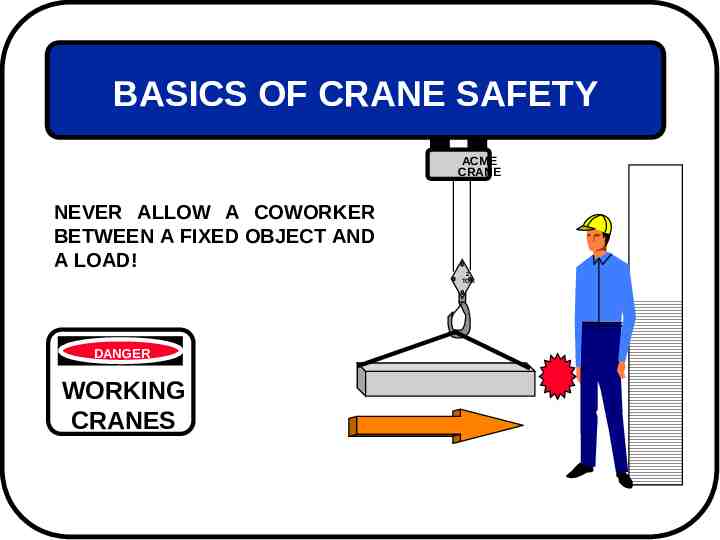
BASICS OF CRANE SAFETY ACME CRANE NEVER ALLOW A COWORKER BETWEEN A FIXED OBJECT AND A LOAD! DANGER WORKING CRANES 2 TON
BASICS OF CRANE SAFETY THINK BEFORE YOU LIFT ACME CRANE ALWAYS POSITION LIFTING DEVICE DIRECTLY OVER LOAD BEFORE LIFTING! 2 TON
BASICS OF CRANE SAFETY KNOW YOUR SAFE WORKING RADIUS Always Ensure That You Know the Safe Travel Radius of the Crane. Contact With Electrical Sources or Other Hazards Can Result in Catastrophic Consequences.
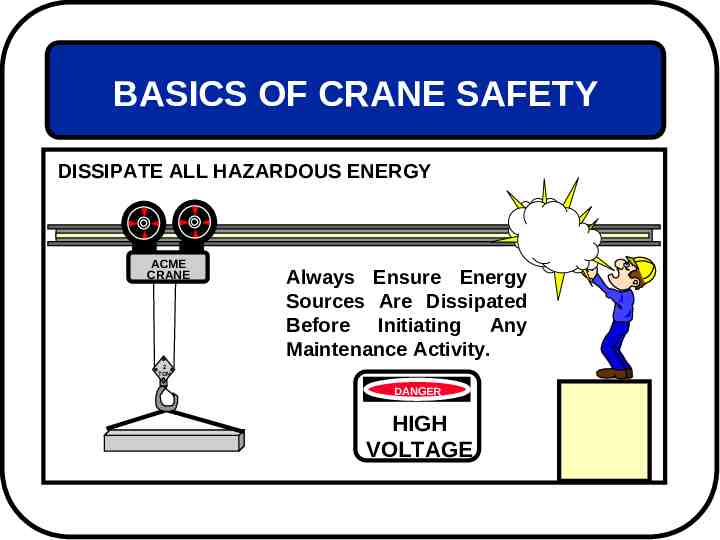
BASICS OF CRANE SAFETY DISSIPATE ALL HAZARDOUS ENERGY ACME CRANE Always Ensure Energy Sources Are Dissipated Before Initiating Any Maintenance Activity. 2 TON DANGER HIGH VOLTAGE
BASICS OF CRANE SAFETY Lifting operations are inherently dangerous. Even when proper training is conducted, Equipment is properly maintained, Employees conduct themselves in a safe manner, and other facets of the safety program are conscientiously attended to, accidents can still occur. The reason is that crane operations are primarily dependant on mechanical devices. These devices can and do fail. When this happens during a lifting event the results can be catastrophic. You are the only controlling influence that can minimize the hazard. Your life literally is in your own hands!
Crane Accident
BASICS OF CRANE SAFETY Safe Practices for Operators: Test all hoist controls and brakes at the beginning of each shift. Never attempt to operate a crane or hoist that is suspected to be unsafe. Always test brakes by a short lift to ensure control. Move loads only after being signaled by the designated, qualified signaler.
BASICS OF CRANE SAFETY Safe Practices for Operators (continued) Never carry loads over workers. Never carry loads past workers (they must yield right of way). Signalers must keep line-of-sight with the operator. Never allow riders on loads or hooks. Never allow unauthorized persons to operate cranes. Always lockout before maintenance or repairing cranes. Frequently inspect cranes exposed to adverse conditions.
BASICS OF CRANE SAFETY Safe Practices for Operators (continued) Always position the hook directly over the load before lifting the load off of the floor. Document and maintain inspection records. Check warning devices and signals before use. Signalers must watch the load. Operators must watch the signalers. Know your travel path in advance of the lift! Know where you’re going to set the load down! Will the new location support the weight?
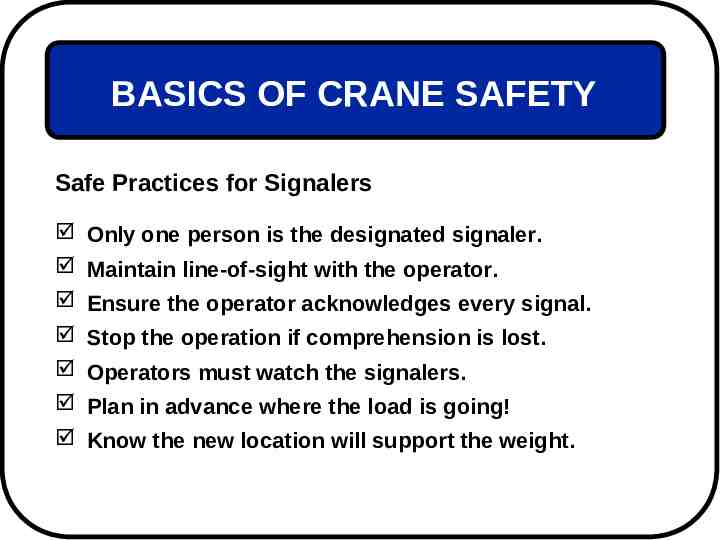
BASICS OF CRANE SAFETY Safe Practices for Signalers Only one person is the designated signaler. Maintain line-of-sight with the operator. Ensure the operator acknowledges every signal. Stop the operation if comprehension is lost. Operators must watch the signalers. Plan in advance where the load is going! Know the new location will support the weight.
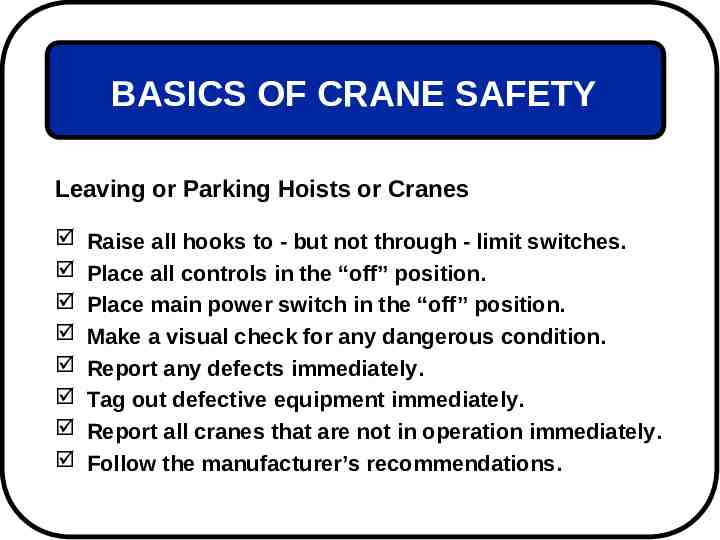
BASICS OF CRANE SAFETY Leaving or Parking Hoists or Cranes Raise all hooks to - but not through - limit switches. Place all controls in the “off” position. Place main power switch in the “off” position. Make a visual check for any dangerous condition. Report any defects immediately. Tag out defective equipment immediately. Report all cranes that are not in operation immediately. Follow the manufacturer’s recommendations.
HANDLING THE LOAD Lifting Factors Size, Weight, and Center of Gravity of the Load. The Number of Sling Legs. The Angle the Sling Makes With the Horizontal Line. The Rated Capacity of the Sling. The History of the Care and Usage of the Sling. DANGER WORKING CRANES
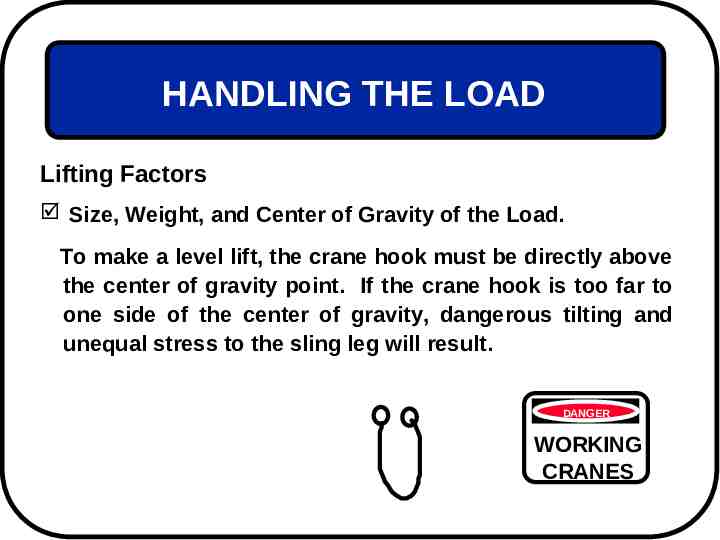
HANDLING THE LOAD Lifting Factors Size, Weight, and Center of Gravity of the Load. To make a level lift, the crane hook must be directly above the center of gravity point. If the crane hook is too far to one side of the center of gravity, dangerous tilting and unequal stress to the sling leg will result. DANGER WORKING CRANES
HANDLING THE LOAD Lifting Factors Number of Legs and Angle with the Horizontal. As the angle formed by the sling leg and the horizontal line decreases, the rated capacity of the sling also decreases. 1000lb 1000lb 1000lb
HANDLING THE LOAD Lifting Factors Rated Capacity of the Sling. The rated capacity varies depending upon the type of the sling, the size of the sling, and type of hitch. Consult with the manufacturer. Also, older slings must be used with additional caution. Sling charts are generally based on new sling usage.
HANDLING THE LOAD Lifting Factors History of Care and Usage. Mishandling and misuse of sling are the leading cause of sling-related accidents. Proper care is essential for maximum service and safety. Always protect slings with cover saddles, burlap padding or wood blocking to prevent sharp bends and cutting edges.
HANDLING THE LOAD Estimating Weight of Load DANGER Use a Dynamometer. WORKING Check shipping papers. CRANES Check nomenclature plates. Use industry standard tables or charts. Consult with the equipment manufacturer. Estimate weight using weights of similar loads. Never attempt a load lift based solely on a guess! Stay within 50% of the cranes rated capacity when estimating loads (or manufacturer recommendation).
HANDLING THE LOAD Types of Rigging and Slings Chains. Wire Rope. Fiber Rope. Synthetic Web. Cargo Nets. EACH TYPE HAS ADVANTAGES AND DISADVANTAGES!
HANDLING THE LOAD Types of Rigging and Slings Consult with the sling manufacturer concerning load capacities, usage methods, restrictions and other pertinent data for specific types of slings.
HANDLING THE LOAD Working Rules for Slings Never load in excess of the rated capacity. Never use a sling that is damaged in any way. Never pull a sling from a suspended load under tension. Never shorten with knots, bolts or other makeshift devices. Always keep suspended loads clear of employees. Always keep suspended loads clear of all obstructions. Always keep hands and fingers clear of untensioned loads. Always pad or protect slings from sharp edges of the load. Always think before you affect a load.
HANDLING THE LOAD Inspection Procedures for Wire Rope Slings Remove from service if you find: 1. 2. 3. 4. 5. 6. Ten randomly distributed broken wires in one lay. Five broken wires in one strand in one lay. Kinking, crushing, bird caging or any other damage. Evidence of heat damage. Any end attachments cracked, deformed or worn. Hooks that have been opened more than 15% of the normal throat opening or twisted more than 10% from the plane of the unbent hook.
HANDLING THE LOAD Inspection Procedures for Alloy Steel Chain Slings Remove from service if you find: 1. 2. 3. 4. 5. 6. Defective or questionable welds. Bending or elongation of chain links. Cracked or deformed master and coupling links. Missing or removed identification tags. Any end attachments cracked, deformed or worn. Any other reason to suspect an unsafe condition.
HANDLING THE LOAD Inspection Procedures for Synthetic Web Slings Remove from service if you find: 1. 2. 3. 4. 5. 6. Acid or caustic burns. Age deterioration (drying out cracking etc.). Melting or charring of the sling surface. Snags, tears or cuts causing exposure of colored thread. Missing or removed identification tags. Any other reason to suspect an unsafe condition.
HANDLING THE LOAD After the Lift is Completed: Clean the sling. Check for damage. Follow proper storage rules. Leave in proper condition for the next lift. Don’t wait to report damaged or defective slings. Follow proper disposal or replacement procedures. DANGER WORKING CRANES
HANDLING THE LOAD Storage Rules for Slings Store Slings: In a dry environment out of direct sunlight. Off of the floor or ground to prevent corrosion. Hung from hooks to prevent tangling and easy access. Away from electrical sources. By type - i.e. don’t mix steel chain slings with synthetics. In a controlled area. DANGER WORKING CRANES
HANDLING THE LOAD Sling Angles: Consult with the sling manufacturer concerning how sling angles affect load capacities for different types of slings. 1000lb 1000lb 1000lb
HANDLING THE LOAD Sling Angles: The angle the sling is hung affects the sling load capacity. The greater the sling angle the greater the stress. Multiple sling usage drastically affects load capacity. The type of sling used is a factor. Consult with the sling manufacturer for proper usage. 1000lb 1000lb 1000lb
HANDLING THE LOAD Sling Angle With Vertical Stresses Per Sling Leg Per 1000 lbs Total Load 0 5 10 15 20 25 30 35 40 45 50 55 60 80 500 502 508 518 532 552 577 610 653 707 778 872 1000 2880 577lbs 577lbs 30 1000lb 30 Angle
HANDLING THE LOAD Sling Angles: 707lbs 707lbs 1000lbs 1000lbs 1000lb 1000lb 45 Angle 60 Angle
HANDLING THE LOAD Sling Angles: 500lbs THE USE OF TWO SLINGS, EACH SUPPORTING THE SAME AMOUNT OF WEIGHT AND HAVING THE SAME SUPPORT ANGLE RESULTS IN EQUAL DISTRIBUTION OF THE LOAD WEIGHT. 500lbs 1000lb 0 Angle
HANDLING THE LOAD Protecting Slings: Protect Slings Against Sharp Edges Protect Slings Against Sharp Edges
STANDARD HAND SIGNALS Hoist Load: Forearm Vertical Forefinger Pointing Up Move Hand in Small Horizontal Circular Motion
STANDARD HAND SIGNALS Lower Load: Arm Downward Forefinger Pointing Down Move Hand in Small Horizontal Circular Motion
STANDARD HAND SIGNALS Bridge Travel: Arm Extended Forward Hand Open and Slightly Raised Make Pushing Motion in the Direction of Travel
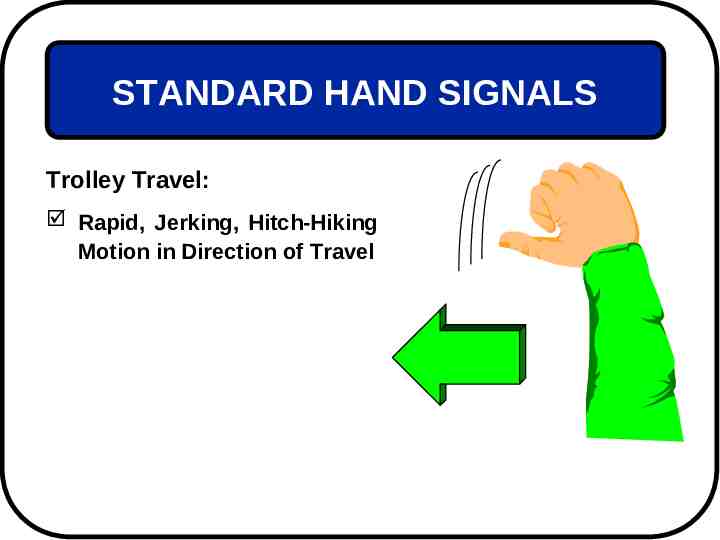
STANDARD HAND SIGNALS Trolley Travel: Rapid, Jerking, Hitch-Hiking Motion in Direction of Travel
STANDARD HAND SIGNALS Stop: Arm Extended Palm Down Move Arm Sideways, Rapidly Back and Forth
STANDARD HAND SIGNALS Emergency Stop: Both Arms Extended Palms Down Move Both Arms Sideways Rapidly Back and Forth
PROTECTIVE EQUIPMENT Protective Clothing and Equipment Considerations: Appropriate for the particular hazard(s) Maintained in good condition Properly stored when not in use Kept clean, fully functional, and sanitary