Commercial Card Expense Reporting (CCER) The Trustees of Roanoke


52 Slides4.33 MB
Commercial Card Expense Reporting (CCER) The Trustees of Roanoke College An internet solution Accessed via Wells Fargo’s secure Commercial Electronic Office (CEO) portal
Commercial Card Expense Reporting (CCER) What is it? CCER is an internet reporting solution that allows on-line access to your card transactions at any time, from any location. It is accessed via Wells Fargo’s secure Commercial Electronic Office (CEO ) portal. Cardholders can: Review/reclassify transactions Input a business description for all transactions Split transactions Approvers can: Review/approve cardholder statements View statement summary reports 2
To get started After receiving your card Activate your card by calling the toll free number located on the activation sticker During activation you will need your Unique Identification Number (ID) - if you do not know your Unique ID, please contact your internal Program Administrator to obtain During activation you will be asked to create a customized Personal Identification Number (PIN) Sign the back of your card Record the Wells Fargo Customer Service number (1-800-932-0036) located on the back of your card in your mobile device, or address book Sign on to the CEO and initialize your CEO User ID 3
Chip and PIN Card Information To enhance the security of your credit card purchases, your new commercial card features chip and personal identification number (PIN) technology, in addition to a magnetic stripe. With this card, you will have added identity verification and more flexibility at chip-enabled and traditional magnetic stripe terminals. Please review the important information below to help you get started with your new card. About chip-enabled cards Over the next year, U.S. merchants will begin using terminals that accept chip-enabled credit cards. Until then, you may use your card by swiping at the point of sale, just as you do today. As chip-enabled terminals are already being used internationally, you may use your card to complete chipenabled transactions in Europe, Asia, South America, and Canada. Getting started with your new card 1. To activate your card, you will need your unique identification (ID) number. If you do not know your unique ID, please contact your program administrator. 2. Activate your new card immediately by calling 1-800-932-0036, 24 hours a day, 7 days a week. When dialing from outside the U.S. or Canada, dial 001-800-932-0036. This is not a toll-free number when calling internationally. If you need help internationally, please call customer service collect at 1-612-332-2224. 3. When you activate your card, you will select a personal identification number (PIN). Use this PIN for chip-enabled transactions when prompted by the terminal. This same PIN will be used for cash advances, if you are authorized to make them. Depending on the terminal set-up, you may be prompted to provide your signature instead of your PIN. Once activated, the card is ready for use at either mag stripe terminals or chip enabled terminals. 4. If you forget or need to change your PIN, call the WellsOne Service Center at 1-800-932-0036, option 2, option 1.2. 4
New User Sign On Sequence of steps Sign on to the Commercial Electronic Office (CEO ) using your temporary password Change your password Set up your secret questions Read and accept the CEO Terms of Use Confirm your profile information 5
Wells Fargo home page wellsfargo.com 6
CEO portal sign-on website https://wellsoffice.wellsfargo.com Enter your: Company ID TRUST898 User ID Unique to user Password Unique to User Company ID, User ID and Password are not case sensitive To change or reset your password, click the Forgot Password? link. If you incorrectly enter your password twice in the same session, you will automatically be taken to the Change Your Password page. 7
Change your password 8
Set up your secret questions 9
Read and accept the CEO Terms of Use 10
Confirm your profile Contact Information Enter your email and phone information; Save, then Continue 11
12
CEO home page Click the link for Commercial Card Expense Reporting. A separate browser window opens and displays the CCER service Click on Support to register for free online CEO product training Click on Help for assistance and training To automatically display CCER when you sign on to the CEO portal, click the link for your user name to set up Automatic Access On the profile page, click the Edit link under Preferences Set Automatic Access to the desired setting and click Save 13
Cardholder experience
Cardholder review period Review your company’s unique CCER statement cycle, and Reminder and Grace Periods within the Cardholder Summary located at the top of the Review Open Statements and View Cycle-to-Date screens An email will be sent out to Cardholders (and Reconcilers) when the current statement cycle has ended, indicating that the statement can be submitted for approval (Statement Reviewed). If the statement end date falls on a weekend, the email will be sent the following Tuesday. If the Cardholder (or Reconciler) has not reviewed and submitted the statement after 3 calendar days, a reminder email will be sent out. Cardholders and Reconcilers will have an additional 2 days grace to complete the review. If you are on vacation or do not have online access, contact your Program Administrator. 15
E-Mail notification Cardholder statement ready for review Statement review for 05/31/20XX Dear Cardholder: Your most recent statement is ready for review by accessing the Wells Fargo Commercial Card Expense Reporting system for the following card(s): xxxx-xxxx-xxxx-1234 Please complete your review in a timely manner and forward your receipts as appropriate. This is an automated email. Please do not reply to this message. 16
Cardholder home page Manage Statements – Review Open Statements The Statement Reviewed button (which submits the expense report to the Approver) will only be available in Review Open Statements Review open statements (default screen for cardholders) will become available when your company has reached the statement End Date Finalize the statement during the review period 17
Manage Statements View Previous Statements – 13 month history 18
Manage Statements View Cycle-to-Date Transactions Transactions appear on your statement as they are posted through the system To view Real-Time Authorizations, click on the View Pending Charges link 19
If a vendor transmits additional details with the transaction, the merchant name is red and underlined Select the merchant name to access the detail screen 20
Available functionality includes: Reclassify - allocate an entire transaction and add a description Add Descriptions - provide transaction details Split and Reclassify - divide a transaction multiple ways and add descriptions Dispute - dispute a transaction 21
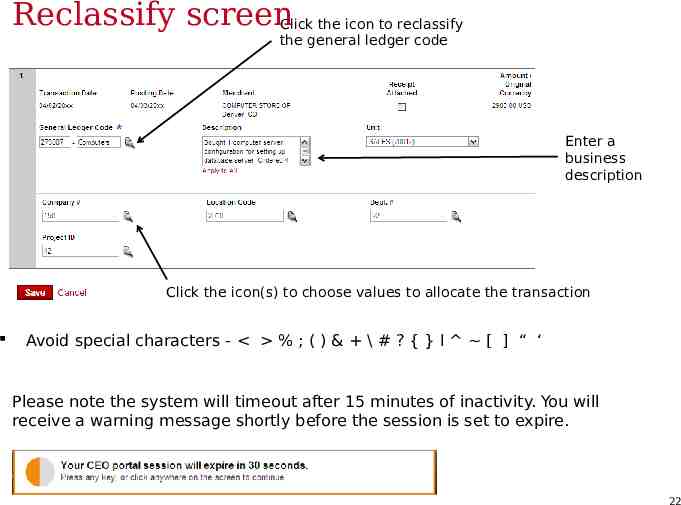
Reclassify screenClick the icon to reclassify the general ledger code Enter a business description Click the icon(s) to choose values to allocate the transaction Avoid special characters - % ; ( ) & \ # ? { } I [ ] “ ‘ Please note the system will timeout after 15 minutes of inactivity. You will receive a warning message shortly before the session is set to expire. 22
Reclassify screen 23
Add description screen Add a transaction description (can be up to 200 characters) Click the Apply to All link to apply the same description to all selected charges Provide name of guests entertained (if applicable) Adhere to company policy Avoid special characters - % ; ( ) & \ # ? { } I [ ] “ ‘ 24
Split and reclassify screen Divide and reallocate a transaction into multiple entries Split by amount or by percentage Select add to create a new row and begin the split process 25
Dispute transaction screen Contact the vendor FIRST to try and get a refund or correction If unresolved after working directly with the vendor, complete the online (or paper) form Notify program administrator of dispute You have 60 days from the posting date to dispute a transaction Additional supporting information may be requested Call the service center if there are unrecognized transactions or suspected fraud 26
Complete your review Select statement reviewed and a message box appears indicating that an email will be sent to your approver Select cover sheet option on the “print” drop-down menu to print the cover sheet for this statement. Email or fax in receipts with the coversheet, or upload receipts via CEO Mobile 27
Receipt Imaging Cover Sheet 866-xxx-xxxx wf ccard [email protected] Make sure the cover sheet pertains to the correct statement period. Receipts may be submitted in one of three ways: 1. Email User emails a single PDF containing the cover sheet at the beginning followed by the receipts for that statement period, or the User emails a set of attachments containing images in any of the following types and includes the cover sheet as one of the attachments (PDF, JPG, GIF, TIF, PNG, BMP) 2. Fax Fax the cover sheet and receipts for the statement period to the 800 number provided 3. CEO Mobile Application Users may select which statement to upload (the two most recent statements periods will be available), or click the upload receipts link directly, and then select the statement Email Best Practices: - Make sure attachments are sent in one of the 6 accepted file types. - Make sure the bar codes on the cover sheet are clear and easy to read. - Do not include email signature lines or logos - Emails configured in plain text format have a better success rate. - A maximum of 5MB per file attachment is recommended. The maximum allowable size for an email and all attachments is 25MB. Receipts may be submitted in batches throughout the statement cycle, or in one batch at the end of the statement review process 28
CCER access via CEO Mobile CEO Mobile Service Access via the browser on your mobile device using your Company ID, User ID and Password at: https://ceomobile.wellsfargo.com Download the CEO Mobile iPhone app from the Apple App Store at https:// itunes.apple.com/us/app/wells-fargo-ceo-mobile/id335685323? mt 8 Download the CEO Mobile Android app from the Google Play Store at https:// play.google.com/store/search?q Wells%20Fargo This link only works when viewed on an Android device An online video can be viewed at: http:// wholesale.wellsfargobank.com/ceomobile card-management Cardholders can: Add/edit out-of-pocket expenses View available credit View posted card charges View declines Upload receipts OOP Only Users can: Add/edit out-of-pocket expenses Upload receipts 29
Mobile Receipt Imaging Getting started Start the upload process – Select which statement to upload into, and then tap Receipts under the Upload section – Or tap Receipts directly, and then select the statement The two most recent statement periods will be available for selection 30
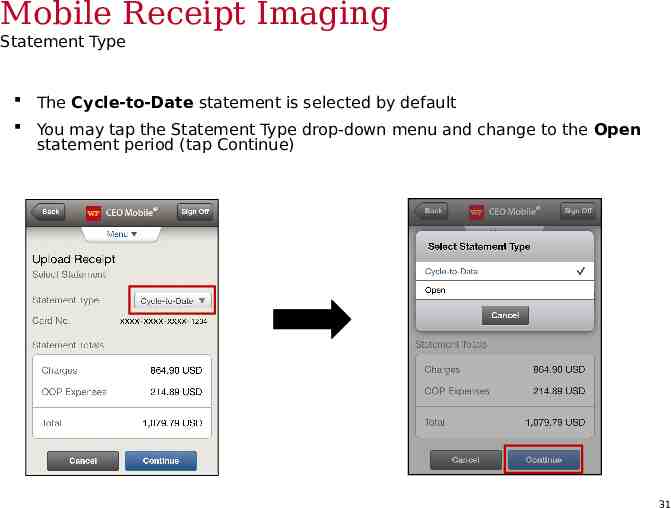
Mobile Receipt Imaging Statement Type The Cycle-to-Date statement is selected by default You may tap the Statement Type drop-down menu and change to the Open statement period (tap Continue) 31
Mobile Receipt Imaging Take a photo, or select receipt images from the gallery After selecting Continue, hold the camera over the receipt and tap the camera icon to take a photo (there will be an option to Use or Retake the image) Tap the photo gallery icon to upload up to 5 images from the photo gallery (select Done when finished) On the Verify Receipt Upload page, tap the Add link to upload additional images Slide the Email Confirmation to YES to receive an email confirming the action taken (this does not guarantee the receipts will be successfully processed) Tap Submit when finished 32
Mobile Receipt Imaging Confirmation and processing A confirmation page will confirm that images were successfully uploaded (tap Done, then OK) – This again does not guarantee the images will be successfully processed – An email will be sent to you noting any image upload failures 33
Receipt Imaging Viewing Images View images by clicking the “view receipt images” link found on the open statements, cycle-to-date, and previous statement screens Print cover sheets for prior statements on the view previous statement screen View historical images for up to seven years via “view historical images” Select statement period and click view, then click view receipts 34
CCER access via CEO Mobile CEO Mobile Service Access via the browser on your mobile device using your Company ID, User ID and Password at: https://ceomobile.wellsfargo.com Download the CEO Mobile iPhone app from the Apple App Store at https:// itunes.apple.com/us/app/wells-fargo-ceo-mobile/id335685323? mt 8 Download the CEO Mobile Android app from the Google Play Store at https:// play.google.com/store/search?q Wells%20Fargo This link only works when viewed on an Android device An online video can be viewed at: http:// wholesale.wellsfargobank.com/ceomobile card-management Cardholders can: View available credit View posted card charges View declines 35
Reports Run transaction reports with various filters You are notified via e-mail when the report is ready View declined transactions to determine the reason for the decline Declines do not appear in real time, they will be displayed within 48 hours 36
Personal profile Click on link to Manage Alerts Billing address for online and phone orders You can also contact the WellsOne Service Center 24/7 at 1-800-932-0036 to obtain available credit. Must provide Unique ID to obtain any information Click to retrieve current available credit 37
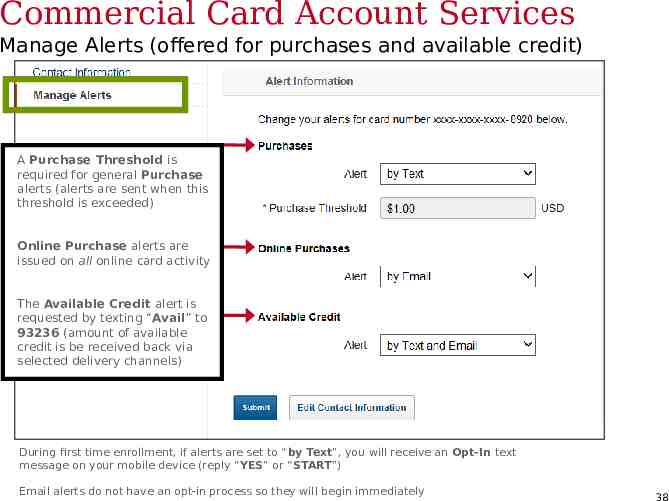
Commercial Card Account Services Manage Alerts (offered for purchases and available credit) A Purchase Threshold is required for general Purchase alerts (alerts are sent when this threshold is exceeded) Online Purchase alerts are issued on all online card activity The Available Credit alert is requested by texting “Avail” to 93236 (amount of available credit is be received back via selected delivery channels) During first time enrollment, if alerts are set to “by Text”, you will receive an Opt-In text message on your mobile device (reply “YES” or “START”) Email alerts do not have an opt-in process so they will begin immediately 38
3D Secure – Verified by Visa / MasterCard SecureCode What is 3-D Secure: 3-D Secure is the industry name for Verified by Visa and MasterCard SecureCode. 3-D Secure technology secures online transactions using an additional level of cardholder authentication. With the introduction of Chip and PIN cards, fraud is increasingly moving online. International and now U.S. internet merchants are beginning to require 3-D Secure to complete transactions. How it works: Cardholders must register their cards online prior to completing their purchase at a 3-D Secure enabled merchant. As part of the registration process, you will need to provide correct answers to 3 identity authentication questions. You will then create a personal passcode to be used for future purchases. Once enrolled, you will be prompted to input your personal passcode during the checkout process at 3-D Secure enabled merchants. How to Enroll: In order to enroll in this free, online security service, cardholders must: Register their card at: https://www.wellsfargo.com/com/fraud/payments fraud/online-purchase-protection. During the registration process you will be asked to provide the last 4 digits of your Unique ID, your monthly credit limit, and the zip code tied to your card to verify your identity (all information may be found in your personal profile). Once this has been provided, you will create a personal passcode to be used when making online purchases with participating merchants. 39
Cardholder Responsibility Collect receipts to verify purchases for auditing Watch for unauthorized transactions on your statement and report/dispute them immediately Dispute any incorrect charges with the vendor directly before filing an online or paper dispute form Complete your reconciliation by the due date Keep the card (and card number) confidential 40
Contact information WellsOne Service Center - 1-800-932-0036 From outside of the United States call 1-612-332-2224 Call immediately if your card is lost, stolen or suspected missing For immediate decline information To access the automated voice response system for the following information: Current balance Available credit Reset PIN Contact a program administrator if: You have questions about your card Need to increase your credit limit Change jobs Need to order cards for other employees Program Administrators: Kristen Douglas Rachael Freeman Rhonda Hibbitts Adam Neal Kathryn Vanness 41
Approver experience
Approver review period Review your company’s unique CCER statement cycle, and Approval Period within the Cardholder Summary located at the top of the Review Open Statements and View Cycle-to-Date screens An email will be sent to the Approver once Cardholders have submitted their statements for approval (Statement Reviewed). An additional email will also be sent listing any Cardholders that failed to submit their statements by the grace period end date. Approvers must approve all statements by 4 calendar days after the end of the Cardholder period. If you are on vacation, or do not have online access, contact your Program Administrator so a secondary Approver can be assigned to your Cardholders. 43
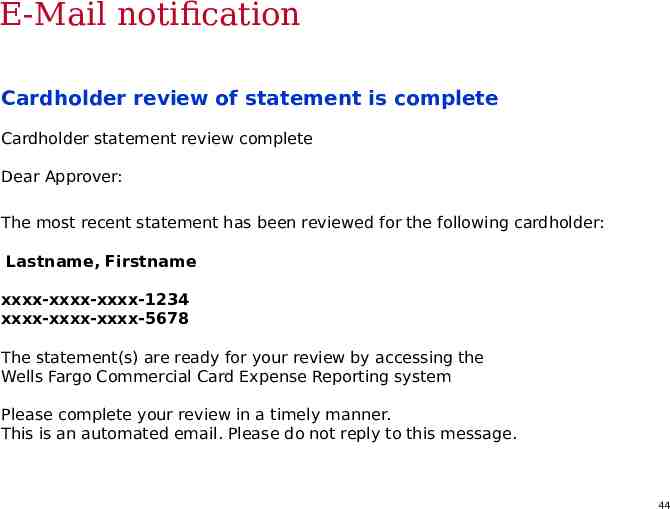
E-Mail notification Cardholder review of statement is complete Cardholder statement review complete Dear Approver: The most recent statement has been reviewed for the following cardholder: Lastname, Firstname xxxx-xxxx-xxxx-1234 xxxx-xxxx-xxxx-5678 The statement(s) are ready for your review by accessing the Wells Fargo Commercial Card Expense Reporting system Please complete your review in a timely manner. This is an automated email. Please do not reply to this message. 44
E-Mail notification Approver mail (after grace period end date) Cardholder statement review overdue for 05/31/20XX Dear Approver: The following cardholder(s) have not reviewed their most recent statement: Lastname, Firstname xxxx-xxxx-xxxx-1234 Lastname, Firstname xxxx-xxxx-xxxx-5678 Notifications have been sent to each cardholder but they have still failed to review their statement. If you choose, you may review the statement on the cardholder’s behalf by accessing the Wells Fargo Commercial Card Expense Reporting system. This is an automated email. Please do not reply to this message. 45
Approver home page Manage Statements – Approve Statements Statement approval queue (if the cycle is ready for review) Notify program administrator if a secondary approver is needed 46
Manage Statements View Cycle-to-Date Transactions Approvers can view activity for any cardholder that rolls up to them for approval 47
View reclassifications View transaction details Make changes if necessary 48
Statement approval Review transaction detail, descriptions, receipts, and make sure all are in compliance with company policy for charges Approve the card expenses by clicking “approve statement” 49
Reports – statement summary Approver option – review up to 12 statement cycles Statement summary report showing cardholder statements over period of time 50
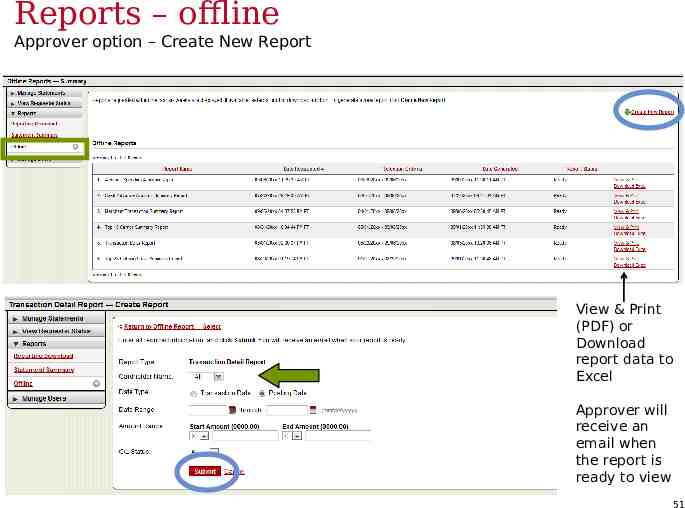
Reports – offline Approver option – Create New Report View & Print (PDF) or Download report data to Excel Approver will receive an email when the report is ready to view 51
Thank you! 2016 Wells Fargo Bank, N.A. All rights reserved. Confidential.