Basic Instrument Tools & Tackle Introduction Tools & Tackle: A tool or
65 Slides1.81 MB
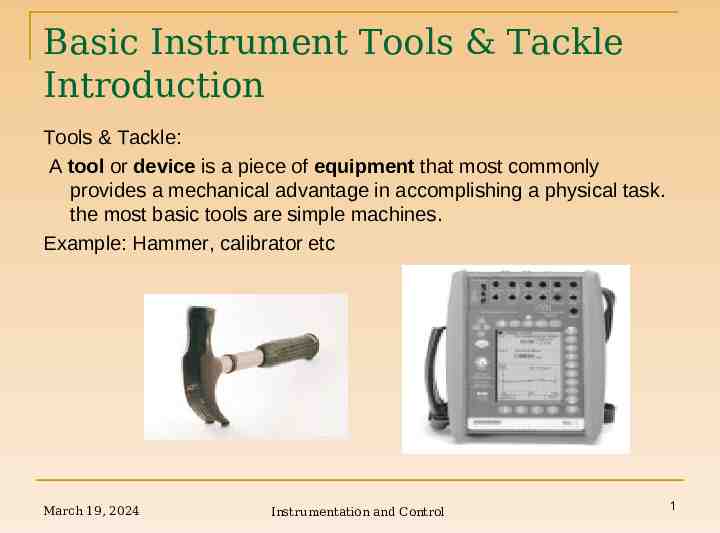
Basic Instrument Tools & Tackle Introduction Tools & Tackle: A tool or device is a piece of equipment that most commonly provides a mechanical advantage in accomplishing a physical task. the most basic tools are simple machines. Example: Hammer, calibrator etc March 19, 2024 Instrumentation and Control 1
Basic Instrument Tools and Tackles Lists List of Instrument Tools & Tackles Multimeter Milliamps Source Pressure Calibrator HART communicator Wrenches Pliers Allen keys Crimping tools Fixed spanners and so on., March 19, 2024 Instrumentation and Control 2
What do meters measure A meter is a measuring instrument. An ammeter measures current, A voltmeter measures the potential difference (voltage) between two points, and An ohmmeter measures resistance. A multimeter combines these functions, and possibly some additional ones as well, into a single instrument. Before going in to detail about multimeter, it is important to have a clear idea of how meters are connected into circuits. Diagrams in Next Slides show a circuit before and after connecting an ammeter. March 19, 2024 Instrumentation and Control 3
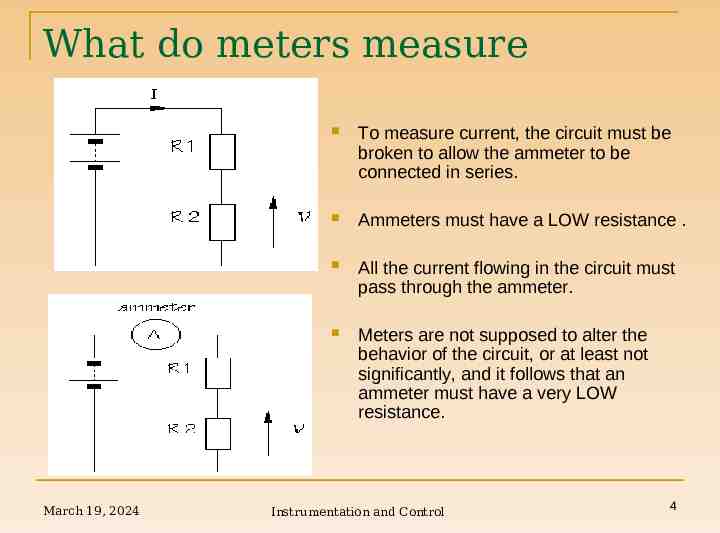
What do meters measure March 19, 2024 To measure current, the circuit must be broken to allow the ammeter to be connected in series. Ammeters must have a LOW resistance . All the current flowing in the circuit must pass through the ammeter. Meters are not supposed to alter the behavior of the circuit, or at least not significantly, and it follows that an ammeter must have a very LOW resistance. Instrumentation and Control 4
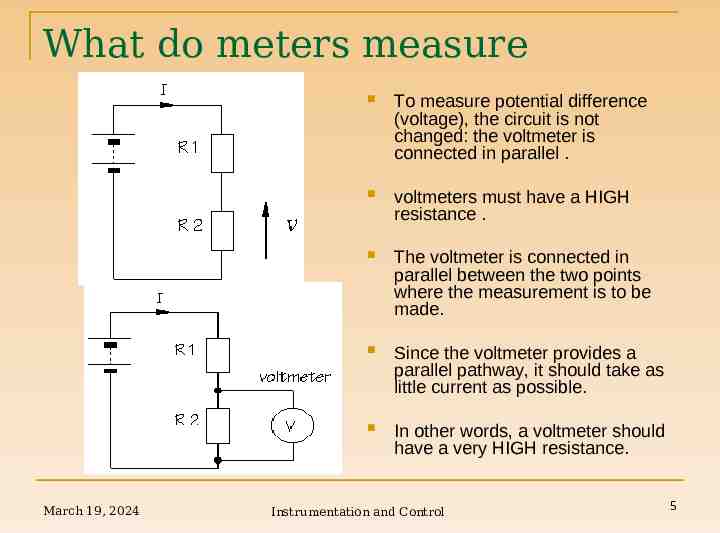
What do meters measure March 19, 2024 To measure potential difference (voltage), the circuit is not changed: the voltmeter is connected in parallel . voltmeters must have a HIGH resistance . The voltmeter is connected in parallel between the two points where the measurement is to be made. Since the voltmeter provides a parallel pathway, it should take as little current as possible. In other words, a voltmeter should have a very HIGH resistance. Instrumentation and Control 5
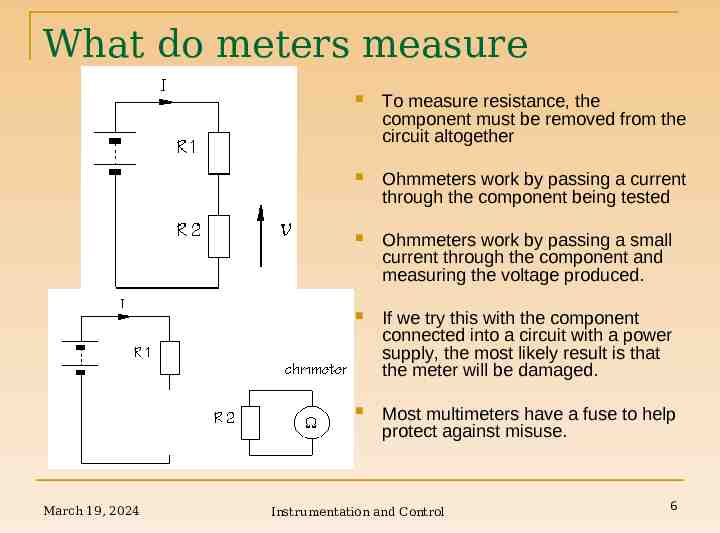
What do meters measure March 19, 2024 To measure resistance, the component must be removed from the circuit altogether Ohmmeters work by passing a current through the component being tested Ohmmeters work by passing a small current through the component and measuring the voltage produced. If we try this with the component connected into a circuit with a power supply, the most likely result is that the meter will be damaged. Most multimeters have a fuse to help protect against misuse. Instrumentation and Control 6
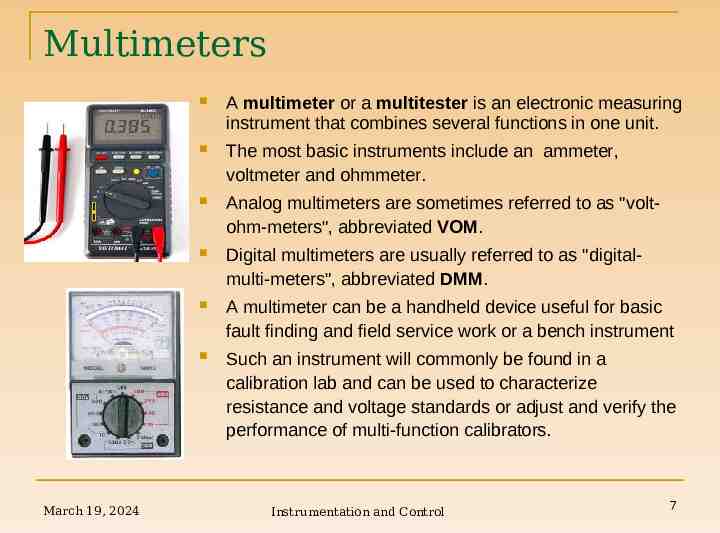
Multimeters March 19, 2024 A multimeter or a multitester is an electronic measuring instrument that combines several functions in one unit. The most basic instruments include an ammeter, voltmeter and ohmmeter. Analog multimeters are sometimes referred to as "voltohm-meters", abbreviated VOM. Digital multimeters are usually referred to as "digitalmulti-meters", abbreviated DMM. A multimeter can be a handheld device useful for basic fault finding and field service work or a bench instrument Such an instrument will commonly be found in a calibration lab and can be used to characterize resistance and voltage standards or adjust and verify the performance of multi-function calibrators. Instrumentation and Control 7
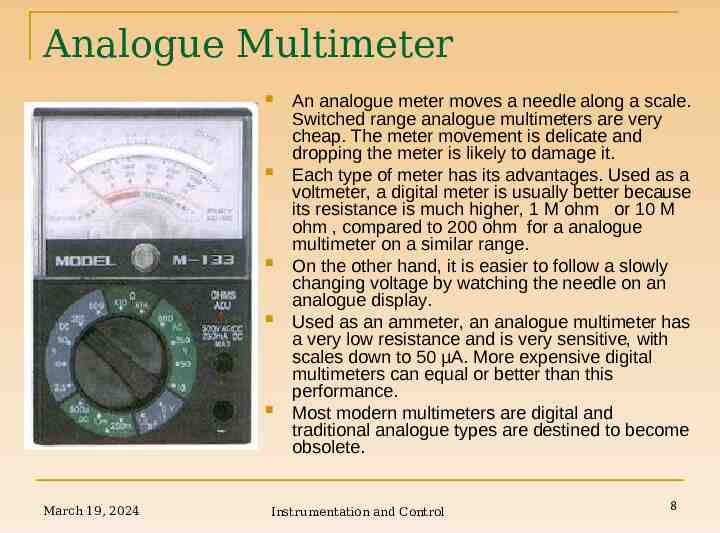
Analogue Multimeter March 19, 2024 An analogue meter moves a needle along a scale. Switched range analogue multimeters are very cheap. The meter movement is delicate and dropping the meter is likely to damage it. Each type of meter has its advantages. Used as a voltmeter, a digital meter is usually better because its resistance is much higher, 1 M ohm or 10 M ohm , compared to 200 ohm for a analogue multimeter on a similar range. On the other hand, it is easier to follow a slowly changing voltage by watching the needle on an analogue display. Used as an ammeter, an analogue multimeter has a very low resistance and is very sensitive, with scales down to 50 µA. More expensive digital multimeters can equal or better than this performance. Most modern multimeters are digital and traditional analogue types are destined to become obsolete. Instrumentation and Control 8
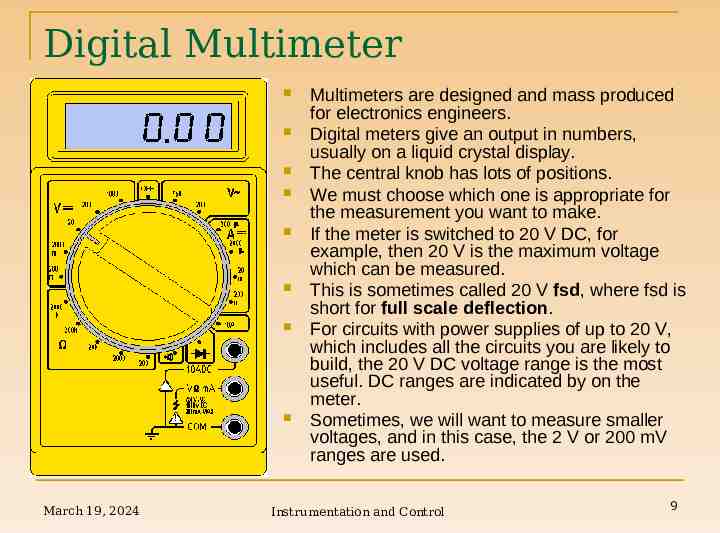
Digital Multimeter March 19, 2024 Multimeters are designed and mass produced for electronics engineers. Digital meters give an output in numbers, usually on a liquid crystal display. The central knob has lots of positions. We must choose which one is appropriate for the measurement you want to make. If the meter is switched to 20 V DC, for example, then 20 V is the maximum voltage which can be measured. This is sometimes called 20 V fsd, where fsd is short for full scale deflection. For circuits with power supplies of up to 20 V, which includes all the circuits you are likely to build, the 20 V DC voltage range is the most useful. DC ranges are indicated by on the meter. Sometimes, we will want to measure smaller voltages, and in this case, the 2 V or 200 mV ranges are used. Instrumentation and Control 9
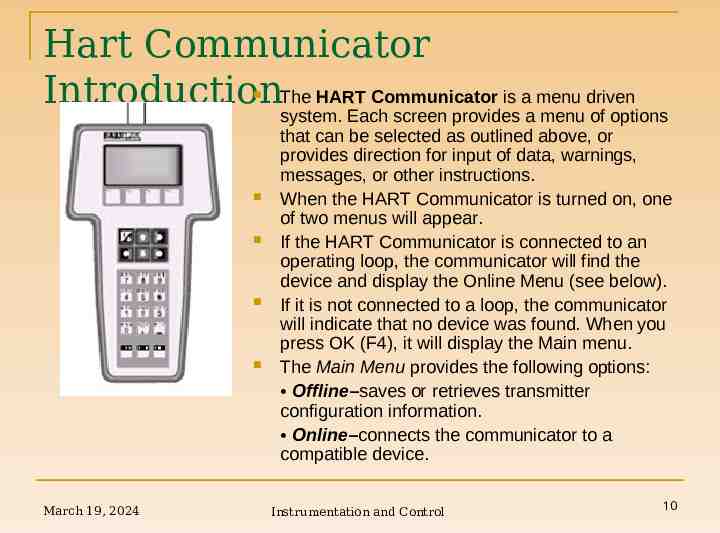
Hart Communicator IntroductionThe HART Communicator is a menu driven March 19, 2024 system. Each screen provides a menu of options that can be selected as outlined above, or provides direction for input of data, warnings, messages, or other instructions. When the HART Communicator is turned on, one of two menus will appear. If the HART Communicator is connected to an operating loop, the communicator will find the device and display the Online Menu (see below). If it is not connected to a loop, the communicator will indicate that no device was found. When you press OK (F4), it will display the Main menu. The Main Menu provides the following options: Offline–saves or retrieves transmitter configuration information. Online–connects the communicator to a compatible device. Instrumentation and Control 10
Hart Communicator Frequency Device–The Frequency Device option displays the frequency Introduction output and corresponding pressure output of current-to-pressure transmitters. Utility–The Utility option provides access to the contrast control for the HART Communicator LCD screen and to the auto poll setting used in multidrop applications. Once selecting a main menu option, the HART Communicator provides the information you need to complete the operation. The Online Menu can be selected from the main menu as outlined above, or it may appear automatically if the HART Communicator is connected to an active loop and can detect an operating transmitter. On-line mode is used for direct evaluation of a particular meter, reconfiguration, changing parameters, maintenance, and other functions. March 19, 2024 Instrumentation and Control 11
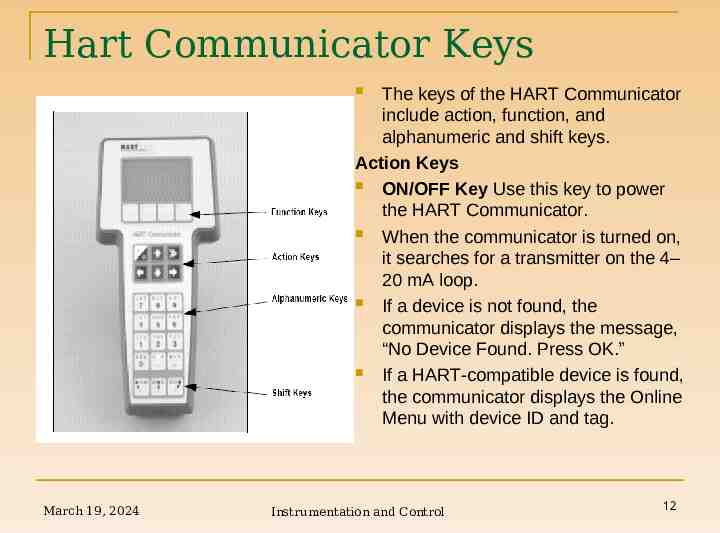
Hart Communicator Keys The keys of the HART Communicator include action, function, and alphanumeric and shift keys. Action Keys ON/OFF Key Use this key to power the HART Communicator. When the communicator is turned on, it searches for a transmitter on the 4– 20 mA loop. If a device is not found, the communicator displays the message, “No Device Found. Press OK.” If a HART-compatible device is found, the communicator displays the Online Menu with device ID and tag. March 19, 2024 Instrumentation and Control 12
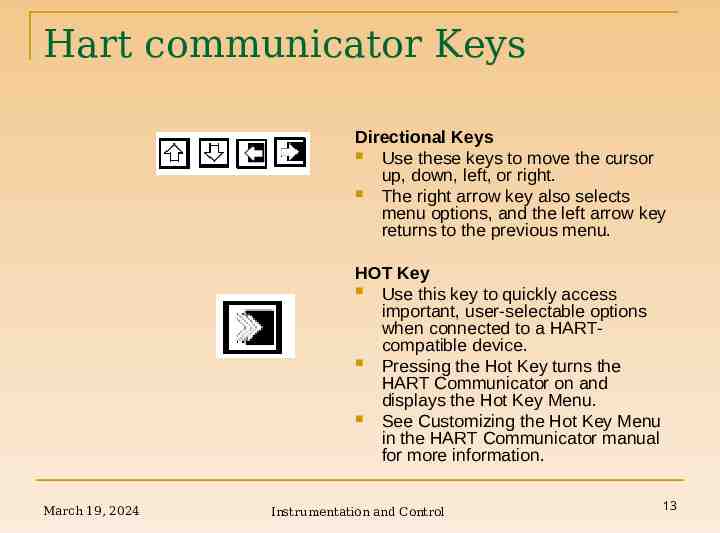
Hart communicator Keys Directional Keys Use these keys to move the cursor up, down, left, or right. The right arrow key also selects menu options, and the left arrow key returns to the previous menu. HOT Key Use this key to quickly access important, user-selectable options when connected to a HARTcompatible device. Pressing the Hot Key turns the HART Communicator on and displays the Hot Key Menu. See Customizing the Hot Key Menu in the HART Communicator manual for more information. March 19, 2024 Instrumentation and Control 13
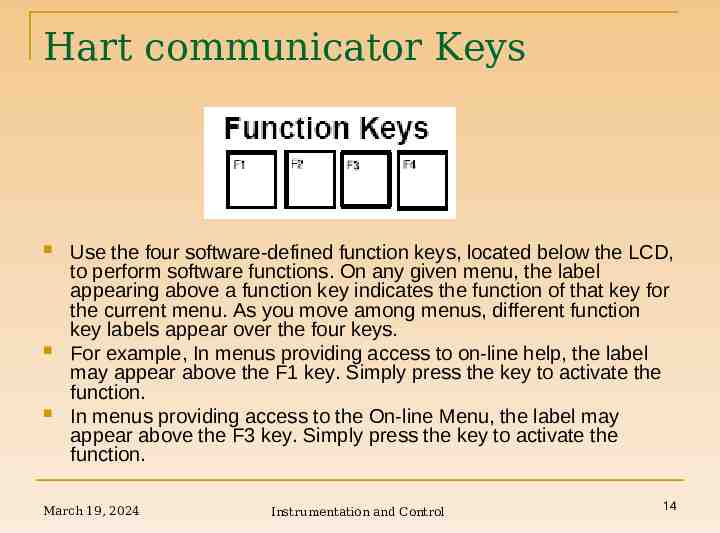
Hart communicator Keys Use the four software-defined function keys, located below the LCD, to perform software functions. On any given menu, the label appearing above a function key indicates the function of that key for the current menu. As you move among menus, different function key labels appear over the four keys. For example, In menus providing access to on-line help, the label may appear above the F1 key. Simply press the key to activate the function. In menus providing access to the On-line Menu, the label may appear above the F3 key. Simply press the key to activate the function. March 19, 2024 Instrumentation and Control 14
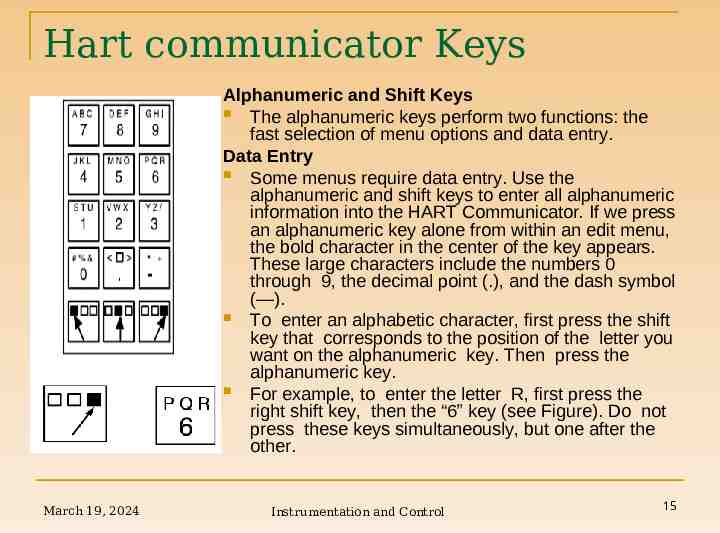
Hart communicator Keys Alphanumeric and Shift Keys The alphanumeric keys perform two functions: the fast selection of menu options and data entry. Data Entry Some menus require data entry. Use the alphanumeric and shift keys to enter all alphanumeric information into the HART Communicator. If we press an alphanumeric key alone from within an edit menu, the bold character in the center of the key appears. These large characters include the numbers 0 through 9, the decimal point (.), and the dash symbol (—). To enter an alphabetic character, first press the shift key that corresponds to the position of the letter you want on the alphanumeric key. Then press the alphanumeric key. For example, to enter the letter R, first press the right shift key, then the “6” key (see Figure). Do not press these keys simultaneously, but one after the other. March 19, 2024 Instrumentation and Control 15
Hart Communicator Fast Key HART fast key sequences provide quick on-line access to transmitter Sequences variables and functions. Instead of stepping our way through the menu structure using the action keys, we can press a HART fast key sequence to move from the Online Menu to the desired variable or function. Onscreen instructions guide you through the rest of the screens. HART Fast Key Example HART fast key sequences are made up of the series of numbers corresponding to the individual options in each step of the menu structure. For example, from the Online Menu we can change the Date. Following the menu structure, press 1 to reach Device Setup, press 3 for Basic Setup, press 4 for Device Info, press 5 for Date. The corresponding HART fast key sequence is 1,3,4,5. HART fast keys are operational only from the Online Menu. If we use them consistently, we will need to return to the Online Menu by pressing HOME (F3) when it is available. If we do not start at the Online Menu, the HART fast key sequences will not function properly. March 19, 2024 Instrumentation and Control 16
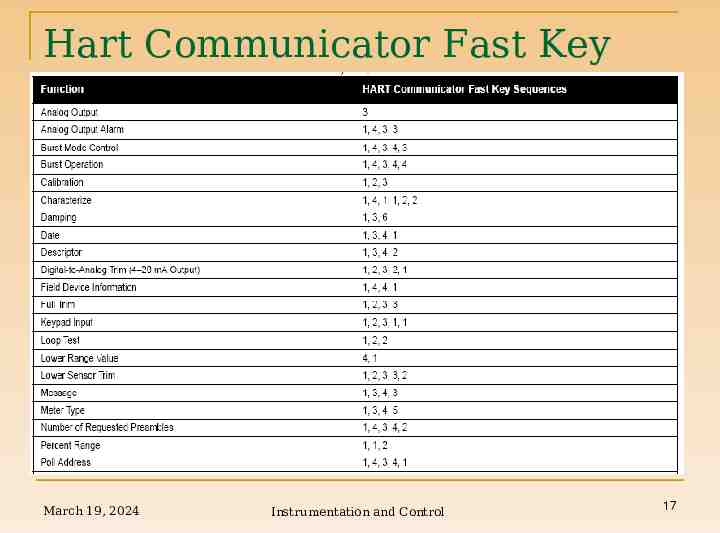
Hart Communicator Fast Key Sequences March 19, 2024 Instrumentation and Control 17
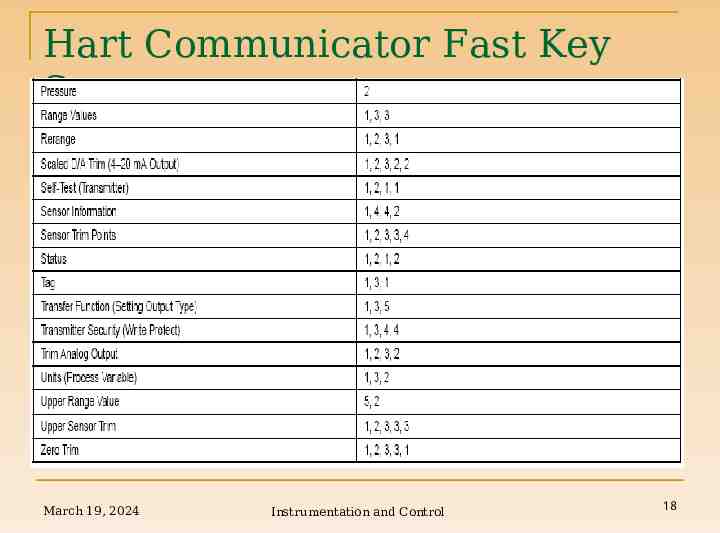
Hart Communicator Fast Key Sequences March 19, 2024 Instrumentation and Control 18
Hart Communicator Connections The HART Communicator Model 275 / 375 can interface with a transmitter from the control room, the instrument site, or any wiring termination point in the loop through the rear connection panel as shown in Figure next slide. To communicate, connect the HART Communicator in parallel with the instrument or load resistor. The connections are non-polarized. Avoid contact with leads and terminals. Do not make connections to the serial port or NiCad recharger jack in an explosive atmosphere. Before connecting the HART Communicator in an explosive atmosphere, make sure the instruments in the loop are installed in accordance with intrinsically safe or non incendive field wiring practices. Both transmitter covers must be fully engaged to meet explosion proof requirements. The HART Communicator needs a minimum of 250 ohms resistance in the loop to function properly. The HART Communicator does not measure loop current directly. March 19, 2024 Instrumentation and Control 19
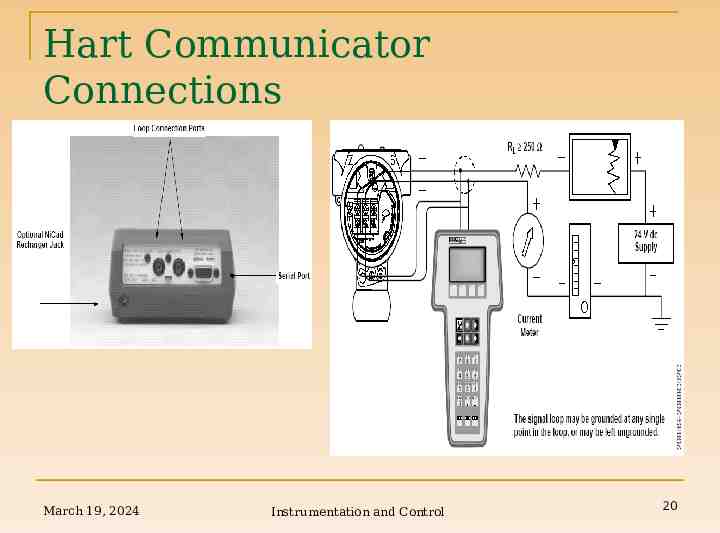
Hart Communicator Connections March 19, 2024 Instrumentation and Control 20
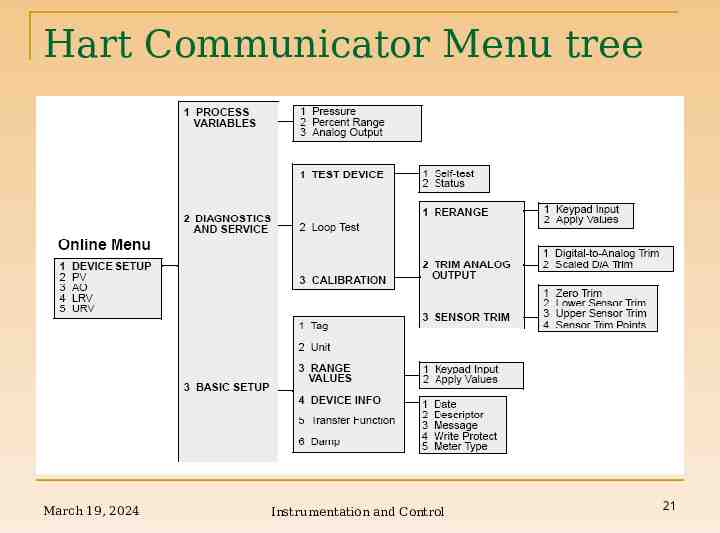
Hart Communicator Menu tree March 19, 2024 Instrumentation and Control 21
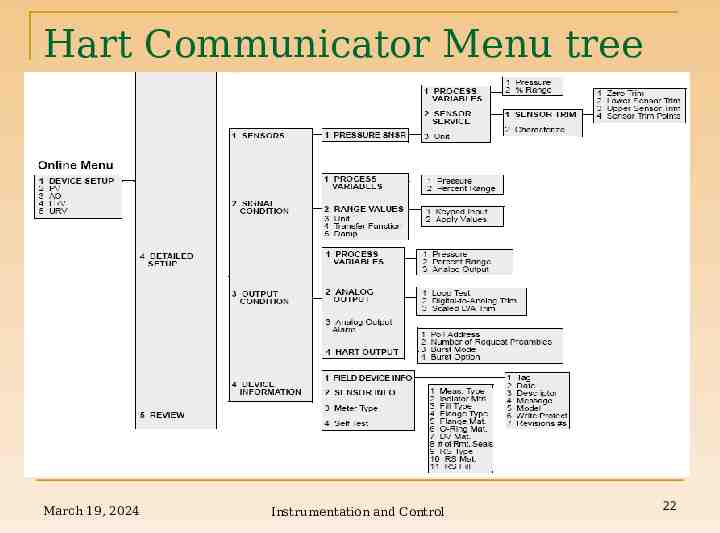
Hart Communicator Menu tree March 19, 2024 Instrumentation and Control 22
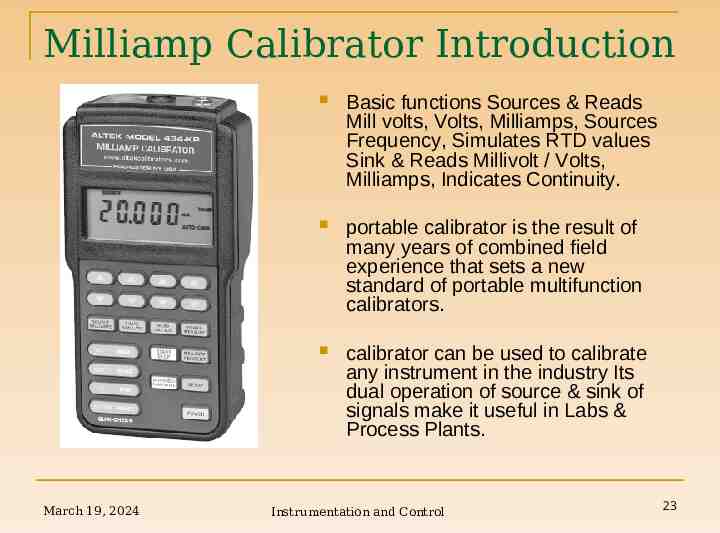
Milliamp Calibrator Introduction March 19, 2024 Basic functions Sources & Reads Mill volts, Volts, Milliamps, Sources Frequency, Simulates RTD values Sink & Reads Millivolt / Volts, Milliamps, Indicates Continuity. portable calibrator is the result of many years of combined field experience that sets a new standard of portable multifunction calibrators. calibrator can be used to calibrate any instrument in the industry Its dual operation of source & sink of signals make it useful in Labs & Process Plants. Instrumentation and Control 23
Calibrator Instruction Turn-on Each time you turn on the Model 434-KP the LCD will display all segments for about 1 second. It then displays the most recently selected scaling for the function selected by the selector knob. Turn-off Press the POWER push-button to turn the 434-KP off. If AUTO-OFF is enabled the 434-KP will turn itself off after 30 minutes of inactivity. Choosing milliamp or percent You may choose to display from 0.000 to 24.000 mA or -25.00 to 125.00%. Press the MILLIAMP / PERCENT push-button to toggle the display. When scaled in percent, 100.00% corresponds to 20.000 mA and 0.00% corresponds to 4.000 mA. Auto cal To maintain accuracy, the Model 434-KP periodically recalibrates its measuring circuitry against internal references. While this is occurring the word CAL will appear on the display for less than 2 seconds. March 19, 2024 Instrumentation and Control 24
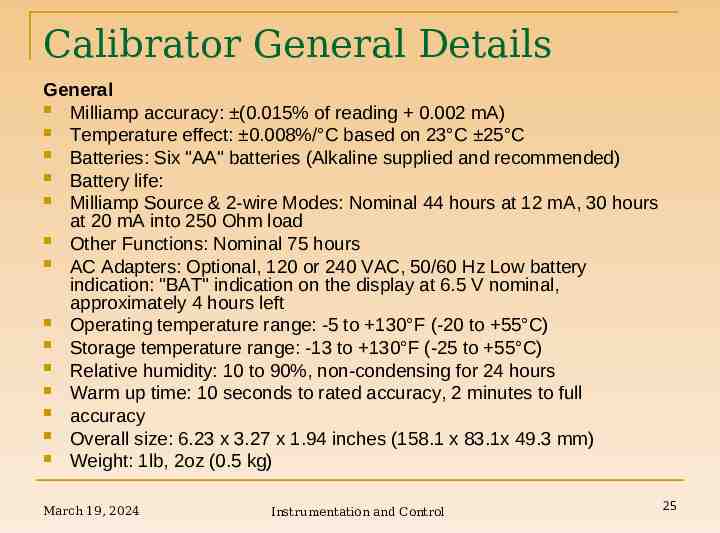
Calibrator General Details General Milliamp accuracy: (0.015% of reading 0.002 mA) Temperature effect: 0.008%/ C based on 23 C 25 C Batteries: Six "AA" batteries (Alkaline supplied and recommended) Battery life: Milliamp Source & 2-wire Modes: Nominal 44 hours at 12 mA, 30 hours at 20 mA into 250 Ohm load Other Functions: Nominal 75 hours AC Adapters: Optional, 120 or 240 VAC, 50/60 Hz Low battery indication: "BAT" indication on the display at 6.5 V nominal, approximately 4 hours left Operating temperature range: -5 to 130 F (-20 to 55 C) Storage temperature range: -13 to 130 F (-25 to 55 C) Relative humidity: 10 to 90%, non-condensing for 24 hours Warm up time: 10 seconds to rated accuracy, 2 minutes to full accuracy Overall size: 6.23 x 3.27 x 1.94 inches (158.1 x 83.1x 49.3 mm) Weight: 1lb, 2oz (0.5 kg) March 19, 2024 Instrumentation and Control 25
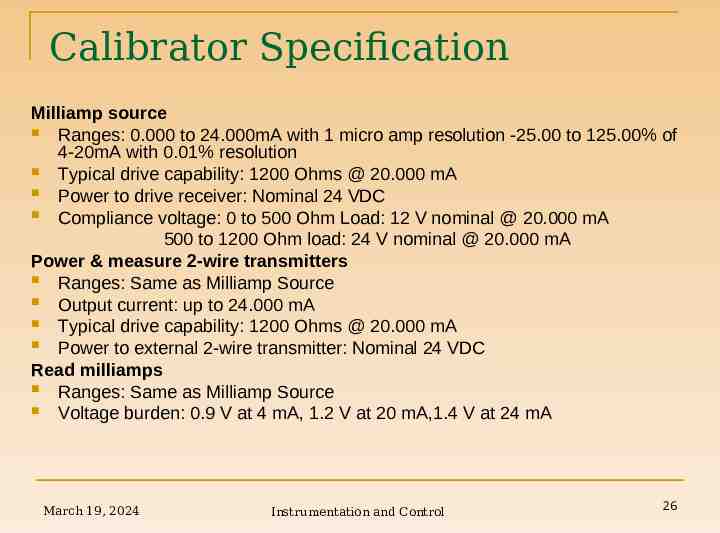
Calibrator Specification Milliamp source Ranges: 0.000 to 24.000mA with 1 micro amp resolution -25.00 to 125.00% of 4-20mA with 0.01% resolution Typical drive capability: 1200 Ohms @ 20.000 mA Power to drive receiver: Nominal 24 VDC Compliance voltage: 0 to 500 Ohm Load: 12 V nominal @ 20.000 mA 500 to 1200 Ohm load: 24 V nominal @ 20.000 mA Power & measure 2-wire transmitters Ranges: Same as Milliamp Source Output current: up to 24.000 mA Typical drive capability: 1200 Ohms @ 20.000 mA Power to external 2-wire transmitter: Nominal 24 VDC Read milliamps Ranges: Same as Milliamp Source Voltage burden: 0.9 V at 4 mA, 1.2 V at 20 mA,1.4 V at 24 mA March 19, 2024 Instrumentation and Control 26
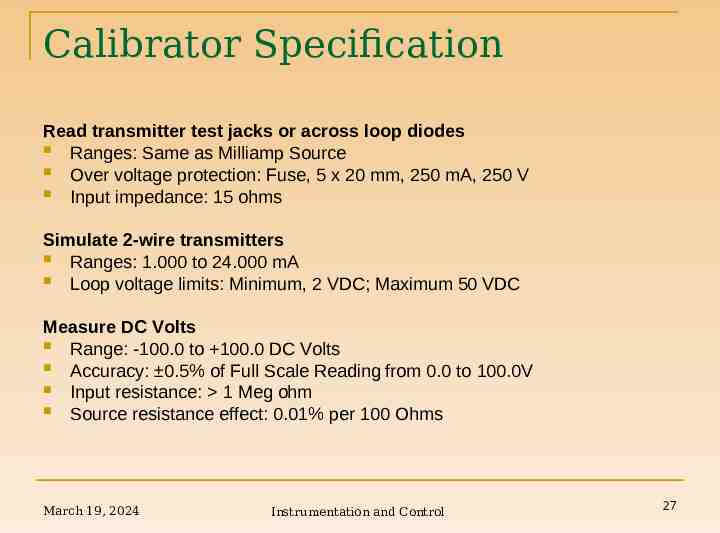
Calibrator Specification Read transmitter test jacks or across loop diodes Ranges: Same as Milliamp Source Over voltage protection: Fuse, 5 x 20 mm, 250 mA, 250 V Input impedance: 15 ohms Simulate 2-wire transmitters Ranges: 1.000 to 24.000 mA Loop voltage limits: Minimum, 2 VDC; Maximum 50 VDC Measure DC Volts Range: -100.0 to 100.0 DC Volts Accuracy: 0.5% of Full Scale Reading from 0.0 to 100.0V Input resistance: 1 Meg ohm Source resistance effect: 0.01% per 100 Ohms March 19, 2024 Instrumentation and Control 27

Universal Calibrator APPLICATION : Applications Calibrations of instruments Commissioning of field instruments Repair & Maintenance of field instruments Use as millimeter with limited facilities USER INDUSTRIES : Chemical Process Industries Cement Plant Paper & Pulp Industries Petrochemical Industries Textile Industries Fertilizer Industries Pharmaceutical Industries Instrument manufacturing unit Automobile Industries Instrument Calibration Labs March 19, 2024 Instrumentation and Control 28
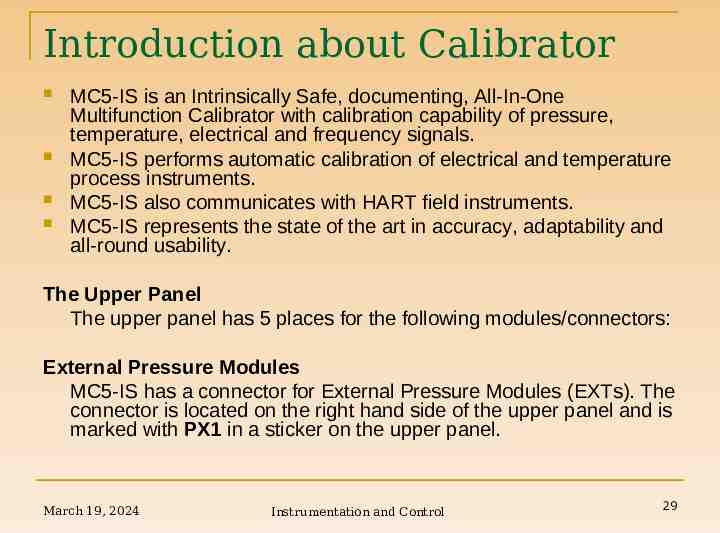
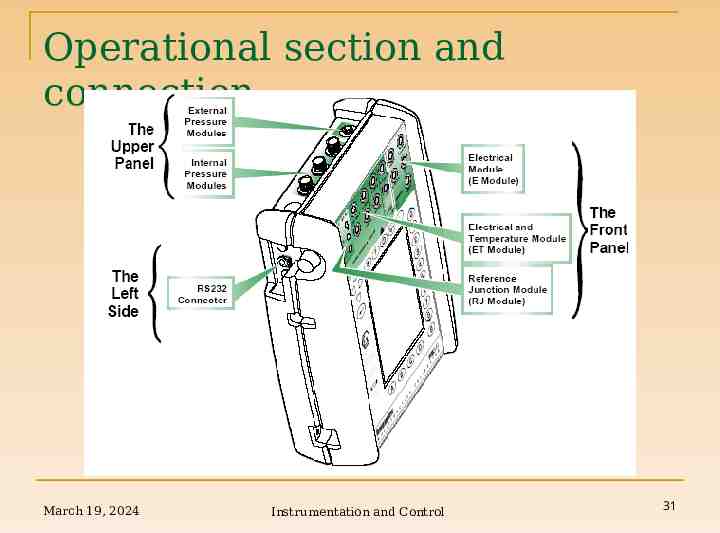
Introduction about Calibrator MC5-IS is an Intrinsically Safe, documenting, All-In-One Multifunction Calibrator with calibration capability of pressure, temperature, electrical and frequency signals. MC5-IS performs automatic calibration of electrical and temperature process instruments. MC5-IS also communicates with HART field instruments. MC5-IS represents the state of the art in accuracy, adaptability and all-round usability. The Upper Panel The upper panel has 5 places for the following modules/connectors: External Pressure Modules MC5-IS has a connector for External Pressure Modules (EXTs). The connector is located on the right hand side of the upper panel and is marked with PX1 in a sticker on the upper panel. March 19, 2024 Instrumentation and Control 29
Calibrator Introduction Internal Pressure Modules Up to three Internal Pressure Modules may be installed in MC5-IS.One of them may be an internal barometric module. The connectors for Internal Pressure modules start from the second connector on the left. The possible Barometric Module is always located as second from right and it measures the barometric pressure through a connection in the back panel of MC5-IS. Normally nothing need to connected to the barometric pressure module’s connector. Internal pressure modules are marked with P1 P3. The recommended pressure medium for all internal pressure modules is clean air. Clean non-corrosive liquids may optionally be used in modules with a measuring range of 20 bar/300 psi or more. Avoid spilling liquid on MC5-IS when connecting/disconnecting pressure hoses to/from pressure modules. To avoid damaging the calibrator, use hand tightening only when connecting the pressure measurement hoses (max. torque 5 Nm,approx. 3.6 lbf ft). If the use of tools is required to secure the connection (typically pressure modules with a pressure range higher than 20 bar), apply the counterforce with a spanner on the connector body’s hexagonal part. The overpressure protection of the internal pressure modules vents to the back of the calibrator. March 19, 2024 Instrumentation and Control 30
Operational section and connection March 19, 2024 Instrumentation and Control 31
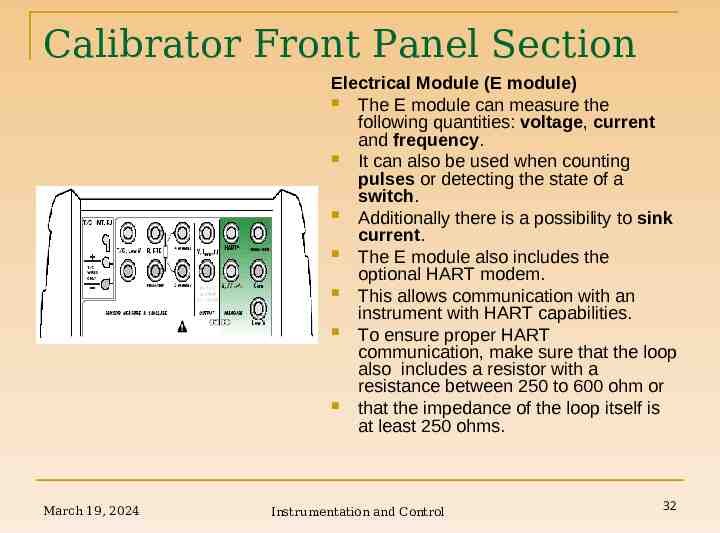
Calibrator Front Panel Section Electrical Module (E module) The E module can measure the following quantities: voltage, current and frequency. It can also be used when counting pulses or detecting the state of a switch. Additionally there is a possibility to sink current. The E module also includes the optional HART modem. This allows communication with an instrument with HART capabilities. To ensure proper HART communication, make sure that the loop also includes a resistor with a resistance between 250 to 600 ohm or that the impedance of the loop itself is at least 250 ohms. March 19, 2024 Instrumentation and Control 32
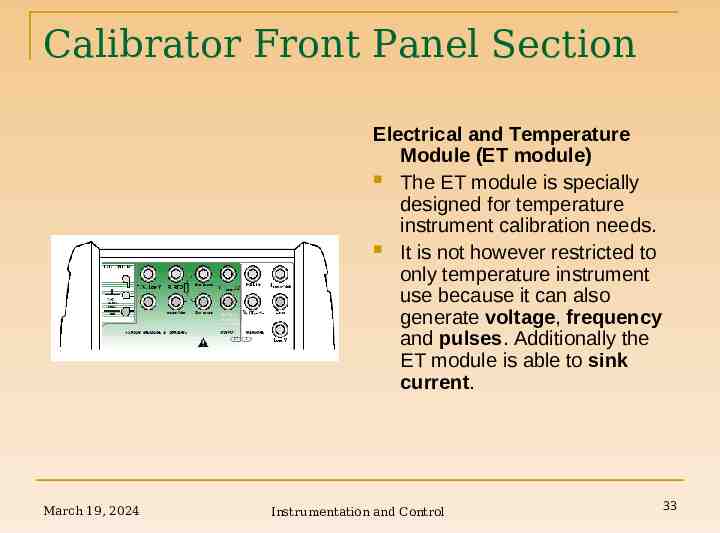
Calibrator Front Panel Section Electrical and Temperature Module (ET module) The ET module is specially designed for temperature instrument calibration needs. It is not however restricted to only temperature instrument use because it can also generate voltage, frequency and pulses. Additionally the ET module is able to sink current. March 19, 2024 Instrumentation and Control 33
Calibrator Measuring capability Measuring capabilities: Low Voltage measurement and T/C measurement using either the internal reference junction or the Low Voltage connectors. Resistance and RTD measurement. Generation/simulation capabilities: T/C simulation using either the internal reference junction or the Low Voltage connectors. Resistance and RTD simulation. Voltage, frequency and pulse generation. Current sink. March 19, 2024 Instrumentation and Control 34
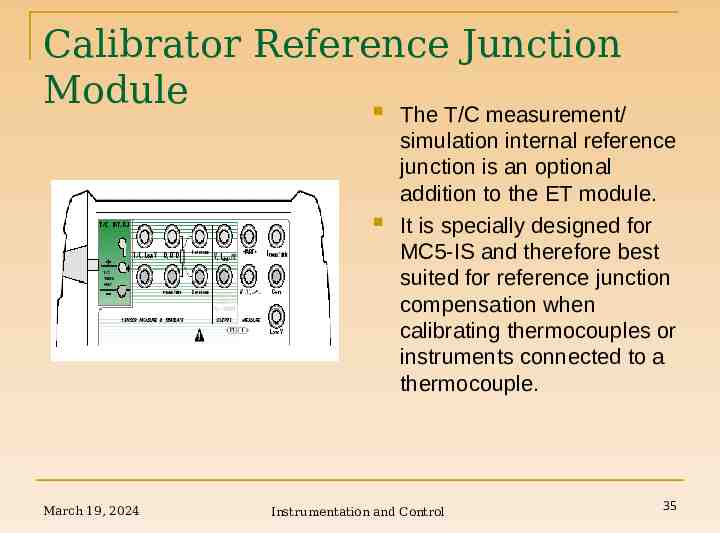
Calibrator Reference Junction Module The T/C measurement/ March 19, 2024 simulation internal reference junction is an optional addition to the ET module. It is specially designed for MC5-IS and therefore best suited for reference junction compensation when calibrating thermocouples or instruments connected to a thermocouple. Instrumentation and Control 35
Calibrator Reference Junction Module The Reference Junction Module is suited for all standard T/C plugs and stripped wires. Open the fixing screw on the left side of MC5-IS before connecting the wires/plug to the Reference Junction Module. Make sure to connect the wires/plug as the polarity is indicated on the Reference Junction Module. Remember to tighten the fastening screw when the wires/plug are connected. Hand tightening is adequate. Do not pull out the wires/plug without first opening the fixing screw. Otherwise you might damage the contact surface of the connectors. T/C measurement and simulation may also be done without the internal reference junction by using the Low Voltage terminals in the ET module. March 19, 2024 Instrumentation and Control 36
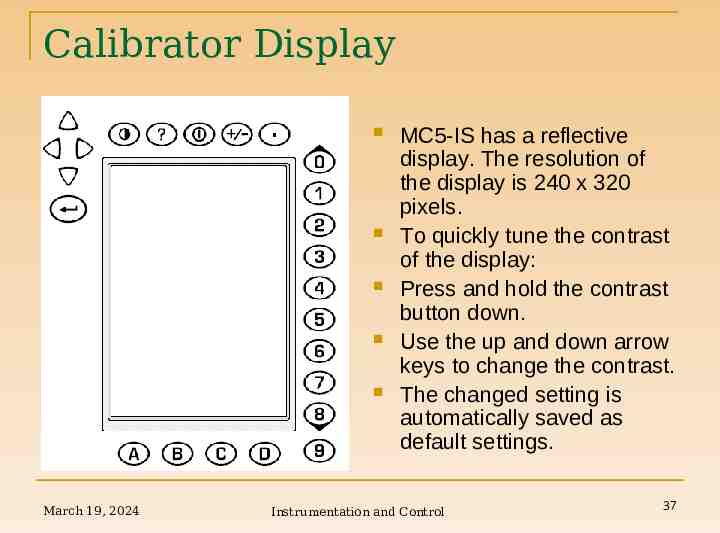
Calibrator Display March 19, 2024 MC5-IS has a reflective display. The resolution of the display is 240 x 320 pixels. To quickly tune the contrast of the display: Press and hold the contrast button down. Use the up and down arrow keys to change the contrast. The changed setting is automatically saved as default settings. Instrumentation and Control 37
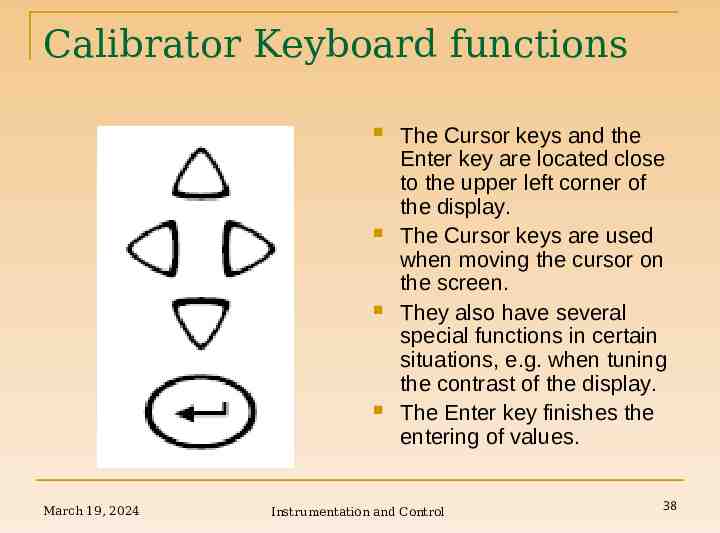
Calibrator Keyboard functions March 19, 2024 The Cursor keys and the Enter key are located close to the upper left corner of the display. The Cursor keys are used when moving the cursor on the screen. They also have several special functions in certain situations, e.g. when tuning the contrast of the display. The Enter key finishes the entering of values. Instrumentation and Control 38
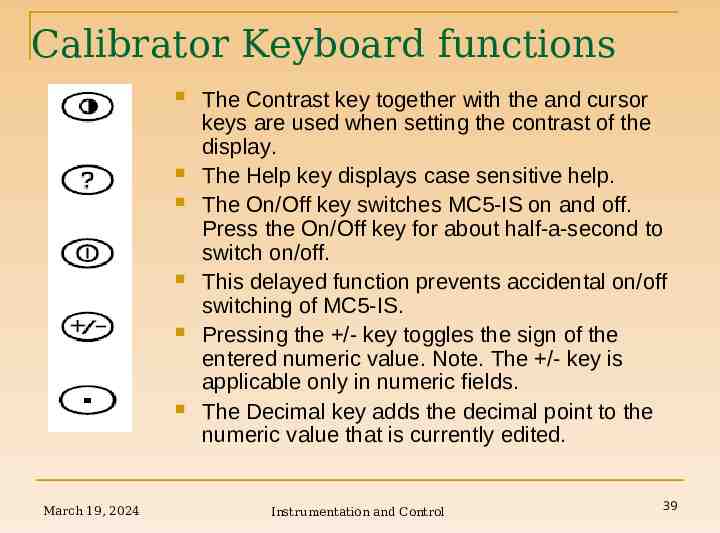
Calibrator Keyboard functions March 19, 2024 The Contrast key together with the and cursor keys are used when setting the contrast of the display. The Help key displays case sensitive help. The On/Off key switches MC5-IS on and off. Press the On/Off key for about half-a-second to switch on/off. This delayed function prevents accidental on/off switching of MC5-IS. Pressing the /- key toggles the sign of the entered numeric value. Note. The /- key is applicable only in numeric fields. The Decimal key adds the decimal point to the numeric value that is currently edited. Instrumentation and Control 39
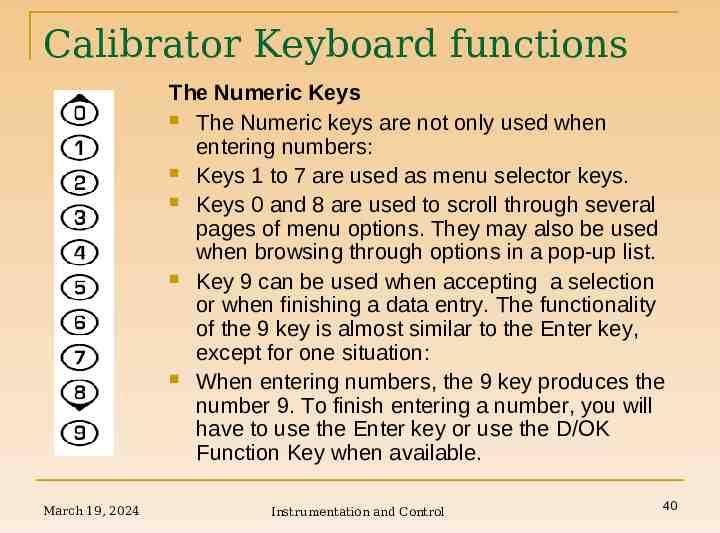
Calibrator Keyboard functions The Numeric Keys The Numeric keys are not only used when entering numbers: Keys 1 to 7 are used as menu selector keys. Keys 0 and 8 are used to scroll through several pages of menu options. They may also be used when browsing through options in a pop-up list. Key 9 can be used when accepting a selection or when finishing a data entry. The functionality of the 9 key is almost similar to the Enter key, except for one situation: When entering numbers, the 9 key produces the number 9. To finish entering a number, you will have to use the Enter key or use the D/OK Function Key when available. March 19, 2024 Instrumentation and Control 40
Calibrator General Description March 19, 2024 Instrumentation and Control 41
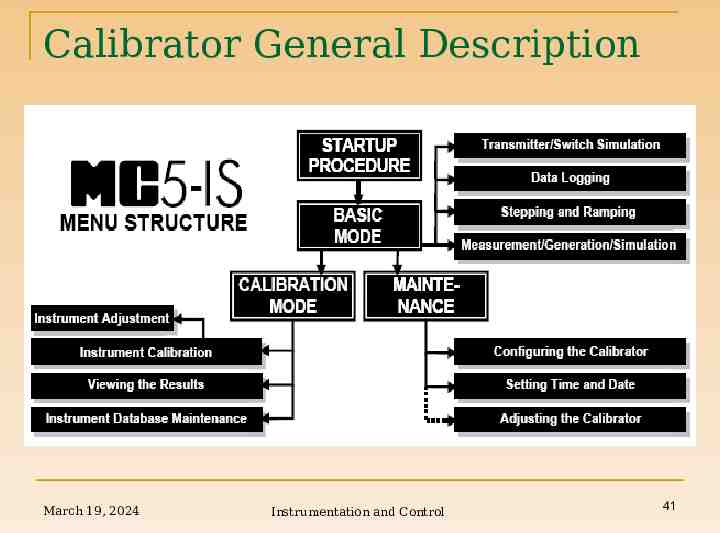
Calibrator General Description Startup Procedure Every time MC5-IS is started the Startup Procedure checks the functionality of the device by performing a self test. If the self-test is passed successfully, some basic calibrator data is displayed. After that MC5-IS automatically proceeds to Basic Mode. Basic Mode In Basic Mode you can measure and generate/simulate signals. There are two separately configurable windows available. Basic Mode is often used for testing connections before starting the actual calibration procedure of an instrument. Stepping and Ramping tools enable generating/simulating signals that vary with time. Maintenance This main function handles calibrator configuration settings. Additionally there is the possibility to recalibrate MC5-IS (requires a password). March 19, 2024 Instrumentation and Control 42
Calibrator User interface March 19, 2024 Instrumentation and Control 43
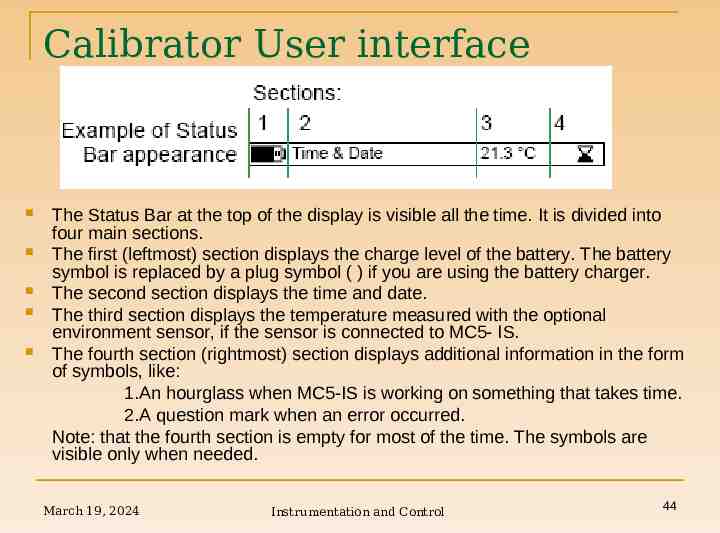
Calibrator User interface The Status Bar at the top of the display is visible all the time. It is divided into four main sections. The first (leftmost) section displays the charge level of the battery. The battery symbol is replaced by a plug symbol ( ) if you are using the battery charger. The second section displays the time and date. The third section displays the temperature measured with the optional environment sensor, if the sensor is connected to MC5- IS. The fourth section (rightmost) section displays additional information in the form of symbols, like: 1.An hourglass when MC5-IS is working on something that takes time. 2.A question mark when an error occurred. Note: that the fourth section is empty for most of the time. The symbols are visible only when needed. March 19, 2024 Instrumentation and Control 44
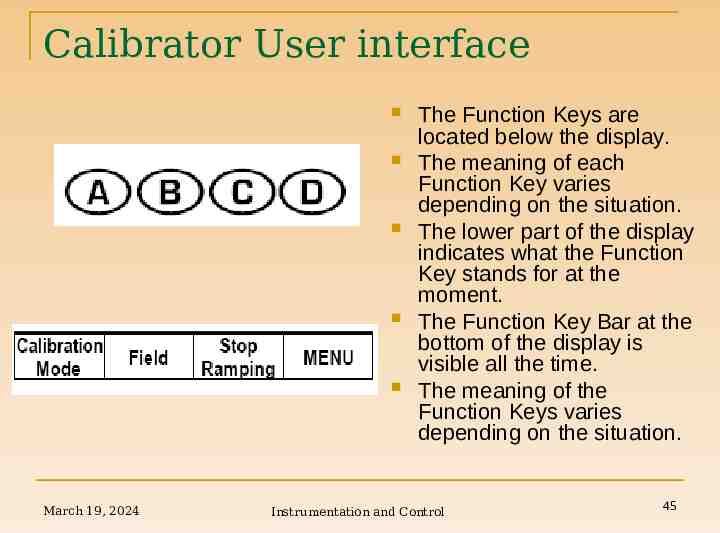
Calibrator User interface March 19, 2024 The Function Keys are located below the display. The meaning of each Function Key varies depending on the situation. The lower part of the display indicates what the Function Key stands for at the moment. The Function Key Bar at the bottom of the display is visible all the time. The meaning of the Function Keys varies depending on the situation. Instrumentation and Control 45
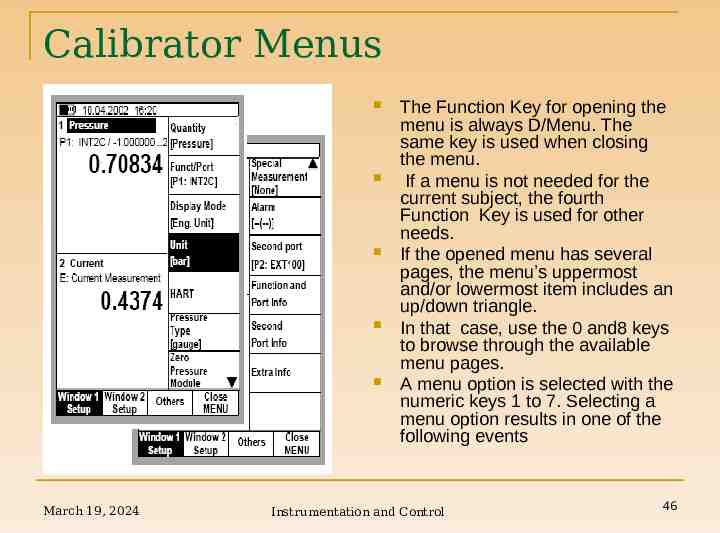
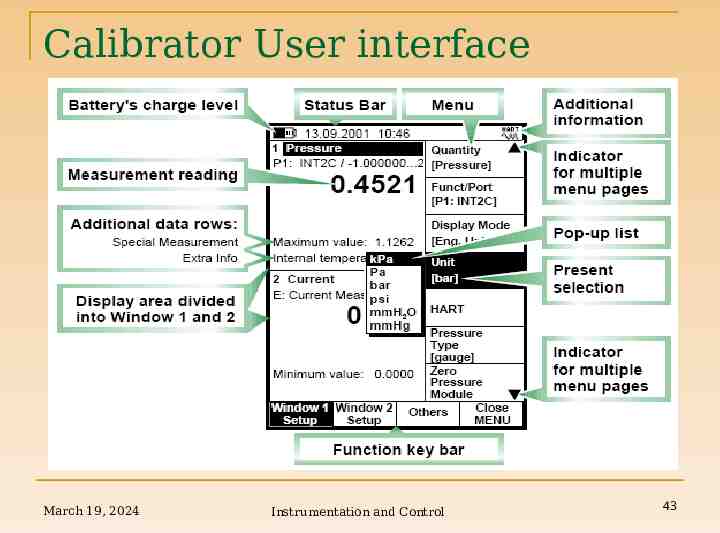
Calibrator Menus March 19, 2024 The Function Key for opening the menu is always D/Menu. The same key is used when closing the menu. If a menu is not needed for the current subject, the fourth Function Key is used for other needs. If the opened menu has several pages, the menu’s uppermost and/or lowermost item includes an up/down triangle. In that case, use the 0 and8 keys to browse through the available menu pages. A menu option is selected with the numeric keys 1 to 7. Selecting a menu option results in one of the following events Instrumentation and Control 46
Calibrator Menus An immediate action follows and the menu closes automatically,e.g. when selecting the Zero Pressure Module option in the picture above. A pop-up list opens for selecting one of the available options. The current selection is displayed inside brackets in the menu. Use the up and down keys, the 0 and 8 keys or the same numeric key that opened the pop-up list to scroll the list. To select an option in the pop-up list, use either the enter key or the 9 key. To close the pop-up menu without selecting anything, press the right side key or the D/Close Function Key. Another menu with new options replaces the previous menu. Sometimes the Function Keys can also open another menu. In the previous picture, the Window 1 setup menu is opened. In this case Function Key B/Window 2 Setup and Function Key C/Others can be used for opening other menus. A new window opens for, e.g. viewing additional information or for configuring the selected task. March 19, 2024 Instrumentation and Control 47
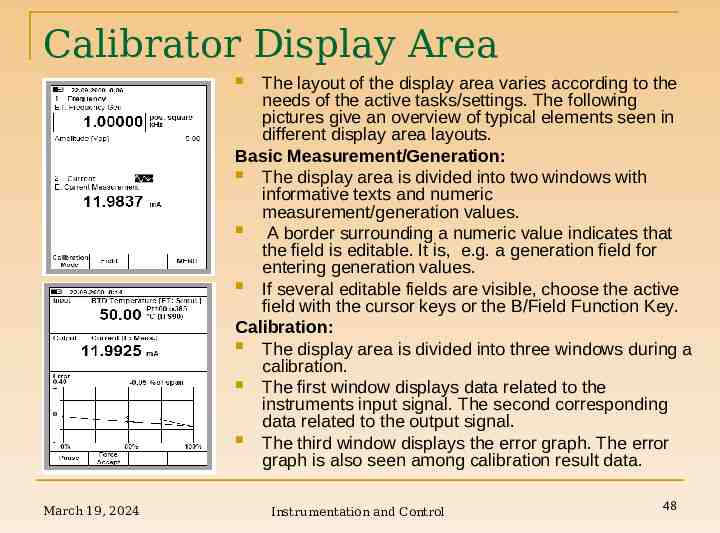
Calibrator Display Area The layout of the display area varies according to the needs of the active tasks/settings. The following pictures give an overview of typical elements seen in different display area layouts. Basic Measurement/Generation: The display area is divided into two windows with informative texts and numeric measurement/generation values. A border surrounding a numeric value indicates that the field is editable. It is, e.g. a generation field for entering generation values. If several editable fields are visible, choose the active field with the cursor keys or the B/Field Function Key. Calibration: The display area is divided into three windows during a calibration. The first window displays data related to the instruments input signal. The second corresponding data related to the output signal. The third window displays the error graph. The error graph is also seen among calibration result data. March 19, 2024 Instrumentation and Control 48
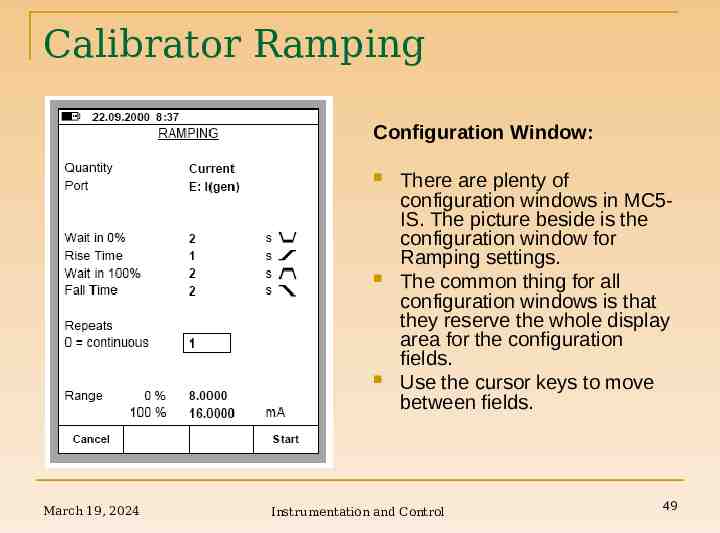
Calibrator Ramping Configuration Window: March 19, 2024 There are plenty of configuration windows in MC5IS. The picture beside is the configuration window for Ramping settings. The common thing for all configuration windows is that they reserve the whole display area for the configuration fields. Use the cursor keys to move between fields. Instrumentation and Control 49
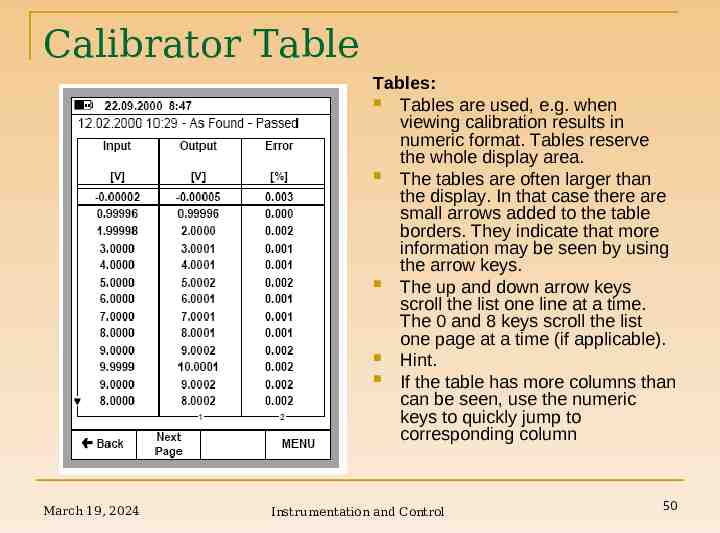
Calibrator Table Tables: Tables are used, e.g. when viewing calibration results in numeric format. Tables reserve the whole display area. The tables are often larger than the display. In that case there are small arrows added to the table borders. They indicate that more information may be seen by using the arrow keys. The up and down arrow keys scroll the list one line at a time. The 0 and 8 keys scroll the list one page at a time (if applicable). Hint. If the table has more columns than can be seen, use the numeric keys to quickly jump to corresponding column March 19, 2024 Instrumentation and Control 50
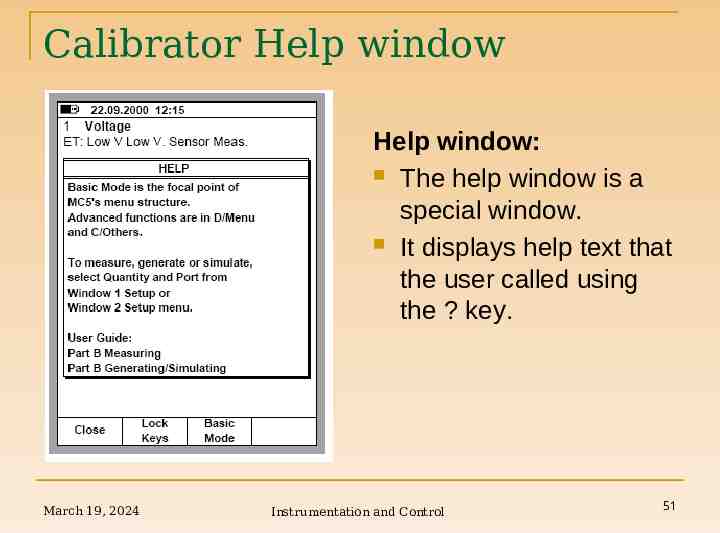
Calibrator Help window Help window: The help window is a special window. It displays help text that the user called using the ? key. March 19, 2024 Instrumentation and Control 51
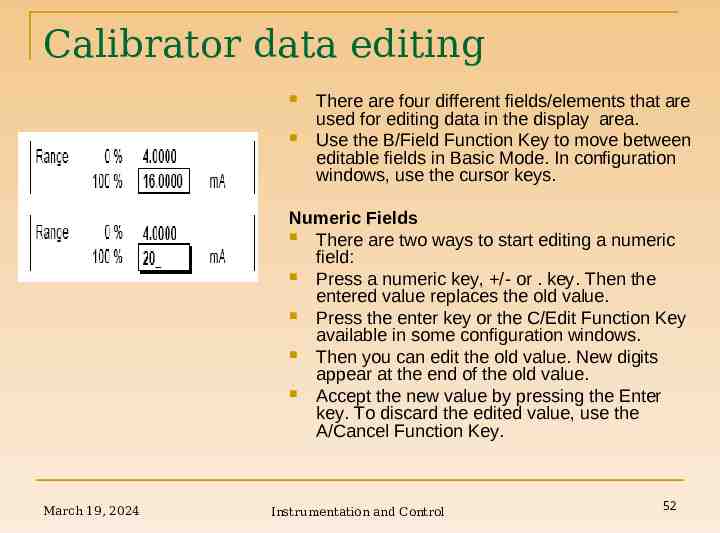
Calibrator data editing There are four different fields/elements that are used for editing data in the display area. Use the B/Field Function Key to move between editable fields in Basic Mode. In configuration windows, use the cursor keys. Numeric Fields There are two ways to start editing a numeric field: Press a numeric key, /- or . key. Then the entered value replaces the old value. Press the enter key or the C/Edit Function Key available in some configuration windows. Then you can edit the old value. New digits appear at the end of the old value. Accept the new value by pressing the Enter key. To discard the edited value, use the A/Cancel Function Key. March 19, 2024 Instrumentation and Control 52
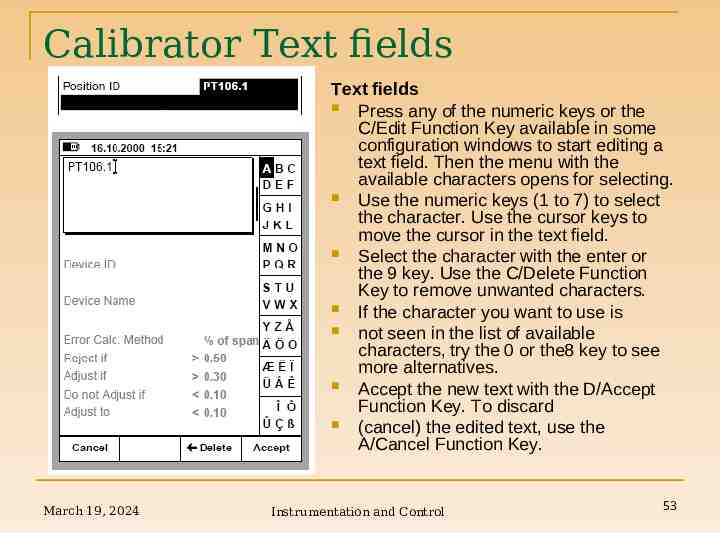
Calibrator Text fields Text fields Press any of the numeric keys or the C/Edit Function Key available in some configuration windows to start editing a text field. Then the menu with the available characters opens for selecting. Use the numeric keys (1 to 7) to select the character. Use the cursor keys to move the cursor in the text field. Select the character with the enter or the 9 key. Use the C/Delete Function Key to remove unwanted characters. If the character you want to use is not seen in the list of available characters, try the 0 or the8 key to see more alternatives. Accept the new text with the D/Accept Function Key. To discard (cancel) the edited text, use the A/Cancel Function Key. March 19, 2024 Instrumentation and Control 53
Calibrator Safety Precautions MC5-IS calibrator is a precision calibration tool that should be used by skilled people. Working with MC5-IS involves the usage of pressure, temperature and/or electrical instruments. Be sure to know how to work with these instruments and how to safely connect/disconnect pressure hoses as well as electrical test leads clips, etc. Use MC5-IS only if you are certain of that it can be used safely. Safe use of MC5-IS is no longer possible if one or more of the following cases are true: When the case of MC5-IS is evidently damaged When MC5-IS is not functioning as expected After prolonged storage in unfavorable conditions After serious damage during transport Sometimes it is necessary to use a portable radio transceiver while working with the calibrator. To prevent calibration errors caused by the radio frequency interference, keep the radio far (at least 1 meter) from the calibrator and the circuit under calibration while sending. March 19, 2024 Instrumentation and Control 54
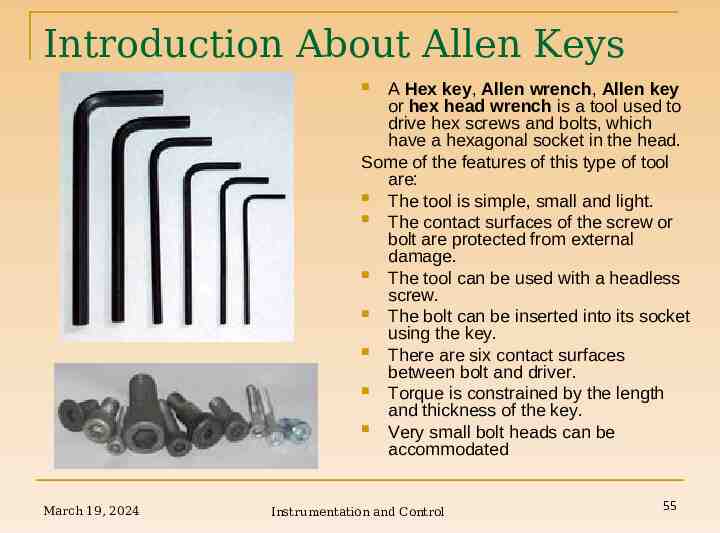
Introduction About Allen Keys A Hex key, Allen wrench, Allen key or hex head wrench is a tool used to drive hex screws and bolts, which have a hexagonal socket in the head. Some of the features of this type of tool are: The tool is simple, small and light. The contact surfaces of the screw or bolt are protected from external damage. The tool can be used with a headless screw. The bolt can be inserted into its socket using the key. There are six contact surfaces between bolt and driver. Torque is constrained by the length and thickness of the key. Very small bolt heads can be accommodated March 19, 2024 Instrumentation and Control 55
Hex Key Standard Sizes (American National Standard) Machinery's Handbook, 26th Edition Nominal 6,8,10,1/4,5/16,3/8,7/16,1/2,5/8,3/4,7/8,1. Socket Size 7/64,9/64,5/32,3/16,1/4,5/16,3/8,3/8,1/2,5/8,3/4,3/4. Standard metric sizes are 0.7, 0.9, 1.3, 1.5, 2, 2.5, 3, 3.5, 4, 4.5, 5, 5.5, 6, 7, 8, 9, 10 mm and larger. Metric hex wrench sizes are sometimes referred to using the designation "M" followed by the size in millimeters of the tool or socket, e.g. "M6". Using a hex wrench on a socket that is too large may result in damage to the fastener or the tool. An example would be using a 5 mm tool in a 5.5 mm socket. Because hex-style hardware and tools are available in both metric and English sizes it is also possible to select a tool that is too small for the fastener by using an English-unit tool on a metric fastener, or the converse. March 19, 2024 Instrumentation and Control 56
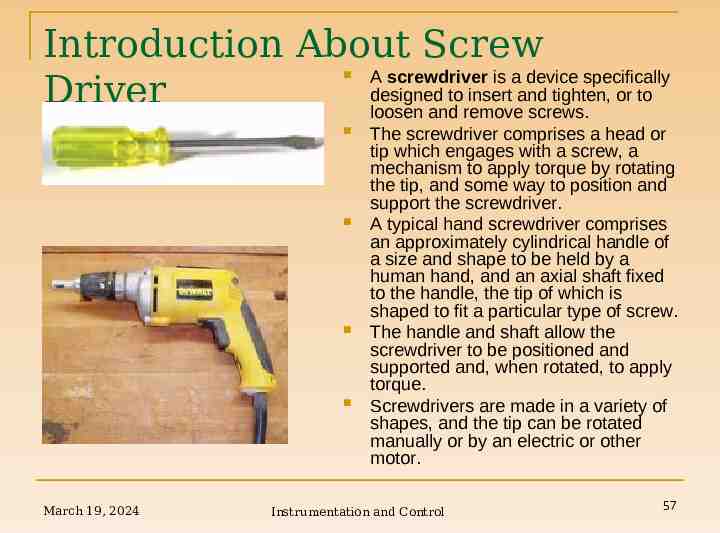
Introduction About Screw A screwdriver is a device specifically designed to insert and tighten, or to Driver loosen and remove screws. March 19, 2024 The screwdriver comprises a head or tip which engages with a screw, a mechanism to apply torque by rotating the tip, and some way to position and support the screwdriver. A typical hand screwdriver comprises an approximately cylindrical handle of a size and shape to be held by a human hand, and an axial shaft fixed to the handle, the tip of which is shaped to fit a particular type of screw. The handle and shaft allow the screwdriver to be positioned and supported and, when rotated, to apply torque. Screwdrivers are made in a variety of shapes, and the tip can be rotated manually or by an electric or other motor. Instrumentation and Control 57
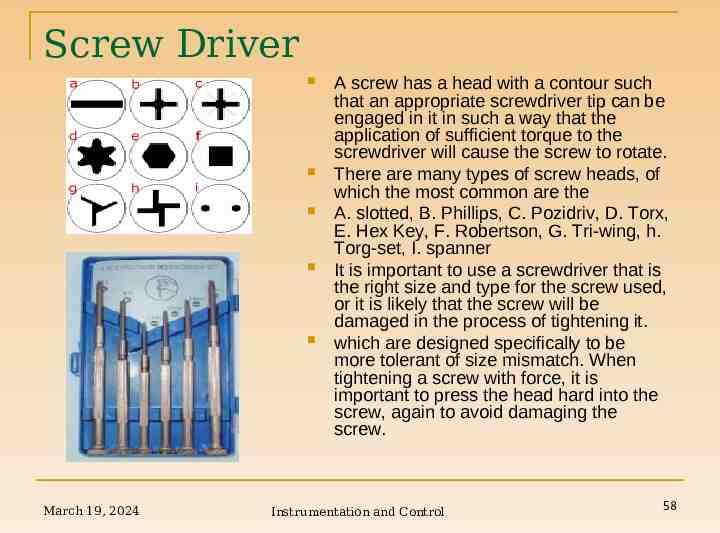
Screw Driver March 19, 2024 A screw has a head with a contour such that an appropriate screwdriver tip can be engaged in it in such a way that the application of sufficient torque to the screwdriver will cause the screw to rotate. There are many types of screw heads, of which the most common are the A. slotted, B. Phillips, C. Pozidriv, D. Torx, E. Hex Key, F. Robertson, G. Tri-wing, h. Torg-set, I. spanner It is important to use a screwdriver that is the right size and type for the screw used, or it is likely that the screw will be damaged in the process of tightening it. which are designed specifically to be more tolerant of size mismatch. When tightening a screw with force, it is important to press the head hard into the screw, again to avoid damaging the screw. Instrumentation and Control 58

Introduction about Pliers Pliers are hand tools, designed primarily for gripping objects by using leverage. Pliers are designed for numerous purposes and require different jaw configurations to grip, turn, pull, or crimp a variety of things. They are a tool common to many dexterous trades and occupations. Many types of pliers also include jaws for cutting. Cutting Pliers Crimping Pliers Rotational Pliers Gripping Pliers March 19, 2024 Instrumentation and Control 59

Introduction about Lineman’s Pliers Lineman's pliers (US English), also called combination pliers are a type of pliers used by Electricians and other tradesmen for gripping small objects, to cut and bend wire and cable, and to hammer other small tools, such as a chisel or screwdriver, and to hammer various types of hardware, especially staples and small nails. Lineman's pliers have a gripping joint at their snub nose, and cutting edge in their craw, and insulating handle grips that reduce (but do not eliminate) the risk of electric shock from contact with live wires (versions with properly tested and guaranteed insulation in two colors to make faults visible are also available). Some versions include either an additional gripping or crimping device at the crux of the handle side of the pliers' joint. Lineman's pliers typically are machined from forged steel and the two handles precisely joined with a heavy-duty rivet that maintains the pliers' accuracy even after repeated use under extreme force on heavygauge wire -- and even use as a hammer. March 19, 2024 Instrumentation and Control 60

Introduction about Nose Player March 19, 2024 Needle-nose pliers (also known as Long-nose pliers) are both cutting and gripping pliers used by electricians and other tradespersons to bend, re-position and cut wire. Their namesake long gripping nose provides excellent control and reach for fine work in small or crowded electrical enclosures, while cutting edges nearer the pliers' joint provide "one-tool" convenience. Given their long shape, they are useful for reaching into cavities where cables (or other materials) have become stuck or unreachable to fingers or other means. Instrumentation and Control 61
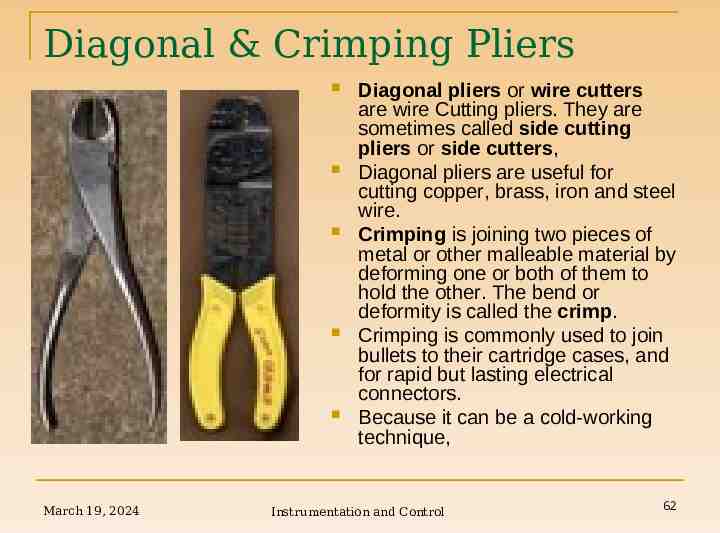
Diagonal & Crimping Pliers March 19, 2024 Diagonal pliers or wire cutters are wire Cutting pliers. They are sometimes called side cutting pliers or side cutters, Diagonal pliers are useful for cutting copper, brass, iron and steel wire. Crimping is joining two pieces of metal or other malleable material by deforming one or both of them to hold the other. The bend or deformity is called the crimp. Crimping is commonly used to join bullets to their cartridge cases, and for rapid but lasting electrical connectors. Because it can be a cold-working technique, Instrumentation and Control 62
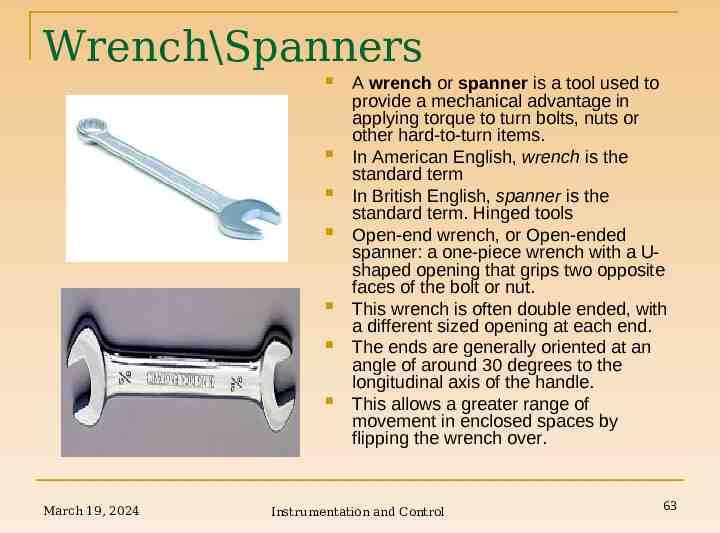
Wrench\Spanners March 19, 2024 A wrench or spanner is a tool used to provide a mechanical advantage in applying torque to turn bolts, nuts or other hard-to-turn items. In American English, wrench is the standard term In British English, spanner is the standard term. Hinged tools Open-end wrench, or Open-ended spanner: a one-piece wrench with a Ushaped opening that grips two opposite faces of the bolt or nut. This wrench is often double ended, with a different sized opening at each end. The ends are generally oriented at an angle of around 30 degrees to the longitudinal axis of the handle. This allows a greater range of movement in enclosed spaces by flipping the wrench over. Instrumentation and Control 63
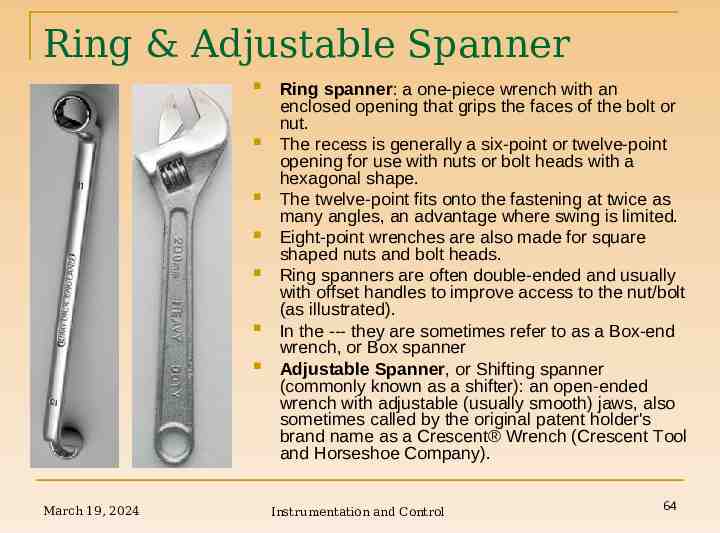
Ring & Adjustable Spanner March 19, 2024 Ring spanner: a one-piece wrench with an enclosed opening that grips the faces of the bolt or nut. The recess is generally a six-point or twelve-point opening for use with nuts or bolt heads with a hexagonal shape. The twelve-point fits onto the fastening at twice as many angles, an advantage where swing is limited. Eight-point wrenches are also made for square shaped nuts and bolt heads. Ring spanners are often double-ended and usually with offset handles to improve access to the nut/bolt (as illustrated). In the --- they are sometimes refer to as a Box-end wrench, or Box spanner Adjustable Spanner, or Shifting spanner (commonly known as a shifter): an open-ended wrench with adjustable (usually smooth) jaws, also sometimes called by the original patent holder's brand name as a Crescent Wrench (Crescent Tool and Horseshoe Company). Instrumentation and Control 64

Introduction about Pipe Wrench March 19, 2024 The pipe wrench, or Stillson wrench is an adjustable wrench used for turning soft iron pipes and fittings with a rounded surface. The design of the adjustable jaw allows it to rock in the frame, such that any forward pressure on the handle tends to pull the jaws tighter together. Teeth angled in the direction of turn dig into the soft pipe. They are not for use on hard hex nuts. Pipe wrenches are usually sold in the following sizes (in inches): 10, 14, 18, 24, 36, and 48. They are usually made of either Steel or aluminum. Instrumentation and Control 65


