Install Hadoop 3.3 on Windows 10


17 Slides419.14 KB
Install Hadoop 3.3 on Windows 10
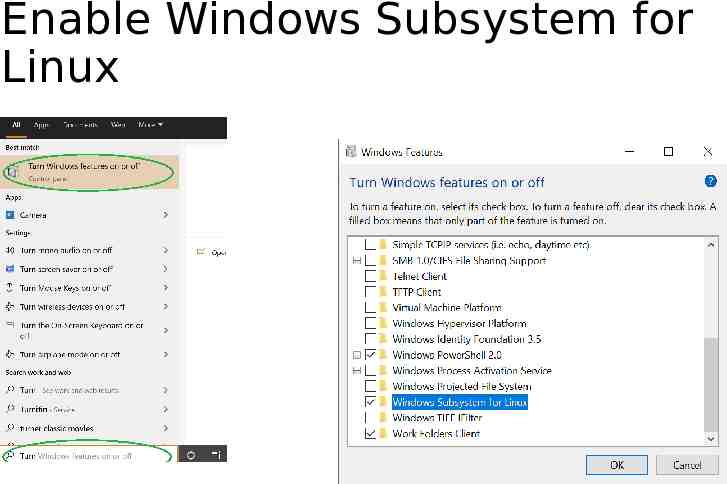
Enable Windows Subsystem for Linux
Open Microsoft Store and search for Linux Download and Install Ubuntu Launch Ubuntu and create a new account Congrats! Now, you have a Linux system on your Windows!
Install Java 8 Run the fullowing command to install Java 8 (jdk1.8) sudo apt-get update sudo apt-get install openjdk-8-jdk Note: must install version 8 (jdk1.8) as shown above
Download Hadoop Run the following command to download wget https://mirrors.ocf.berkeley.edu/apache/hadoop/common/hadoop-3.3.0/hadoop-3.3.0.tar.gz
Unzip Hadoop Binary Run the following command to create a hadoop folder under user home folder: mkdir /hadoop And then run the following command to unzip the binary package: tar -xvzf hadoop-3.3.0.tar.gz -C /hadoop Once it is unpacked, change the current directory to the Hadoop folder: cd /hadoop/hadoop-3.3.0/
Configure ssh Make sure you can SSH to localhost in Ubuntu: ssh localhost If you cannot ssh to localhost without a passphrase, run the following command to initialize your private and public keys: ssh-keygen -t rsa -P '' -f /.ssh/id rsa cat /.ssh/id rsa.pub /.ssh/authorized keys chmod 0600 /.ssh/authorized keys If you encounter errors like ‘ssh: connect to host localhost port 22: Connection refused’, run the following commands: sudo apt-get install ssh sudo service ssh restart
Configure Hadoop Add the following to /.bashrc export JAVA HOME /usr/lib/jvm/java-1.8.0-openjdk-amd64 export HADOOP HOME /hadoop/hadoop-3.3.0 export PATH PATH: HADOOP HOME/bin export HADOOP CONF DIR HADOOP HOME/etc/hadoop Run the following command to source the latest variables: source /.bashrc
Add the following to HADOOP HOME/etc/hadoop/hadoop-env.sh export JAVA HOME /usr/lib/jvm/java-8-openjdk-amd64
Add the following configuration to HADOOP HOME/etc/hadoop/core-site.xml (i.e., use the following to replace empty configuration /configuration configuration property name fs.defaultFS /name value hdfs://localhost:9000 /value /property /configuration
Add the following configuration to HADOOP HOME/etc/hadoop/hdfs-site.xml (i.e., use the following to replace empty configuration /configuration configuration property name dfs.replication /name value 1 /value /property /configuration
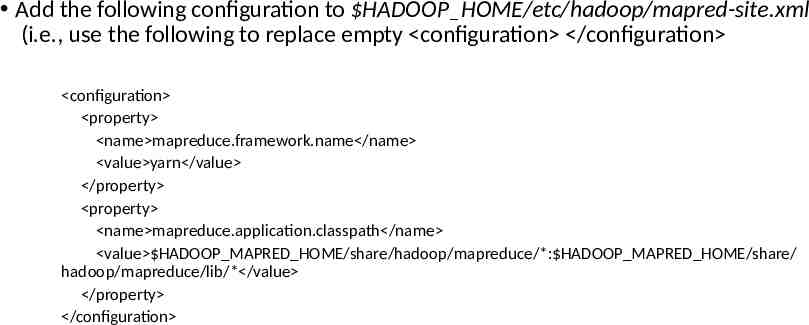
Add the following configuration to HADOOP HOME/etc/hadoop/mapred-site.xml (i.e., use the following to replace empty configuration /configuration configuration property name mapreduce.framework.name /name value yarn /value /property property name mapreduce.application.classpath /name value HADOOP MAPRED HOME/share/hadoop/mapreduce/*: HADOOP MAPRED HOME/share/ hadoop/mapreduce/lib/* /value /property /configuration
Add the following configuration to HADOOP HOME/etc/hadoop/yarn-site.xml (i.e., use the following to replace empty configuration /configuration configuration property name yarn.nodemanager.aux-services /name value mapreduce shuffle /value /property property name yarn.nodemanager.env-whitelist /name value JAVA HOME,HADOOP COMMON HOME,HADOOP HDFS HOME,HADOOP CONF DIR,CLASSPATH PREP END DISTCACHE,HADOOP YARN HOME,HADOOP MAPRED HOME /value /property /configuration
Format namenode Run the following command cd HADOOP HOME bin/hdfs namenode –format jps After running jps, you should see something like:
Open the following URL in Browser http://localhost:9870/dfshealth.html#tab-overview You should see something like:
Run DFS Service Run the following command cd HADOOP HOME sbin/start-dfs.sh
Stop the service Run the following command cd HADOOP HOME sbin/stop-dfs.sh