Chrome River: Submitting a Pre-Approval Report Office of


17 Slides715.33 KB
Chrome River: Submitting a Pre-Approval Report Office of the Controller
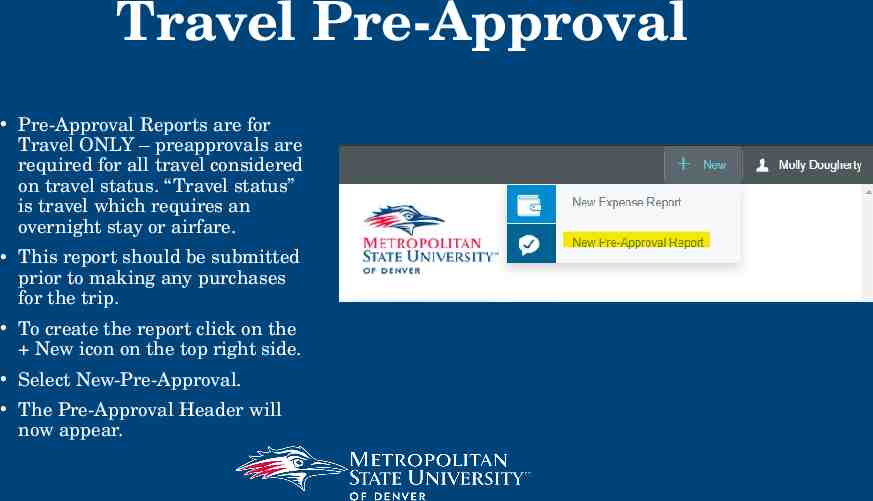
Travel Pre-Approval Pre-Approval Reports are for Travel ONLY – preapprovals are required for all travel considered on travel status. “Travel status” is travel which requires an overnight stay or airfare. This report should be submitted prior to making any purchases for the trip. To create the report click on the New icon on the top right side. Select New-Pre-Approval. The Pre-Approval Header will now appear.
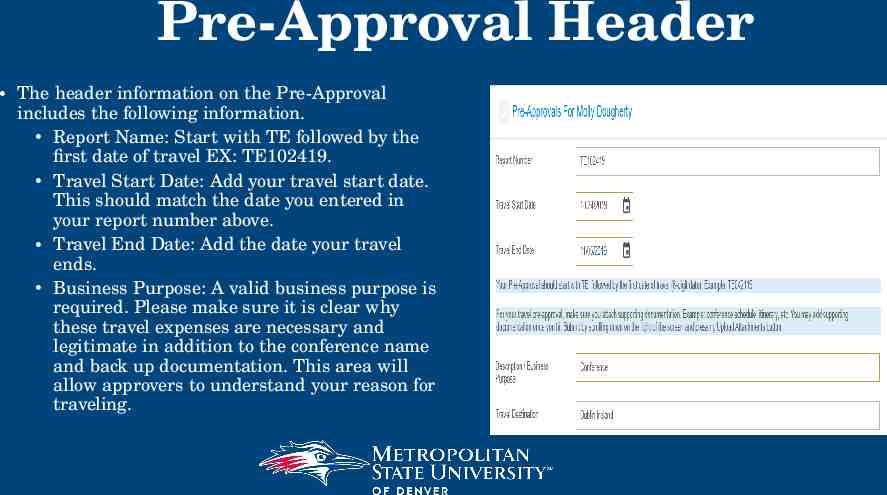
Pre-Approval Header The header information on the Pre-Approval includes the following information. Report Name: Start with TE followed by the first date of travel EX: TE102419. Travel Start Date: Add your travel start date. This should match the date you entered in your report number above. Travel End Date: Add the date your travel ends. Business Purpose: A valid business purpose is required. Please make sure it is clear why these travel expenses are necessary and legitimate in addition to the conference name and back up documentation. This area will allow approvers to understand your reason for traveling.
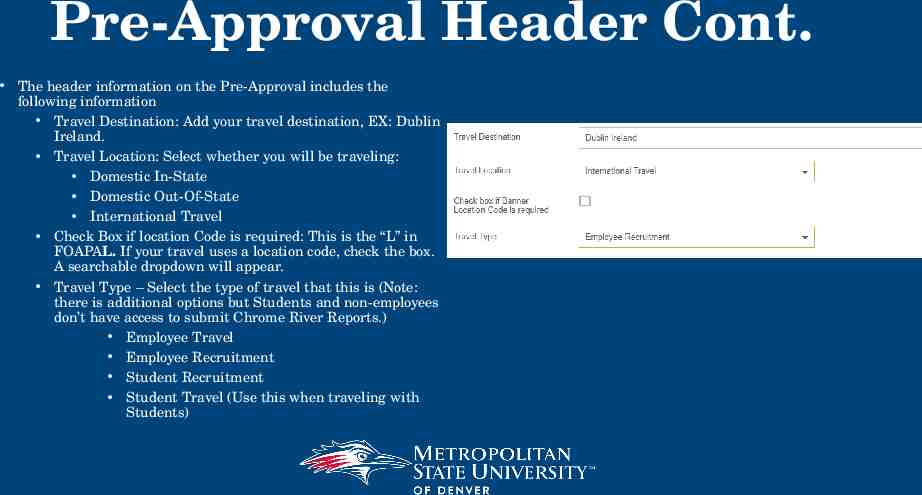
Pre-Approval Header Cont. The header information on the Pre-Approval includes the following information Travel Destination: Add your travel destination, EX: Dublin Ireland. Travel Location: Select whether you will be traveling: Domestic In-State Domestic Out-Of-State International Travel Check Box if location Code is required: This is the “L” in FOAPAL. If your travel uses a location code, check the box. A searchable dropdown will appear. Travel Type – Select the type of travel that this is (Note: there is additional options but Students and non-employees don’t have access to submit Chrome River Reports.) Employee Travel Employee Recruitment Student Recruitment Student Travel (Use this when traveling with Students)
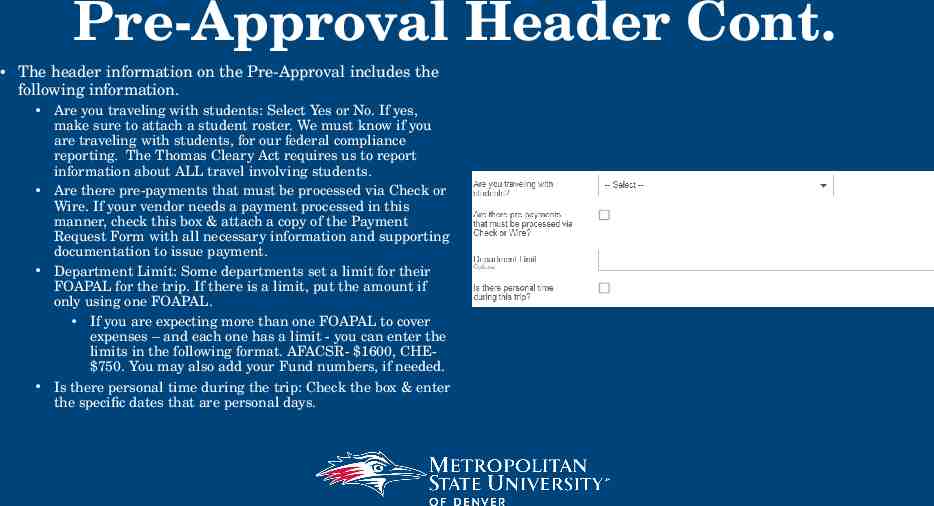
Pre-Approval Header Cont. The header information on the Pre-Approval includes the following information. Are you traveling with students: Select Yes or No. If yes, make sure to attach a student roster. We must know if you are traveling with students, for our federal compliance reporting. The Thomas Cleary Act requires us to report information about ALL travel involving students. Are there pre-payments that must be processed via Check or Wire. If your vendor needs a payment processed in this manner, check this box & attach a copy of the Payment Request Form with all necessary information and supporting documentation to issue payment. Department Limit: Some departments set a limit for their FOAPAL for the trip. If there is a limit, put the amount if only using one FOAPAL. If you are expecting more than one FOAPAL to cover expenses – and each one has a limit - you can enter the limits in the following format. AFACSR- 1600, CHE 750. You may also add your Fund numbers, if needed. Is there personal time during the trip: Check the box & enter the specific dates that are personal days.
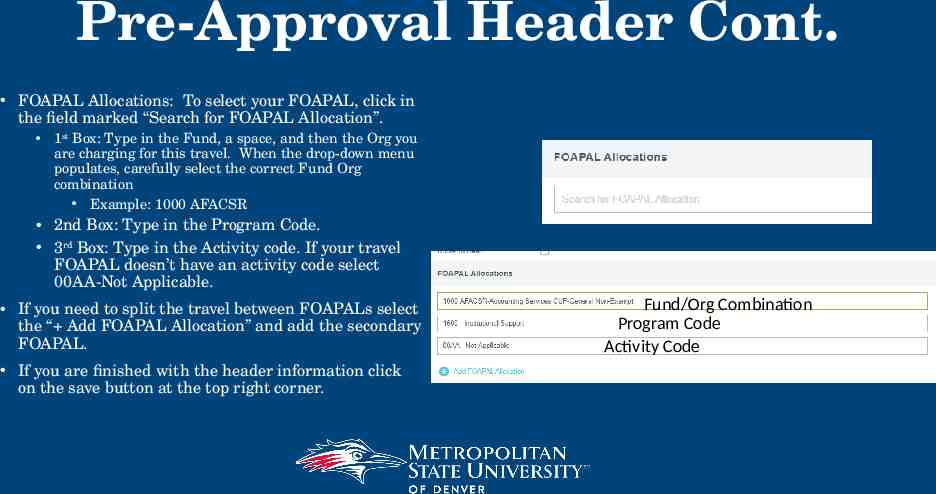
Pre-Approval Header Cont. FOAPAL Allocations: To select your FOAPAL, click in the field marked “Search for FOAPAL Allocation”. 1st Box: Type in the Fund, a space, and then the Org you are charging for this travel. When the drop-down menu populates, carefully select the correct Fund Org combination Example: 1000 AFACSR 2nd Box: Type in the Program Code. 3rd Box: Type in the Activity code. If your travel FOAPAL doesn’t have an activity code select 00AA-Not Applicable. If you need to split the travel between FOAPALs select the “ Add FOAPAL Allocation” and add the secondary FOAPAL. If you are finished with the header information click on the save button at the top right corner. Fund/Org Combination Program Code Activity Code
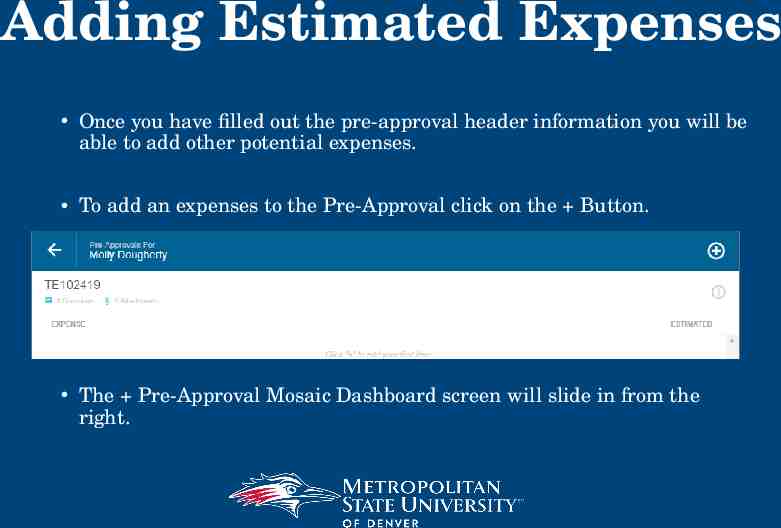
Adding Estimated Expenses Once you have filled out the pre-approval header information you will be able to add other potential expenses. To add an expenses to the Pre-Approval click on the Button. The Pre-Approval Mosaic Dashboard screen will slide in from the right.
Adding Estimated Expenses Cont. Clicking the Button on will open the expenses tiles page on the right hand of the screen. Clicking on an expense type tile takes you to a new screen to add the required information for that expense.
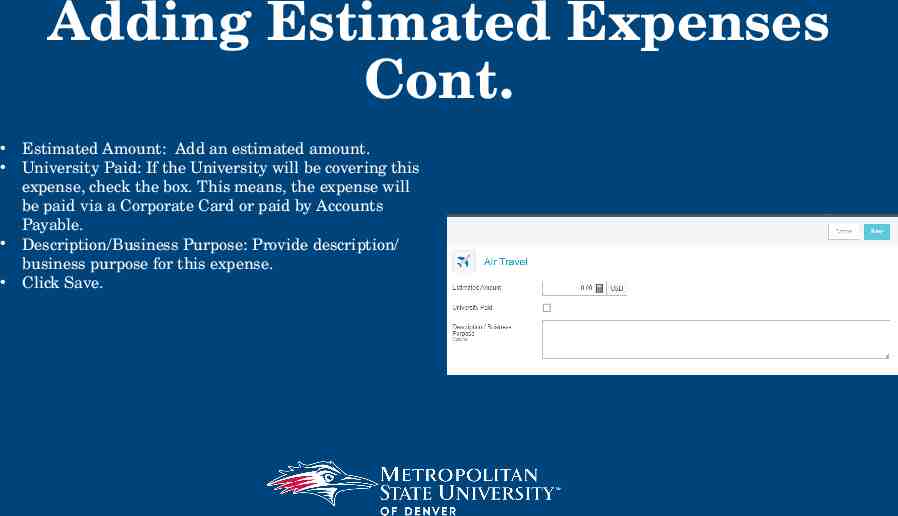
Adding Estimated Expenses Cont. Estimated Amount: Add an estimated amount. University Paid: If the University will be covering this expense, check the box. This means, the expense will be paid via a Corporate Card or paid by Accounts Payable. Description/Business Purpose: Provide description/ business purpose for this expense. Click Save.
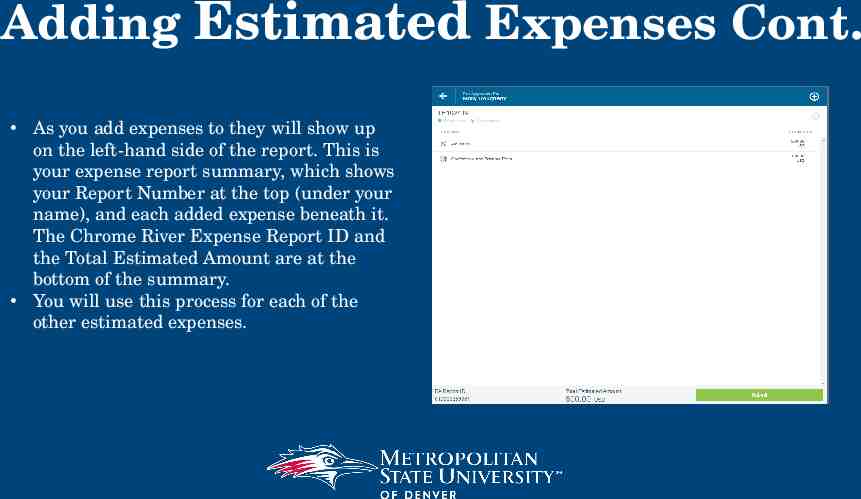
Adding Estimated Expenses Cont. As you add expenses to they will show up on the left-hand side of the report. This is your expense report summary, which shows your Report Number at the top (under your name), and each added expense beneath it. The Chrome River Expense Report ID and the Total Estimated Amount are at the bottom of the summary. You will use this process for each of the other estimated expenses.
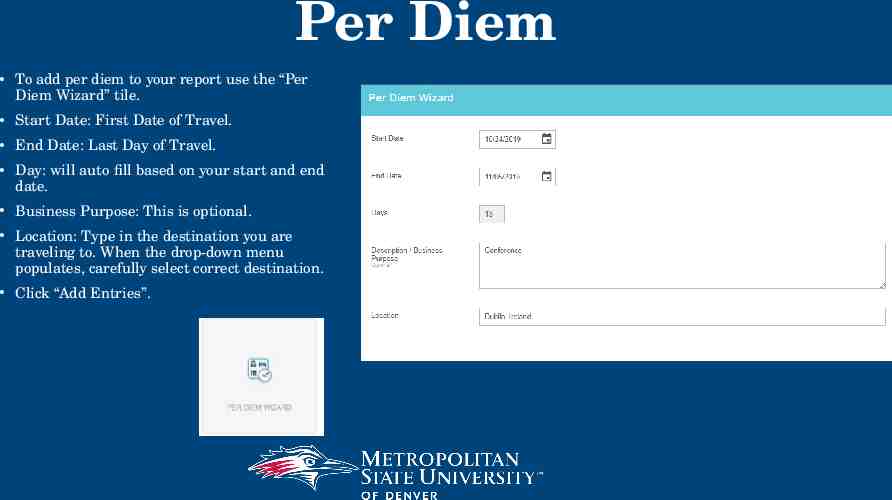
Per Diem To add per diem to your report use the “Per Diem Wizard” tile. Start Date: First Date of Travel. End Date: Last Day of Travel. Day: will auto fill based on your start and end date. Business Purpose: This is optional. Location: Type in the destination you are traveling to. When the drop-down menu populates, carefully select correct destination. Click “Add Entries”.
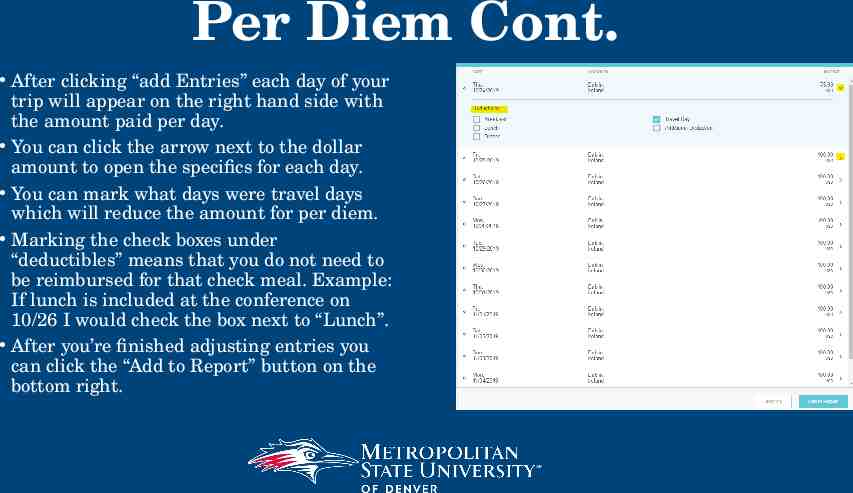
Per Diem Cont. After clicking “add Entries” each day of your trip will appear on the right hand side with the amount paid per day. You can click the arrow next to the dollar amount to open the specifics for each day. You can mark what days were travel days which will reduce the amount for per diem. Marking the check boxes under “deductibles” means that you do not need to be reimbursed for that check meal. Example: If lunch is included at the conference on 10/26 I would check the box next to “Lunch”. After you’re finished adjusting entries you can click the “Add to Report” button on the bottom right.
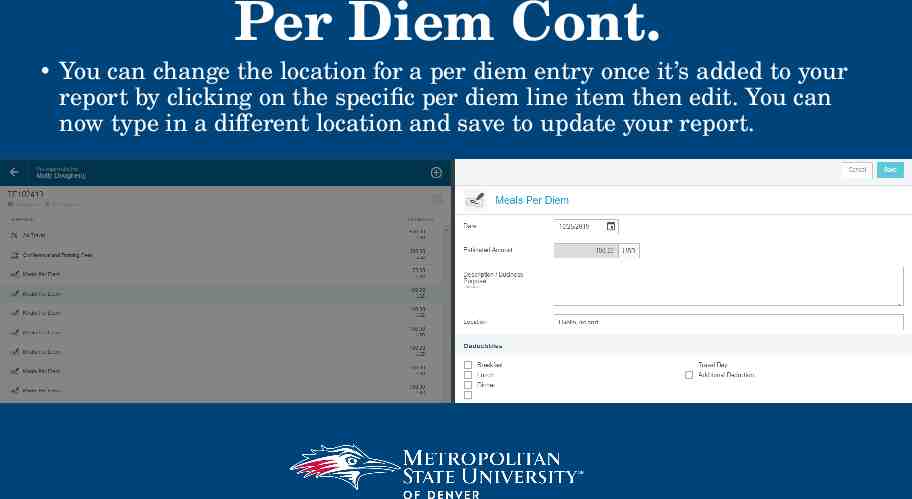
Per Diem Cont. You can change the location for a per diem entry once it’s added to your report by clicking on the specific per diem line item then edit. You can now type in a different location and save to update your report.
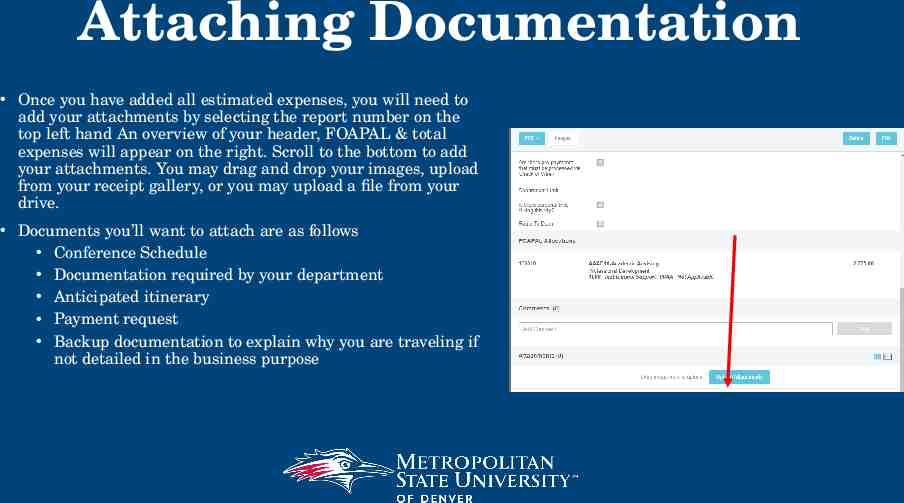
Attaching Documentation Once you have added all estimated expenses, you will need to add your attachments by selecting the report number on the top left hand An overview of your header, FOAPAL & total expenses will appear on the right. Scroll to the bottom to add your attachments. You may drag and drop your images, upload from your receipt gallery, or you may upload a file from your drive. Documents you’ll want to attach are as follows Conference Schedule Documentation required by your department Anticipated itinerary Payment request Backup documentation to explain why you are traveling if not detailed in the business purpose
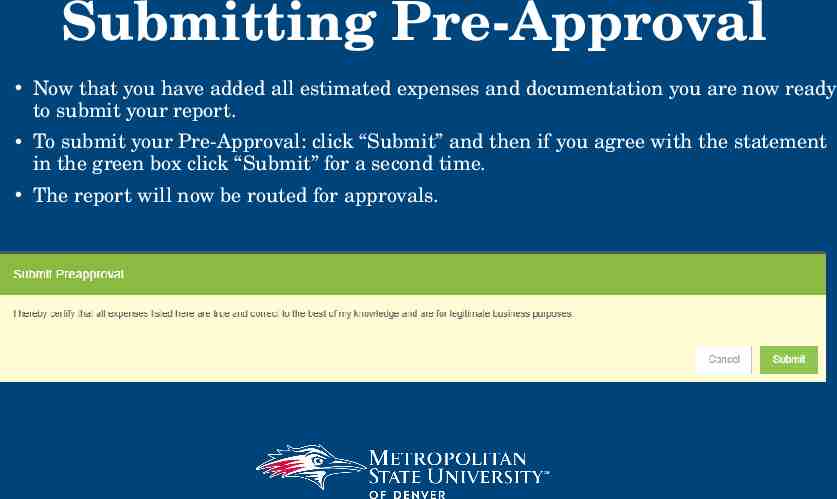
Submitting Pre-Approval Now that you have added all estimated expenses and documentation you are now ready to submit your report. To submit your Pre-Approval: click “Submit” and then if you agree with the statement in the green box click “Submit” for a second time. The report will now be routed for approvals.
Key Takeaways Pre-Approval Reports are for Travel ONLY – preapprovals are required for all travel considered on travel status. “Travel status” is travel which requires an overnight stay or airfare. A Pre-Approval should be created prior to making any travel related purchases. Expenses will be estimate and will possibly fluctuate up or down when completing your Travel Expenses report upon returning. A valid business purpose is required. Please make sure it is clear why these travel expenses are necessary and legitimate in addition to the conference name and back up documentation.
Keep an eye out for additional Chrome River trainings. If you have questions, concerns or feedback please contact the corporate card team Molly Dougherty Corporate Card Administrator [email protected] (303)605-7074 Troy Clark Corporate Card Administrator [email protected] (303)605-5838